
There’s nowhere quite like Sedona when it comes to hiking. We’ve spent years ticking off awesome hikes all across America’s national parks, state parks, forests, mountains, deserts and canyons but we think Sedona has something very special. Why? Because it has a huge maze-like network of amazing hiking trails right on its doorstep.
We’ve personally hiked the most popular trails in town, and we’ve gone a step further by finding some super fun lesser known trails that you can add to your list. So, in this guide we show you the easy, moderate and hard hikes you simply can’t miss when you visit Sedona, based entirely on our own experiences. Read more about us.
We spent 8 amazing days hiking in Sedona in December 2021. It quickly became one of our favorite places in the US, not just for hikes, but also for travel photography and outdoor adventure in general. We couldn’t quite believe how many awesome trails were all within a few miles drive of Sedona’s built up areas.
Our favorite trails in Sedona include Cathedral Rock, Birthing Cave, Subway Cave, Pyramid Loop, Doe Mountain and Little Sugarloaf. But we could quite easily make a case for each of the hiking trails we’ll show you in this guide. But if we’re being honest, we found the famous Devils Bridge to be a bit underwhelming.
Our summary:
- Easy Hike – Birthing Cave via Long Canyon
- Moderate Hike – Munds Wagon
- Hard Hike – Cathedral Rock
- Sunrise Hike – Chimney Rock and Little Sugarloaf
- Sunset Hike – Airport Mesa Sedona View
- Cave Hike – Subway Cave via Boynton Canyon
- Hidden Gem Hike – Pyramid Loop
- Overrated Hike – Devils Bridge
Okay, let’s get right into the hikes we think you should add to your Sedona itinerary. We’re ordering by difficulty from easiest to hardest, and we include our maps within each hike so you can see parking and trail routes. At the end we’ll show you different ways you can create hiking itineraries for your visit to Sedona. Let’s begin!
Note: Our content is reader supported and contains affiliate links. If you make a purchase through one of these links, we may earn a small commission at no extra cost to you and it helps us keep this site running.
SEDONA Planning
📖 Ultimate Sedona Guidebook: Get our complete 50+ page offline PDF with everything you need for Sedona.
📞 Personalized Sedona Planning Call: Book a 60 minute call with Mark to have your questions answered, optimize your itinerary, avoid tourist traps and get our best insider tips.
💡 Still Planning? Read our essential first-timer’s guide to visiting Sedona.
1. Airport Mesa Sedona View Trail
- Difficulty: Easy
- Distance: 1.4 miles roundtrip
- Elevation Gain: 250 ft
- Trailheads: Scenic Lookout / Vortex Site
- Time: 1 hour
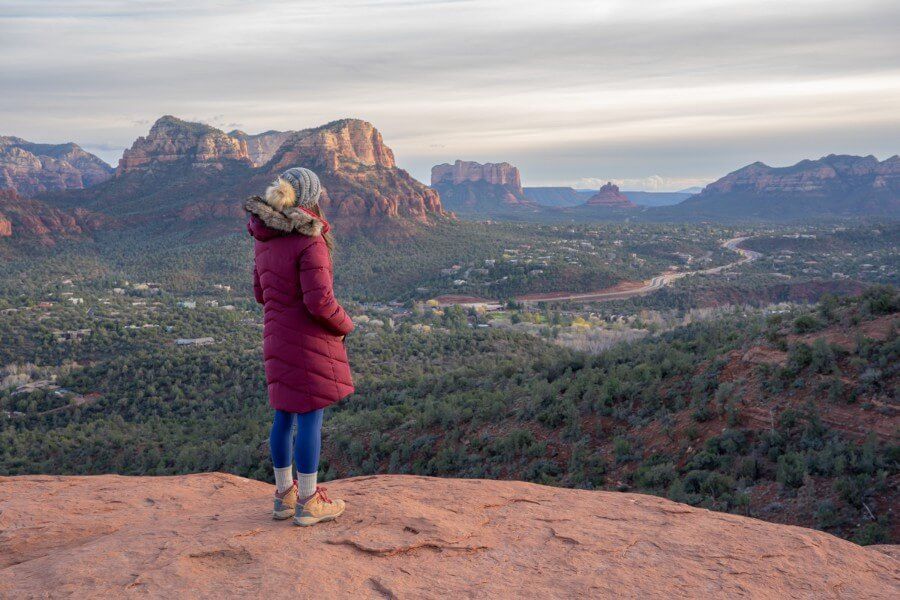
Sedona View Trail is a hike you shouldn’t miss. It’s a short, easy and inclusive trail connecting Airport Mesa’s lower vortex site and upper scenic viewpoint.
The scenic viewpoint is one of Sedona’s most popular sunset spots because it has elevated west facing views and it’s accessible by car. And the lower vortex site has excellent views overlooking Bell Rock and Sedona’s eastern red rock cliffs.

You can park either in a paid parking lot at the top of the hill near the scenic view, or in a small but free parking area near the vortex site at the bottom of the hill.
We parked at the top and hiked downhill to the vortex site, enjoying clear views over downtown the whole way. After taking photos from the vortex site, we hiked back up the narrow trail to the scenic viewpoint in time for sunset.

If you want to make this a harder hike or you arrive way before sunset and need to fill some time, you can include Airport Mesa Loop Trail which would add a further 3 miles and 400 ft elevation gain. We didn’t do the loop, but we probably will the next time we’re in town.
2. West Fork Trail
- Difficulty: Easy
- Distance: 6.6 miles roundtrip
- Elevation Gain: 500 ft
- Trailhead: West Fork Oak Creek Trailhead
- Time: 3-4 hours

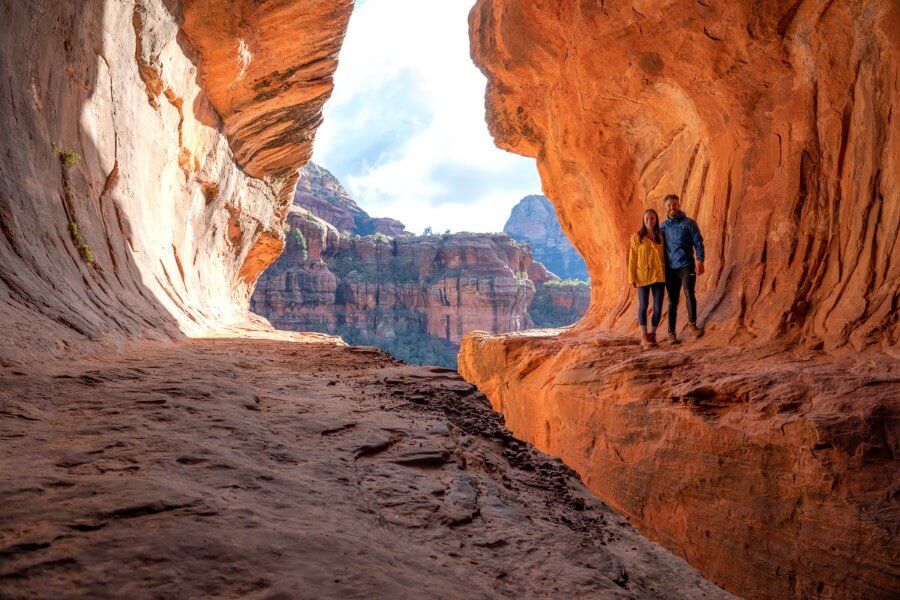
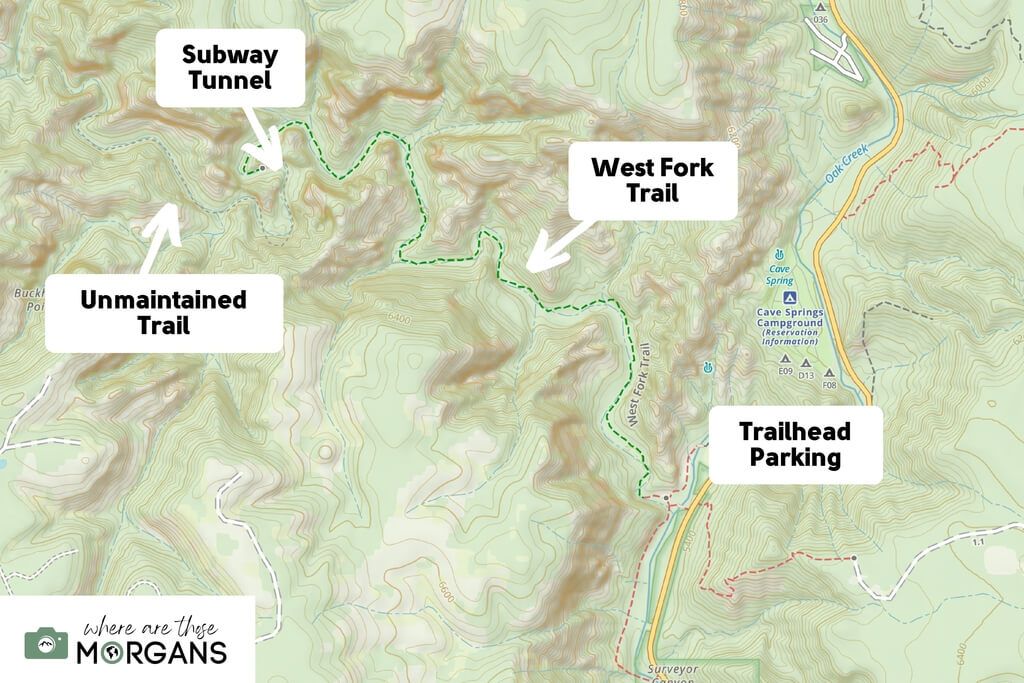
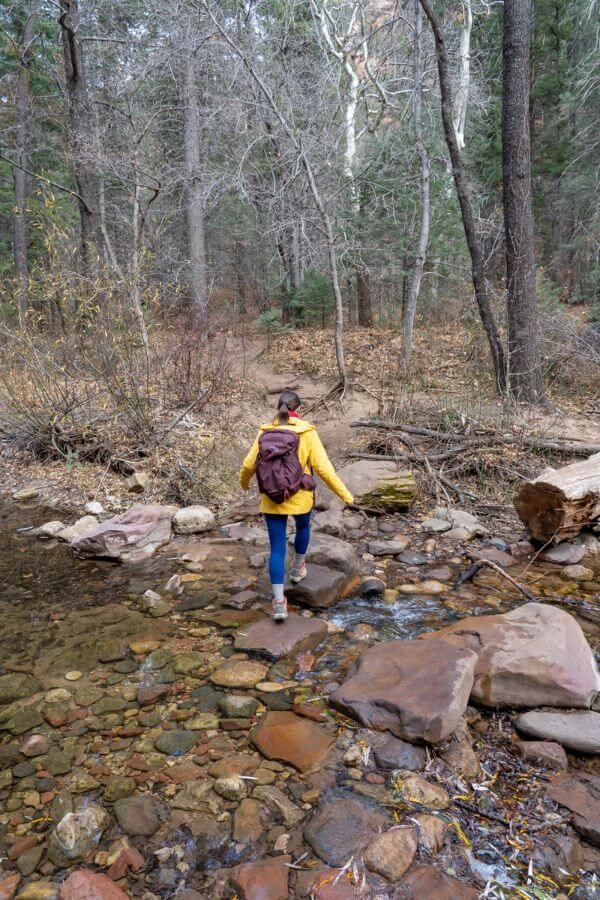
West Fork of Oak Creek Trail is an interesting and unique hike in Sedona. It’s quite a long trail, but it’s very flat and we barely broke into a sweat. Most of the hike is through peaceful forested land, but we crossed the shallow Oak Creek around a dozen times.
The trail ended when we reach a subway-like tunnel formation which you can see in our photo above. It does continue on an unmaintained trail but leave that to the experienced backcountry hikers.
What makes this trail unique is that it’s located 10 miles drive north of Sedona and there are no other popular hikes nearby. It’s massively inconvenient when compared to the other top trails in town, but it’s also so much quieter than those other trails.
We saw very few people on this hike, maybe a total of 5 other hikers in 3 hours. And that’s unheard of in Sedona.
Another downside was that we paid a one-off entrance fee of $11 because West Fork Trail is on private land. Our Red Rock Pass and America the Beautiful did not work here. So why hike it if it’s isolated and expensive? Well, it has a 4.8/5 on both Google and AllTrails with thousands of reviews.
We didn’t love it because we prefer more adventurous trails, but we think it would be perfect if you’re visiting Sedona with your family or you want to escape the crowds in town.
3. Fay Canyon Trail
- Difficulty: Easy
- Distance: 2 miles roundtrip
- Elevation Gain: 150 ft
- Trailhead: Fay Canyon Trailhead
- Time: 1.5 hours
Fay Canyon Trail is another hike you shouldn’t miss if you’re looking for a short and fun trail that’s easy to access. It’s sandwiched between Boynton Canyon and Doe Mountain, and there’s more popular hikes nearby so you should definitely include Fay Canyon when you visit this area to the northwest of town.
The trailhead has the largest parking lot of all hikes along Boynton Canyon, but there are also alternatives with connecting trails to reach Fay Canyon.

The trail at its most basic is flat, scenic and perfect for beginners. But it also has optional trail variations which includes a steep climb up a bank to reach Fay Canyon Arch, and two end-of-trail rock scramble climbs leading to magnificent canyon views. If you take any of the spur routes, the difficulty of this hike goes from easy to moderate.
We think it’s perfect for families or large groups with different hiking abilities to keep everyone entertained.
We climbed up the steep bank to reach Fay Canyon Arch, then continued to the end of trail and climbed up the West Ascent scramble. The bank to reach Fay Canyon is doable for most people in good shape, but the scramble is very narrow with drops so you need to be confident, and you can’t have a fear of heights.
We loved the views looking back down the canyon, so we think both spurs are worth doing.
4. Soldier Pass Trail
- Difficulty: Easy (moderate with cave)
- Distance: 2.4 miles roundtrip (4.2 miles with cave)
- Elevation Gain: 250 ft (750 ft with cave)
- Trailhead: Soldier Pass Trailhead
- Time: 2 hours (3 hours with cave)
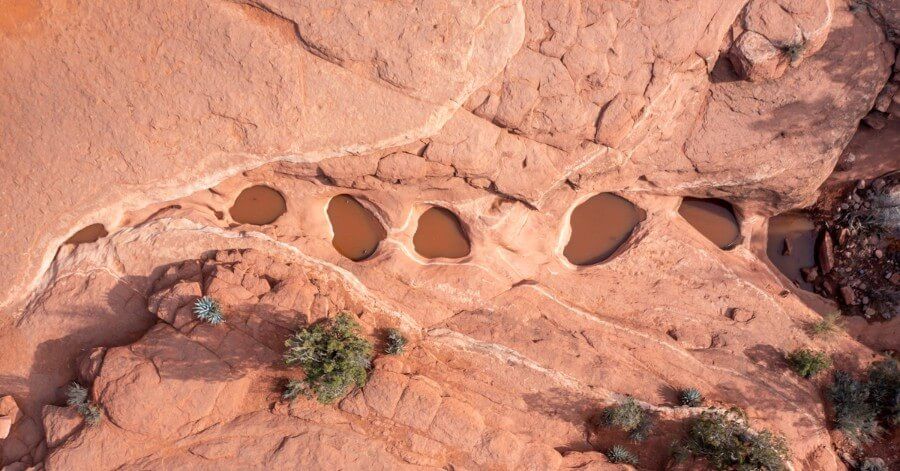
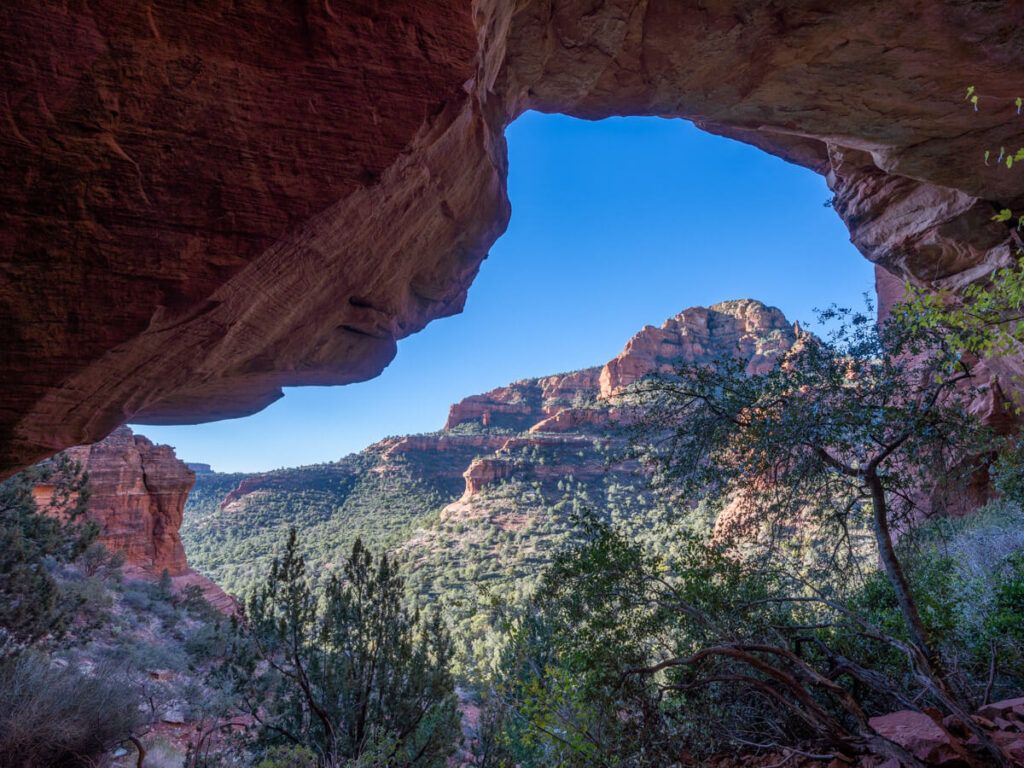
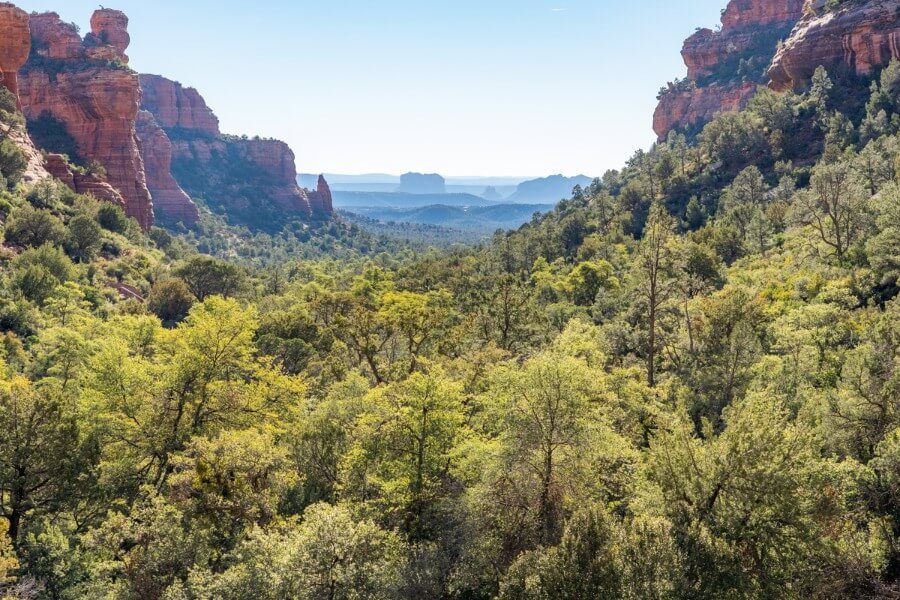
Soldier Pass Trail is one of Sedona’s best but busiest hikes. It features several natural attractions including Devils Kitchen (a giant sinkhole), Seven Sacred Pools (series of small water-filled holes) and Soldier Pass Cave.
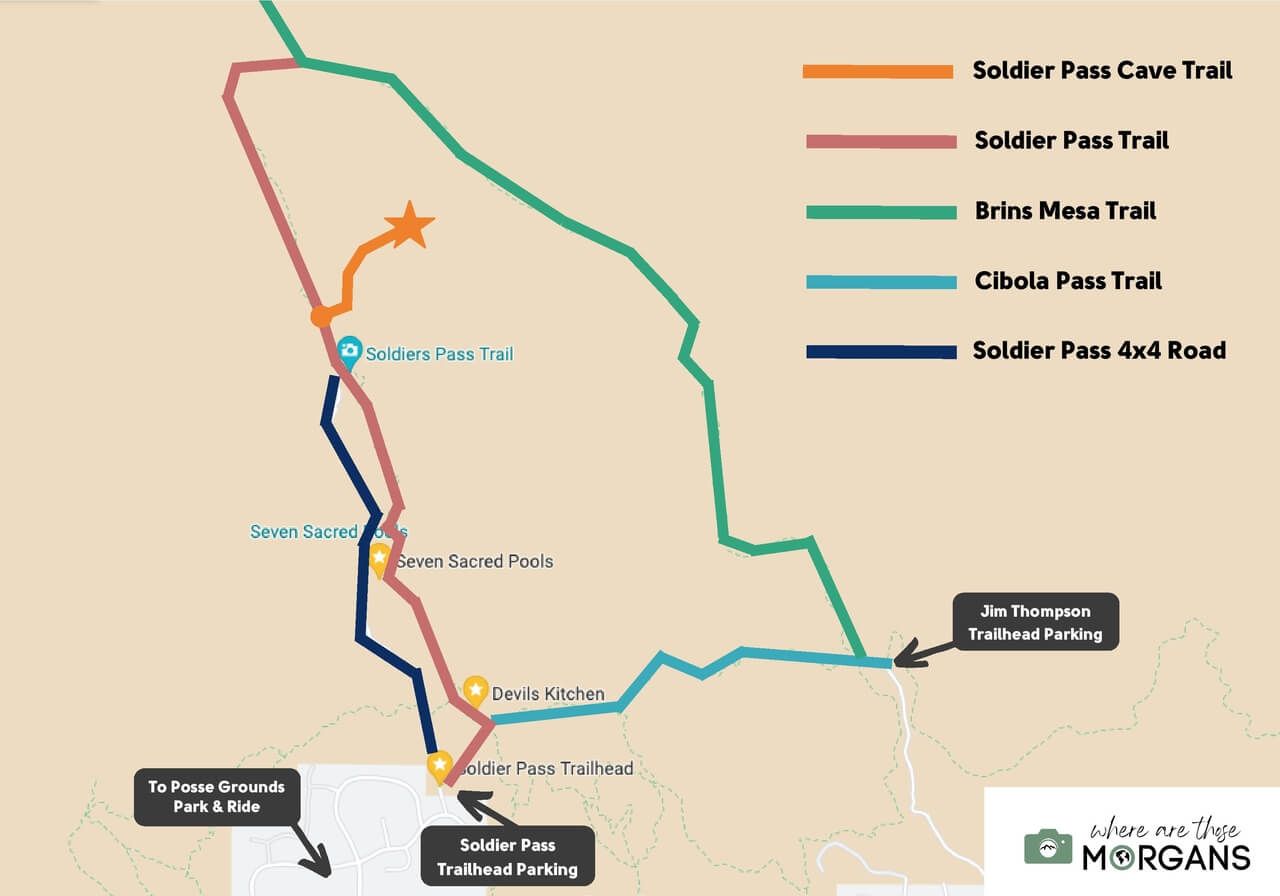
We love the hike and the cave, but it’s a crowded trail and parking is a real problem. It’s not even worth trying to park at Soldier Pass Trailhead. We recommend either parking at Jim Thompson Trailhead or taking the Sedona Shuttle from Posse Ground park and ride (operates Thur-Sun year round).
If you have enough time on your itinerary, you should consider hiking the full loop around Brins Mesa.
We hired a Jeep for 3 days in Sedona, so we had exclusive access to Soldier Pass 4WD road (dark blue line in our photo above) which allowed us to access all parts of the hiking trail easily. We walked to Devils Kitchen, Seven Sacred Pools and the cave before returning to our Jeep and leaving.
We found the hike to be very easy overall, but the climb up to Soldier Pass Cave increased the difficulty to moderate. And climbing inside the cave was easy enough, but it did require us to use hands and feet.
We thought the photogenic cave interior was well worth the extra effort, so don’t miss it when you hike Soldier Pass Trail.
5. Birthing Cave via Long Canyon Trail
- Difficulty: Easy
- Distance: 1.8 miles roundtrip
- Elevation Gain: 270 ft
- Trailhead: Long Canyon Trailhead
- Time: 1.5 hours
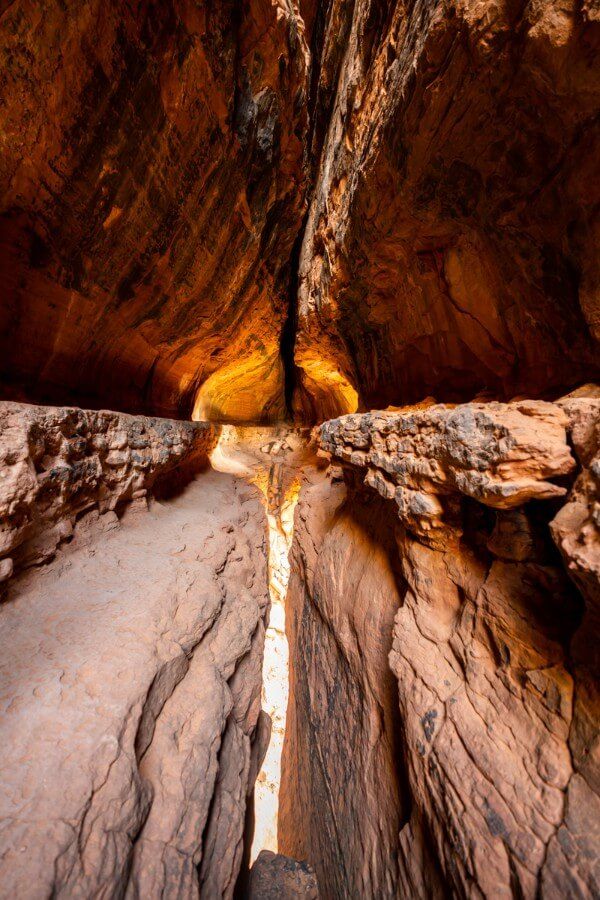
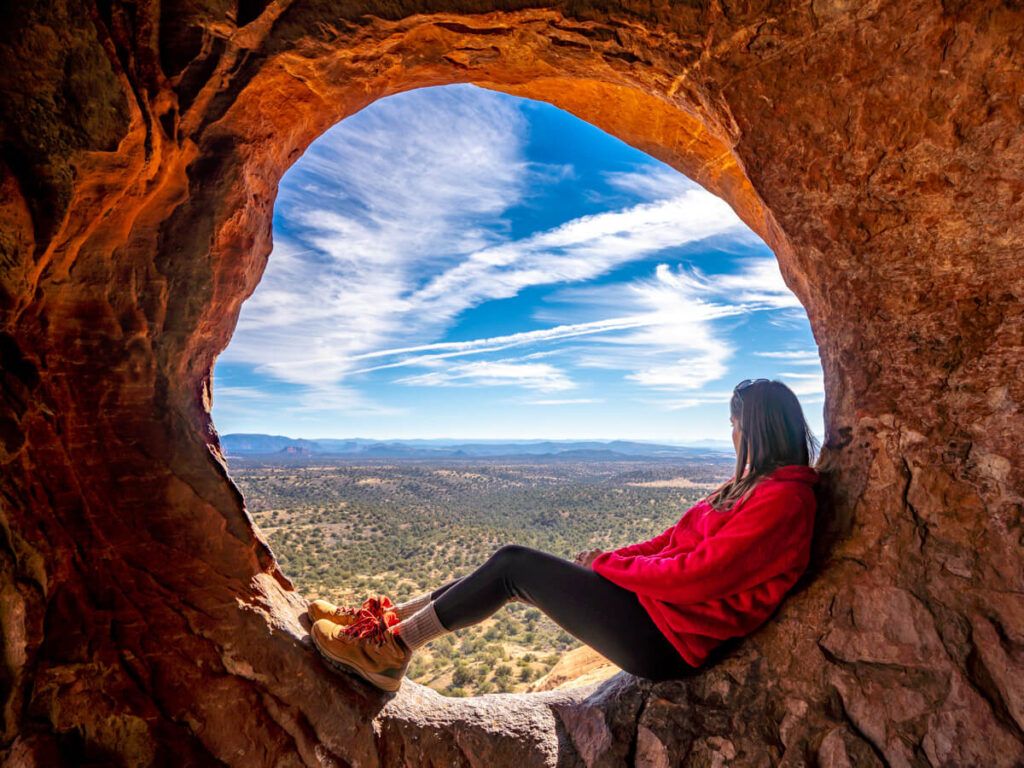
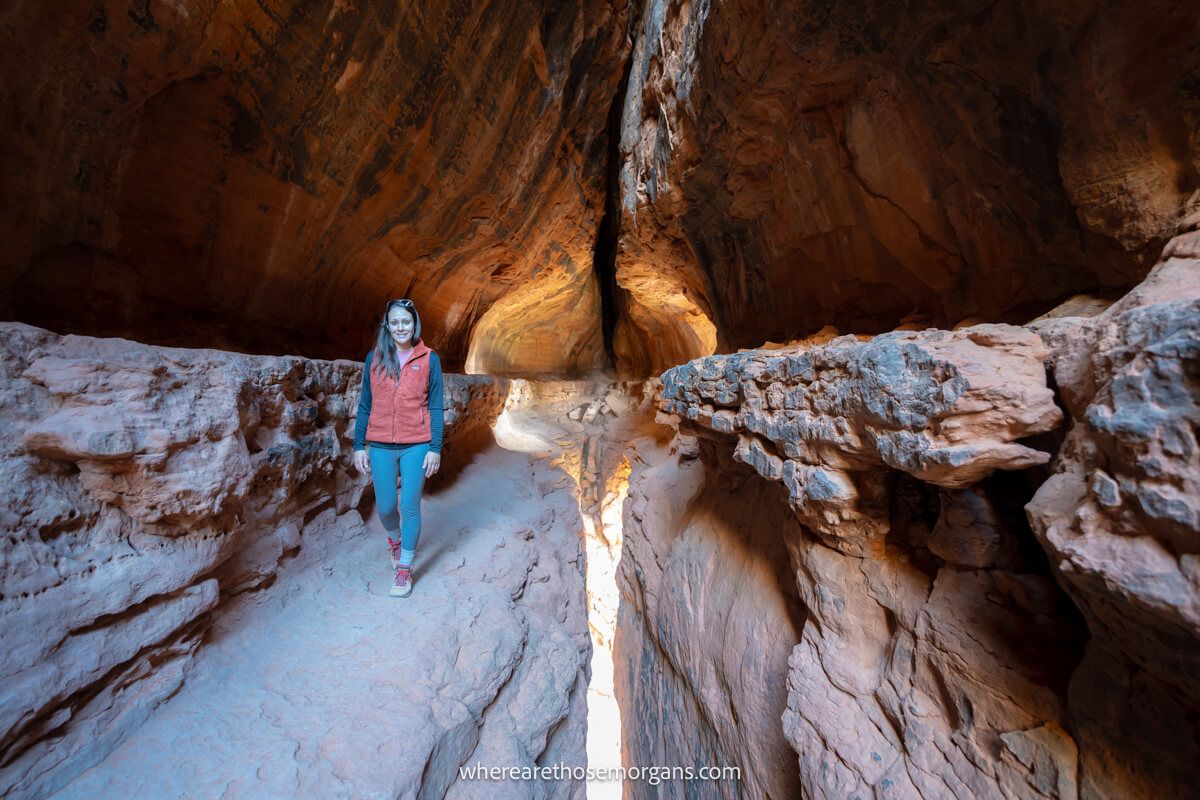
Birthing Cave Trail is one of our favorite cave hikes in Sedona because it’s easy to access, it’s quiet and the cave opening is exceptionally photogenic when looking out from the inside.
Parking at Long Canyon Trailhead is limited but it’s usually not too busy, and you can always use Mescal Trailhead as a backup with a connecting trail. We barely saw anyone on the trail and had the cave to ourselves.
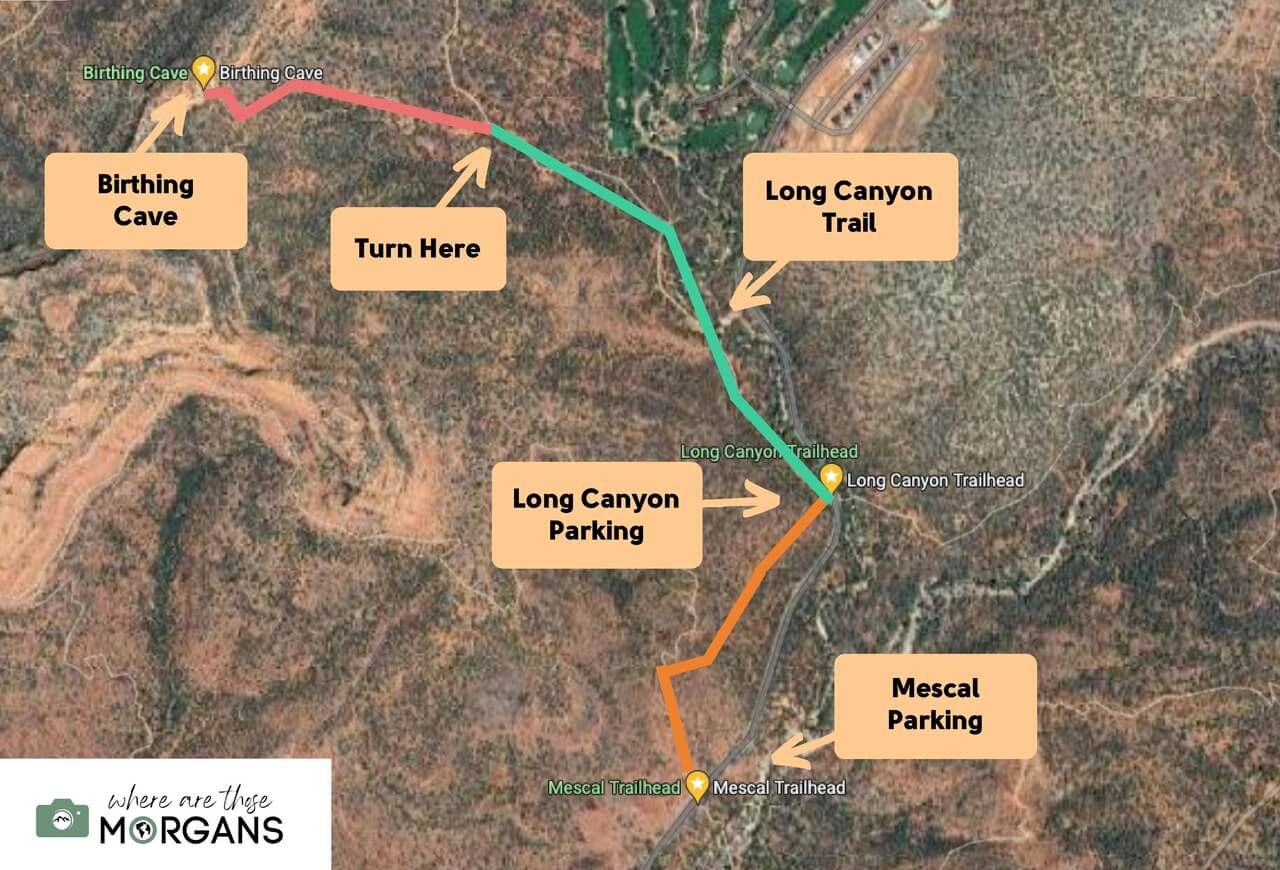
After parking at Long Canyon Trailhead, we walked the easy and flat trail, and passed by a golf course before reaching a crossroads. We saw a broken wooden fence on the trail, and it was there that we turned left through an opening in the trees.
A narrow beaten path led us to the base of a steep hill and we climbed it to reach Birthing Cave. The climb is steep and loose underfoot, so you should wear robust shoes.
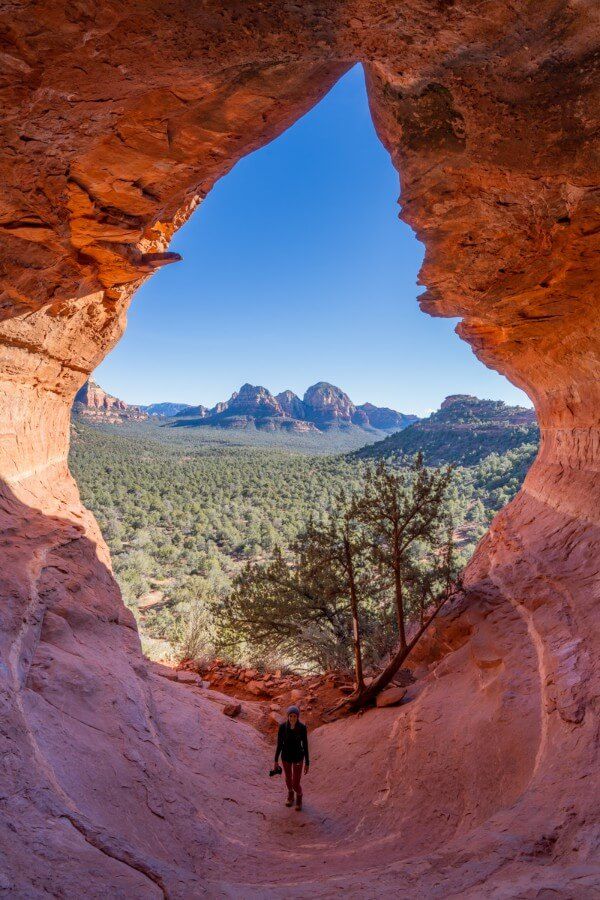
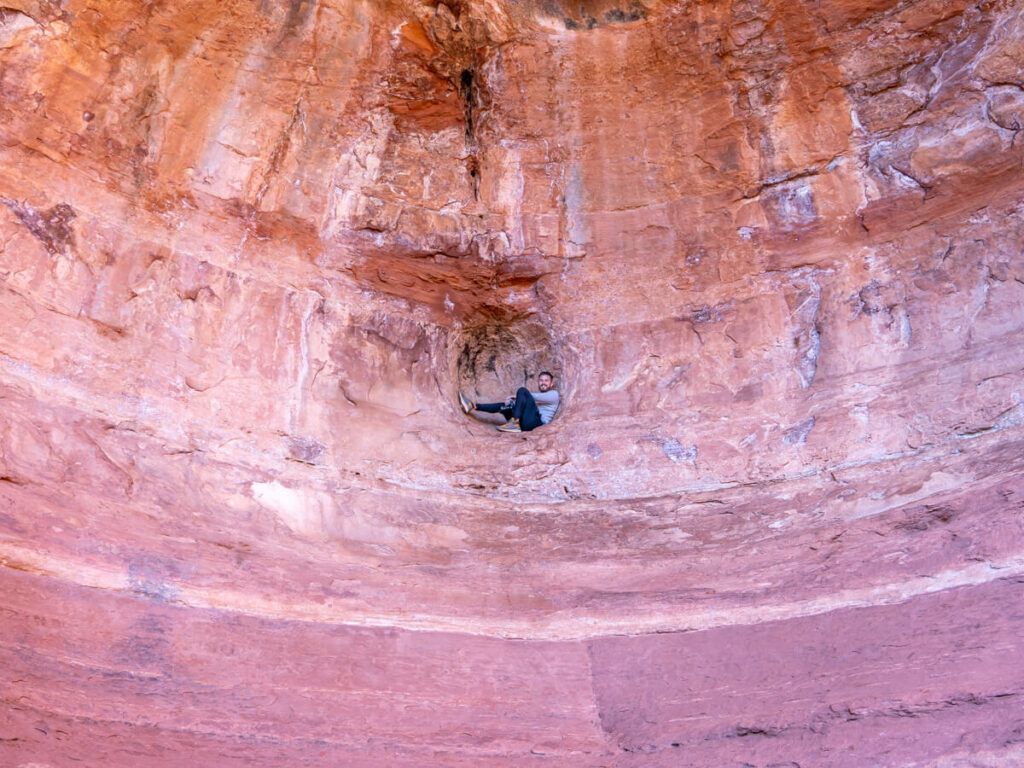
From outside, the cave doesn’t look like much more than a depression, but once you get inside and climb up the back part into a round hole shaped like half a tennis ball or an ice cream scooper, you can look back out at an amazing view.
The cave entrance is shaped like a tear or a flame, right? We used our wide angle lens to capture the cave entrance in one frame with Kristen at the bottom for perspective.
Need help planning your trip to Sedona?
Our Sedona travel guidebook gives you hidden gem hiking trails, secret caves, vortex sites, ancient ruins, wineries, jeep trails, photo spots, where to eat and stay, 1-5 day itinerary ideas and much more. Plus, you’ll get an exclusive map to use in Sedona!
View Guidebook
6. Shaman’s Cave via Robbers Roost Trail
- Difficulty: Easy / Moderate
- Distance: 1 mile roundtrip (3 miles w/out 4WD)
- Elevation Gain: 200 ft (450 ft w/out 4WD)
- Trailhead: Hideout Trailhead (FR 9530 w/out 4WD)
- Time: 1.5 hours (2.5 hours w/out 4WD)
Shaman’s Cave, also known as Hideout Cave, was the quietest and most isolated cave hike we did in Sedona. It’s a great cave to visit, and Robbers Roost Trail is really easy to get to it.
But we only recommend doing this hike if you have access to a high clearance vehicle. We drove our Jeep all the way to within half a mile of the cave and we loved it. But in a normal car, the hike is 3 miles roundtrip and most of it is along a boring and exposed rocky road.
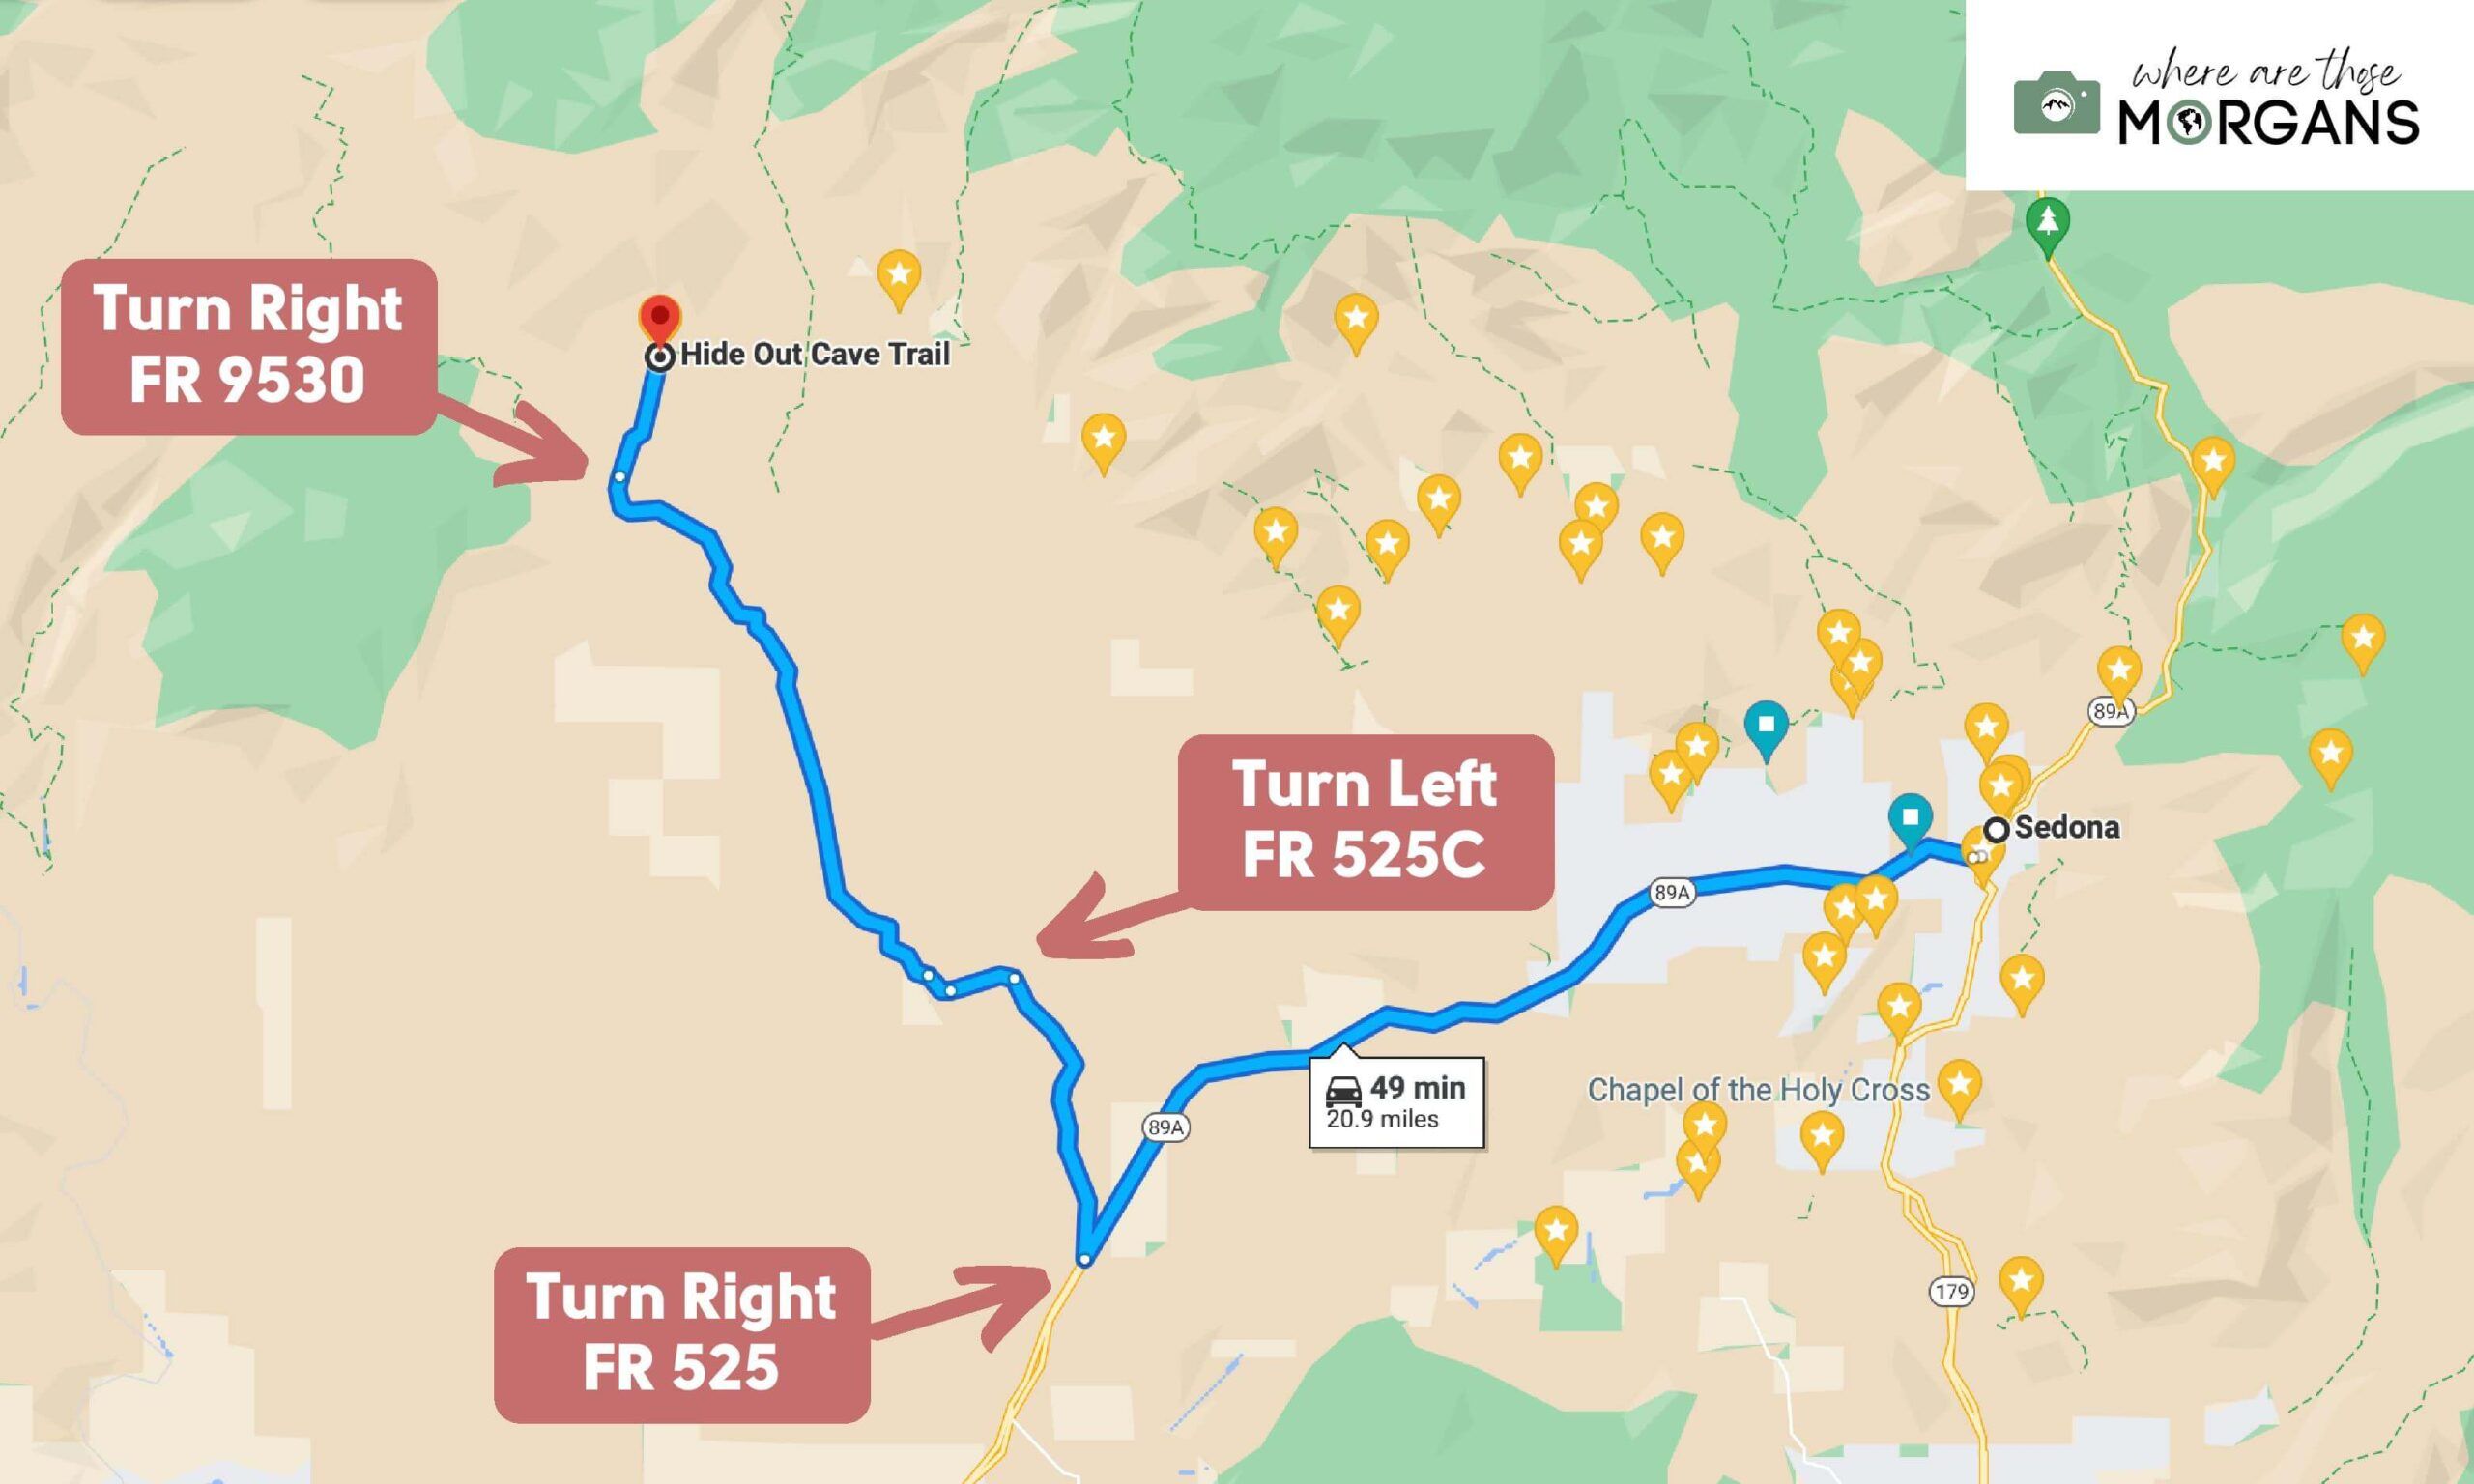
Robbers Roost Trail is located 21 miles northwest of downtown Sedona and it’s all gravel roads after leaving 89A. It’s not easy to visit, which means the trail and cave are usually empty. We had the whole place to ourselves and it was great to escape the crowds for a morning.
While we were up in the northwest we drove our Jeep to visit Honanki Heritage Site and Palatki Heritage Site, as well as driving Diamondback Gulch and Outlaw Jeep trails.
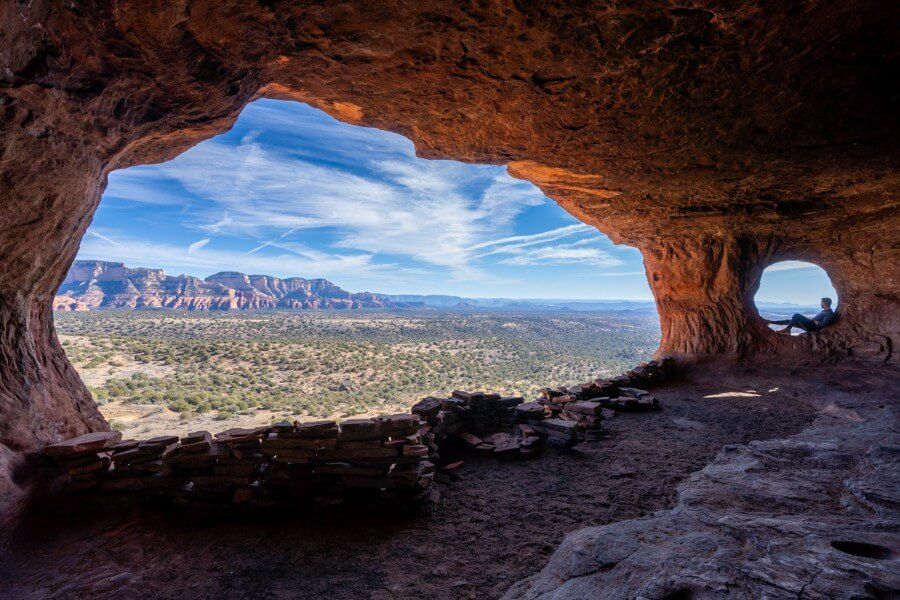
On the trail itself we dropped 50 ft into a ravine and immediately climbed 50 ft back out of it, like a V-shape. We accessed Hideout Cave by skirting a narrow ledge with a steep drop, which wasn’t too scary but it definitely got our attention.
Inside the cave we enjoyed far reaching views through one large and one small natural window. It’s a hike you should do if you have a high clearance vehicle.
7. Devils Bridge Trail
- Difficulty: Moderate
- Distance: 4 miles roundtrip
- Elevation Gain: 450 ft
- Trailhead: Dry Creek Trailhead
- Time: 3 hours
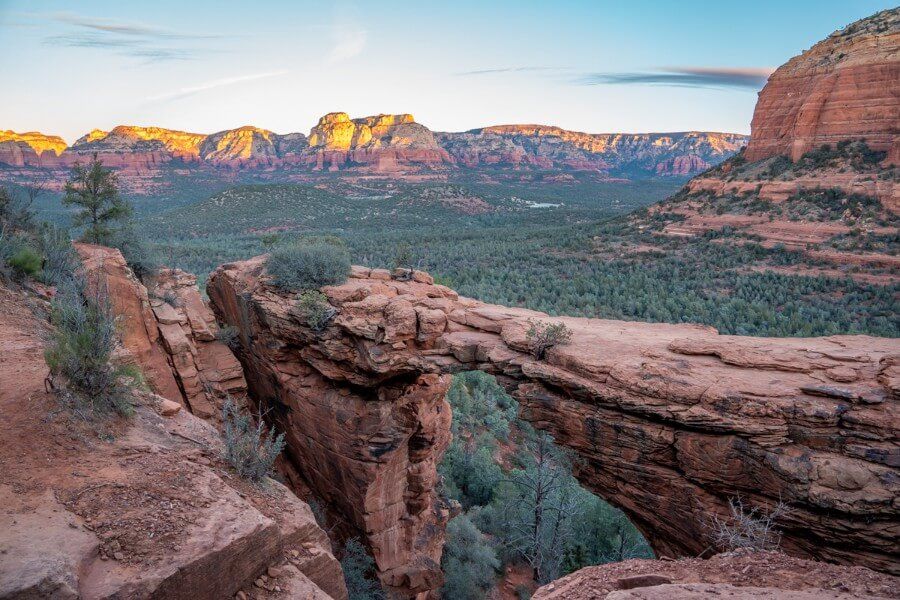
Devils Bridge Trail is the most hyped up and buzzy hike in Sedona because of its popularity on social media. We decided to try beating the crowds by hiking it in time for sunrise, and we were still around 6 or 7 groups from the front of the line waiting to walk out onto the narrow natural bridge.
Dry Creek Trailhead is the best place to park, but you can also park on the roadside nearby or you can park in Mescal Trailhead and connect to Devils Bridge via Chuck Wagon Trail. The Sedona Shuttle also stops at Dry Creek Trailhead.
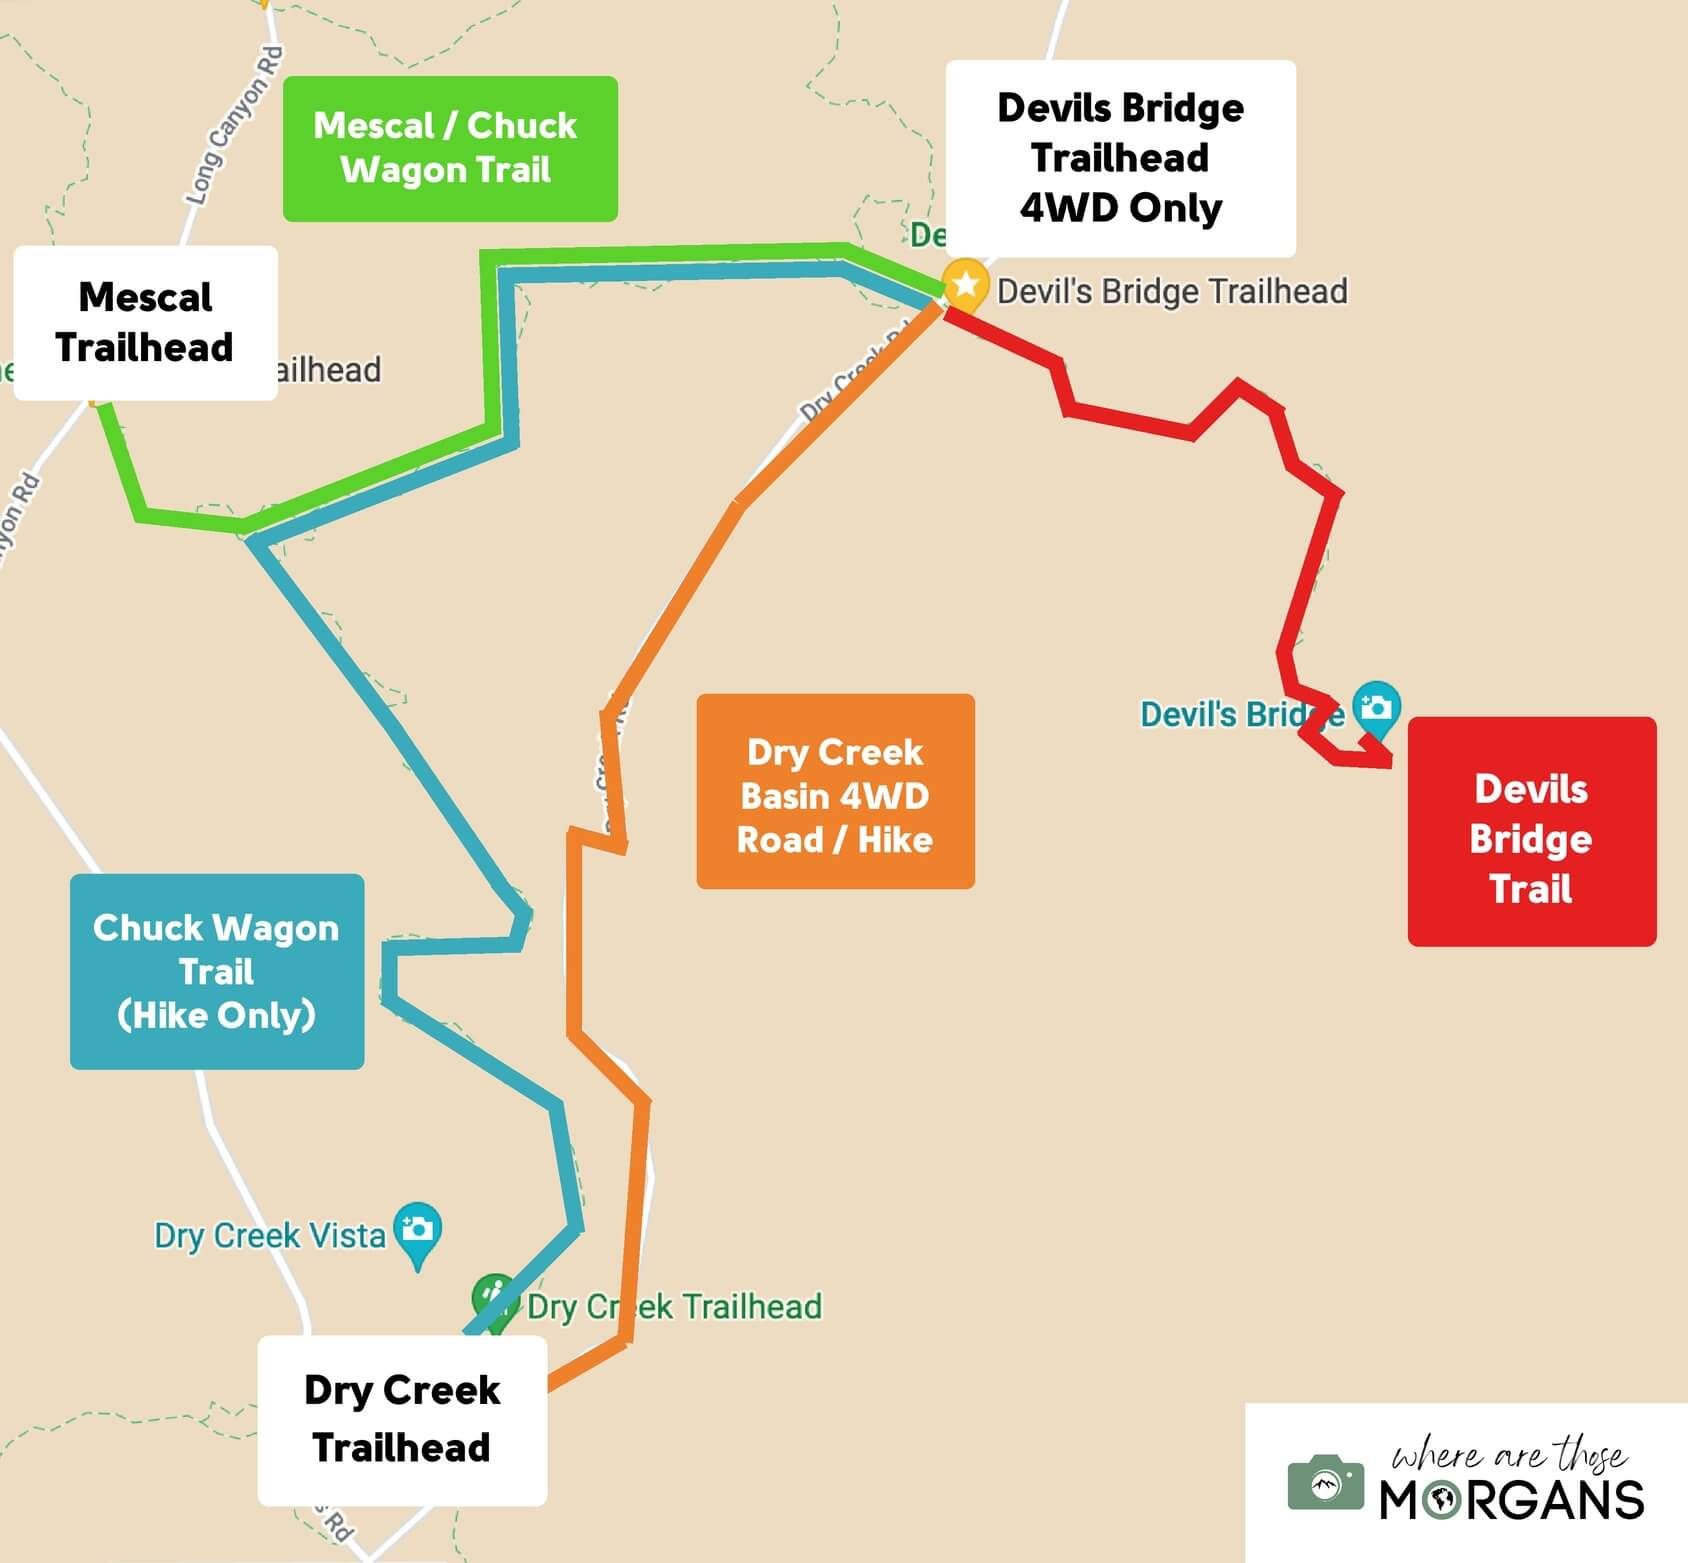
Devils Bridge Trail itself is very short (red line in our map above). We used our Jeep to park right at Devils Bridge Trailhead (high clearance only), rather than having to deal with parking and hiking from Dry Creek or Mescal.
We recommend parking at Mescal because Dry Creek Road isn’t fun to walk on. Once you reach Devils Bridge Trail proper, you’re on a normal hiking path.
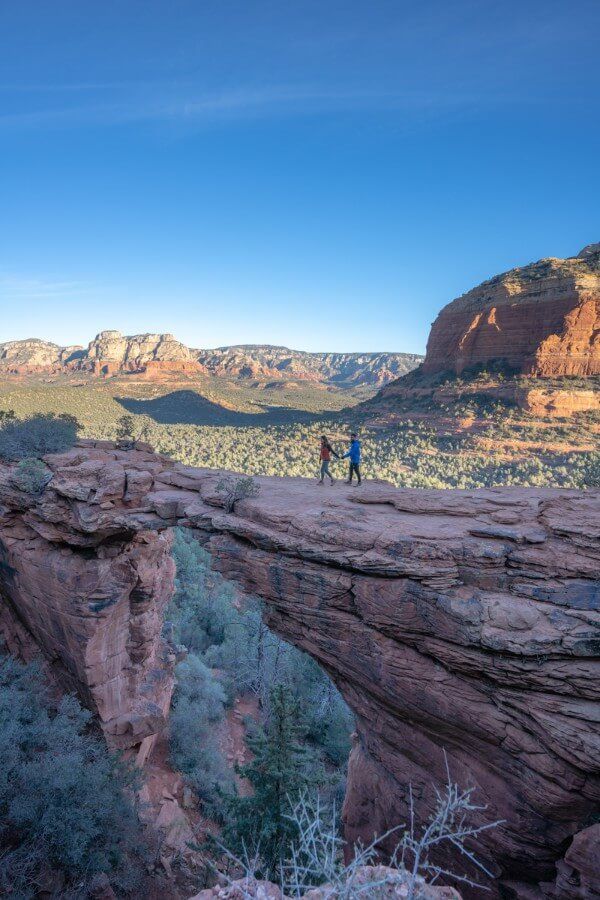
We thought the hike to Devils Bridge was good but not great. Not much happened really, we just climbed a few steep rocks and before long we were at the summit. The bridge and distant mountains view is stunning, but we weren’t huge fans of the theater show at the top.
Everyone was friendly and helped each other out with photos but it took ages and the line kept getting longer as the minutes passed by after sunrise. Overall we’re torn on this one. It’s a fun experience but only worth it if you really care about getting the bridge photo.
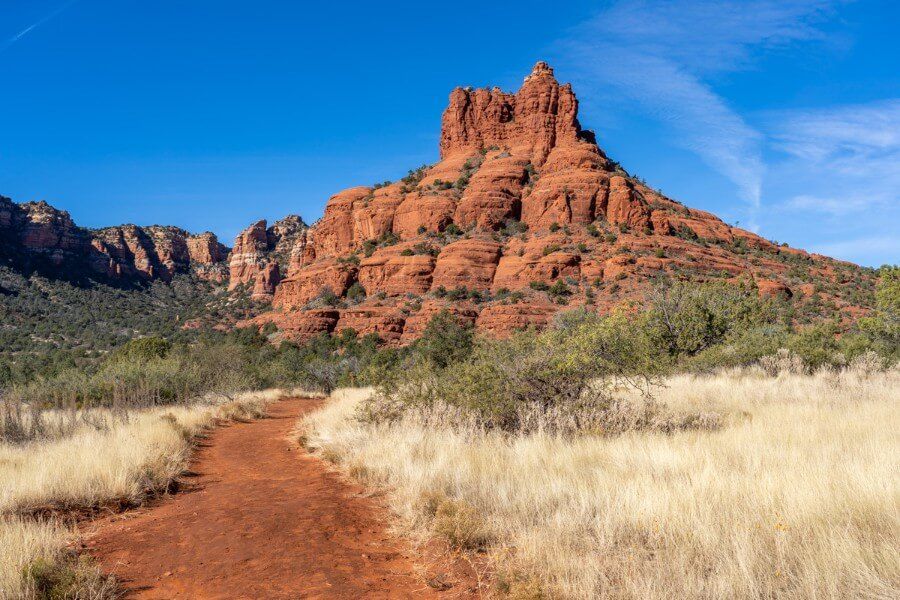
8. Bell Rock And Courthouse Butte Loop Trail
- Difficulty: Moderate
- Distance: 4.5 miles roundtrip
- Elevation Gain: 800 ft
- Trailhead: Bell Rock Trailhead
- Time: 3 hours
Bell Rock and Courthouse Butte Trail connects two skyline dominating formations on the southern edges of Sedona. You can just hike straight up Bell Rock, or you can also include a flat, quiet and scenic loop trail around Courthouse Butte. We did both and we think it’s worth it.
If you can’t get parked at Bell Rock Trailhead, drive south towards the Village of Oak Creek and park at Bell Rock Pathway instead. You can easily connect to Courthouse Butte loop from there.
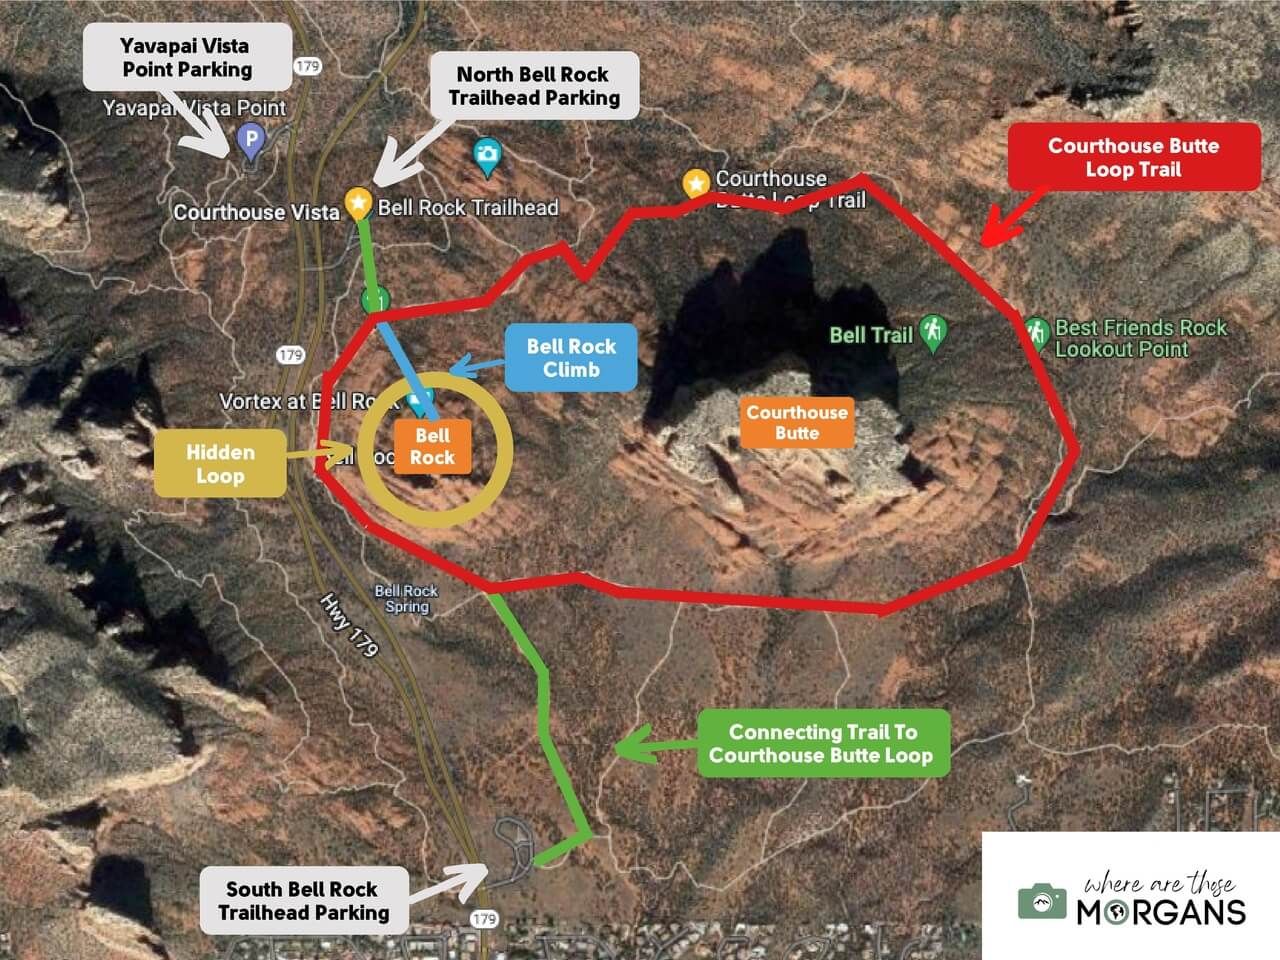
We parked at Bell Rock Trailhead and decided to hike around the Courthouse Butte Loop first (red line above). Once we’d completed the loop, we hiked up Bell Rock which quickly opened up spectacular views.
We found a hidden trail which ended up circling around Bell Rock (gold line) and it was our favorite part of the hike. The hidden trail was very much interpretive and there were drop offs, so only hike it if you’re experienced and have robust shoes.
We think Courthouse Butte is a fantastic loop trail for families of all ages. And even if you only make it part of the way up Bell Rock, it’s well worth it for the views.
Throw in the adventurous hidden loop and this trail becomes unmissable for avid hikers. Bell Rock is also one of the main vortex sites in Sedona, so it’s usually pretty busy.
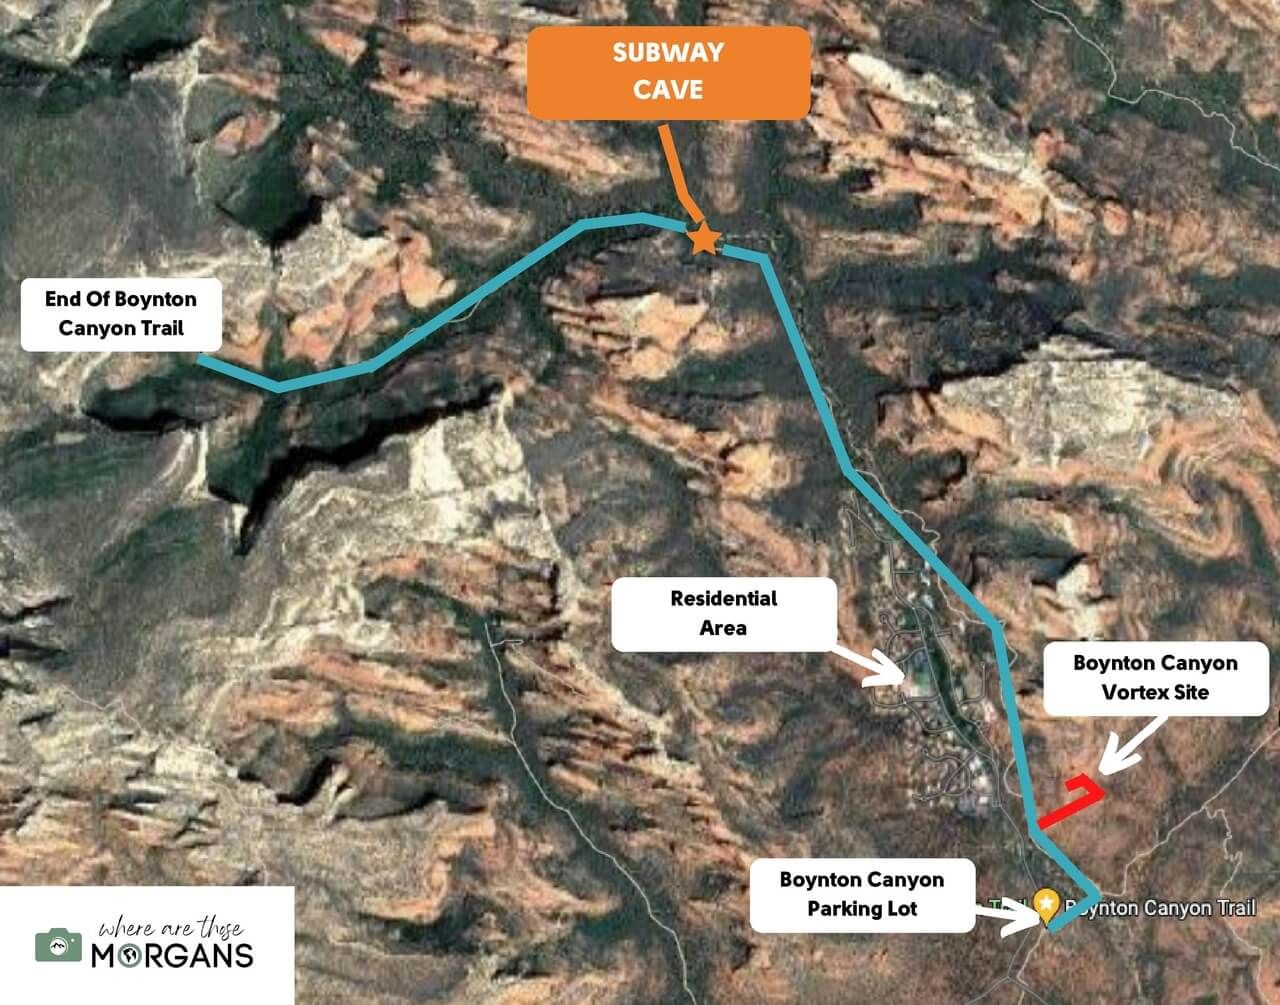
9. Boynton Canyon Trail To Subway Cave
- Difficulty: Moderate
- Distance: 5 miles roundtrip
- Elevation Gain: 600 ft
- Trailhead: Boynton Canyon Trailhead
- Time: 3 hours
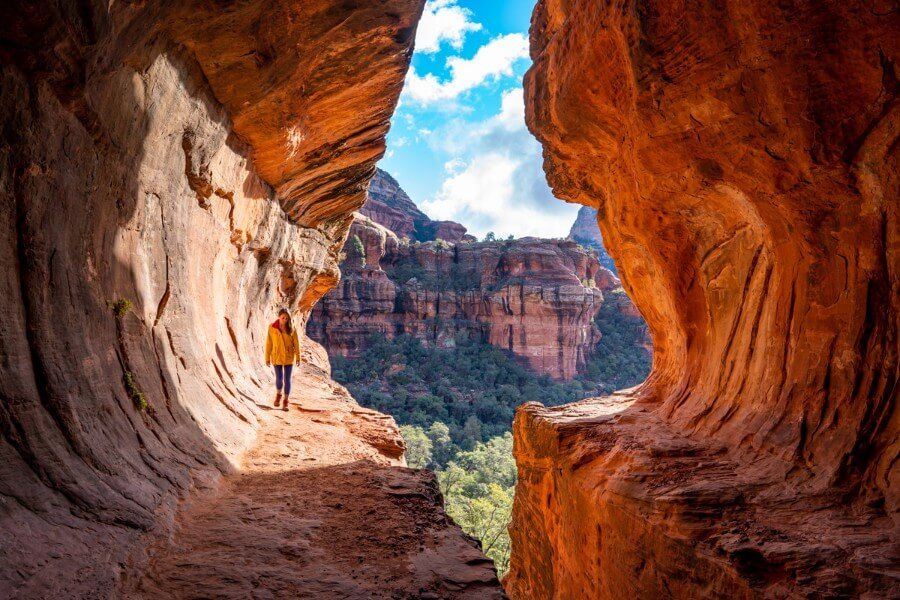
Subway Cave is the most popular cave hike in Sedona. It’s located around two-thirds into Boynton Canyon Trail, which also features a vortex site, another lesser known cave called Kachina Cave and an elevated end-of-trail viewpoint.
Most of the hike is easy until it gets steep near the end, and if you take either cave trail you’ll climb steep banks.
We started with Subway Cave, then went to the end-of-trail viewpoint and finished with the vortex site. So we missed Kachina Cave because we didn’t know about it at the time.
Subway Cave is by far the more popular anyway, and to reach it you’ll turn right once you see an unusually large burnt tree on the left side of Boynton Canyon Trail. From there it’s an obvious route until you climb up and skirt around the outside of the cave before hopping inside.

The climb inside Subway Cave isn’t the worst, but you need to be careful and wear robust shoes for gripping the rocks.
We had the cave to ourselves because we visited in December when it’s quieter in Sedona. But we’ve read hiker reviews and they mostly say the cave is packed, so it might be worth visiting very early or much later in the day to avoid crowds.
10. Doe Mountain Trail
- Difficulty: Moderate
- Distance: 1.5 miles roundtrip
- Elevation Gain: 400 ft
- Trailhead: Doe Mountain Trailhead
- Time: 2 hours
Doe Mountain Trail was one of our favorite sunrise hikes in Sedona. The trail is very short but it’s steep enough to make it a bit of a lung buster, so we’d say it’s moderately difficult overall.
You’ll climb 400 ft in less than a mile, mostly on switchbacks. At the top you’ll find a huge flat mesa and at the far side of the mesa you’ll be rewarded with sensational views.
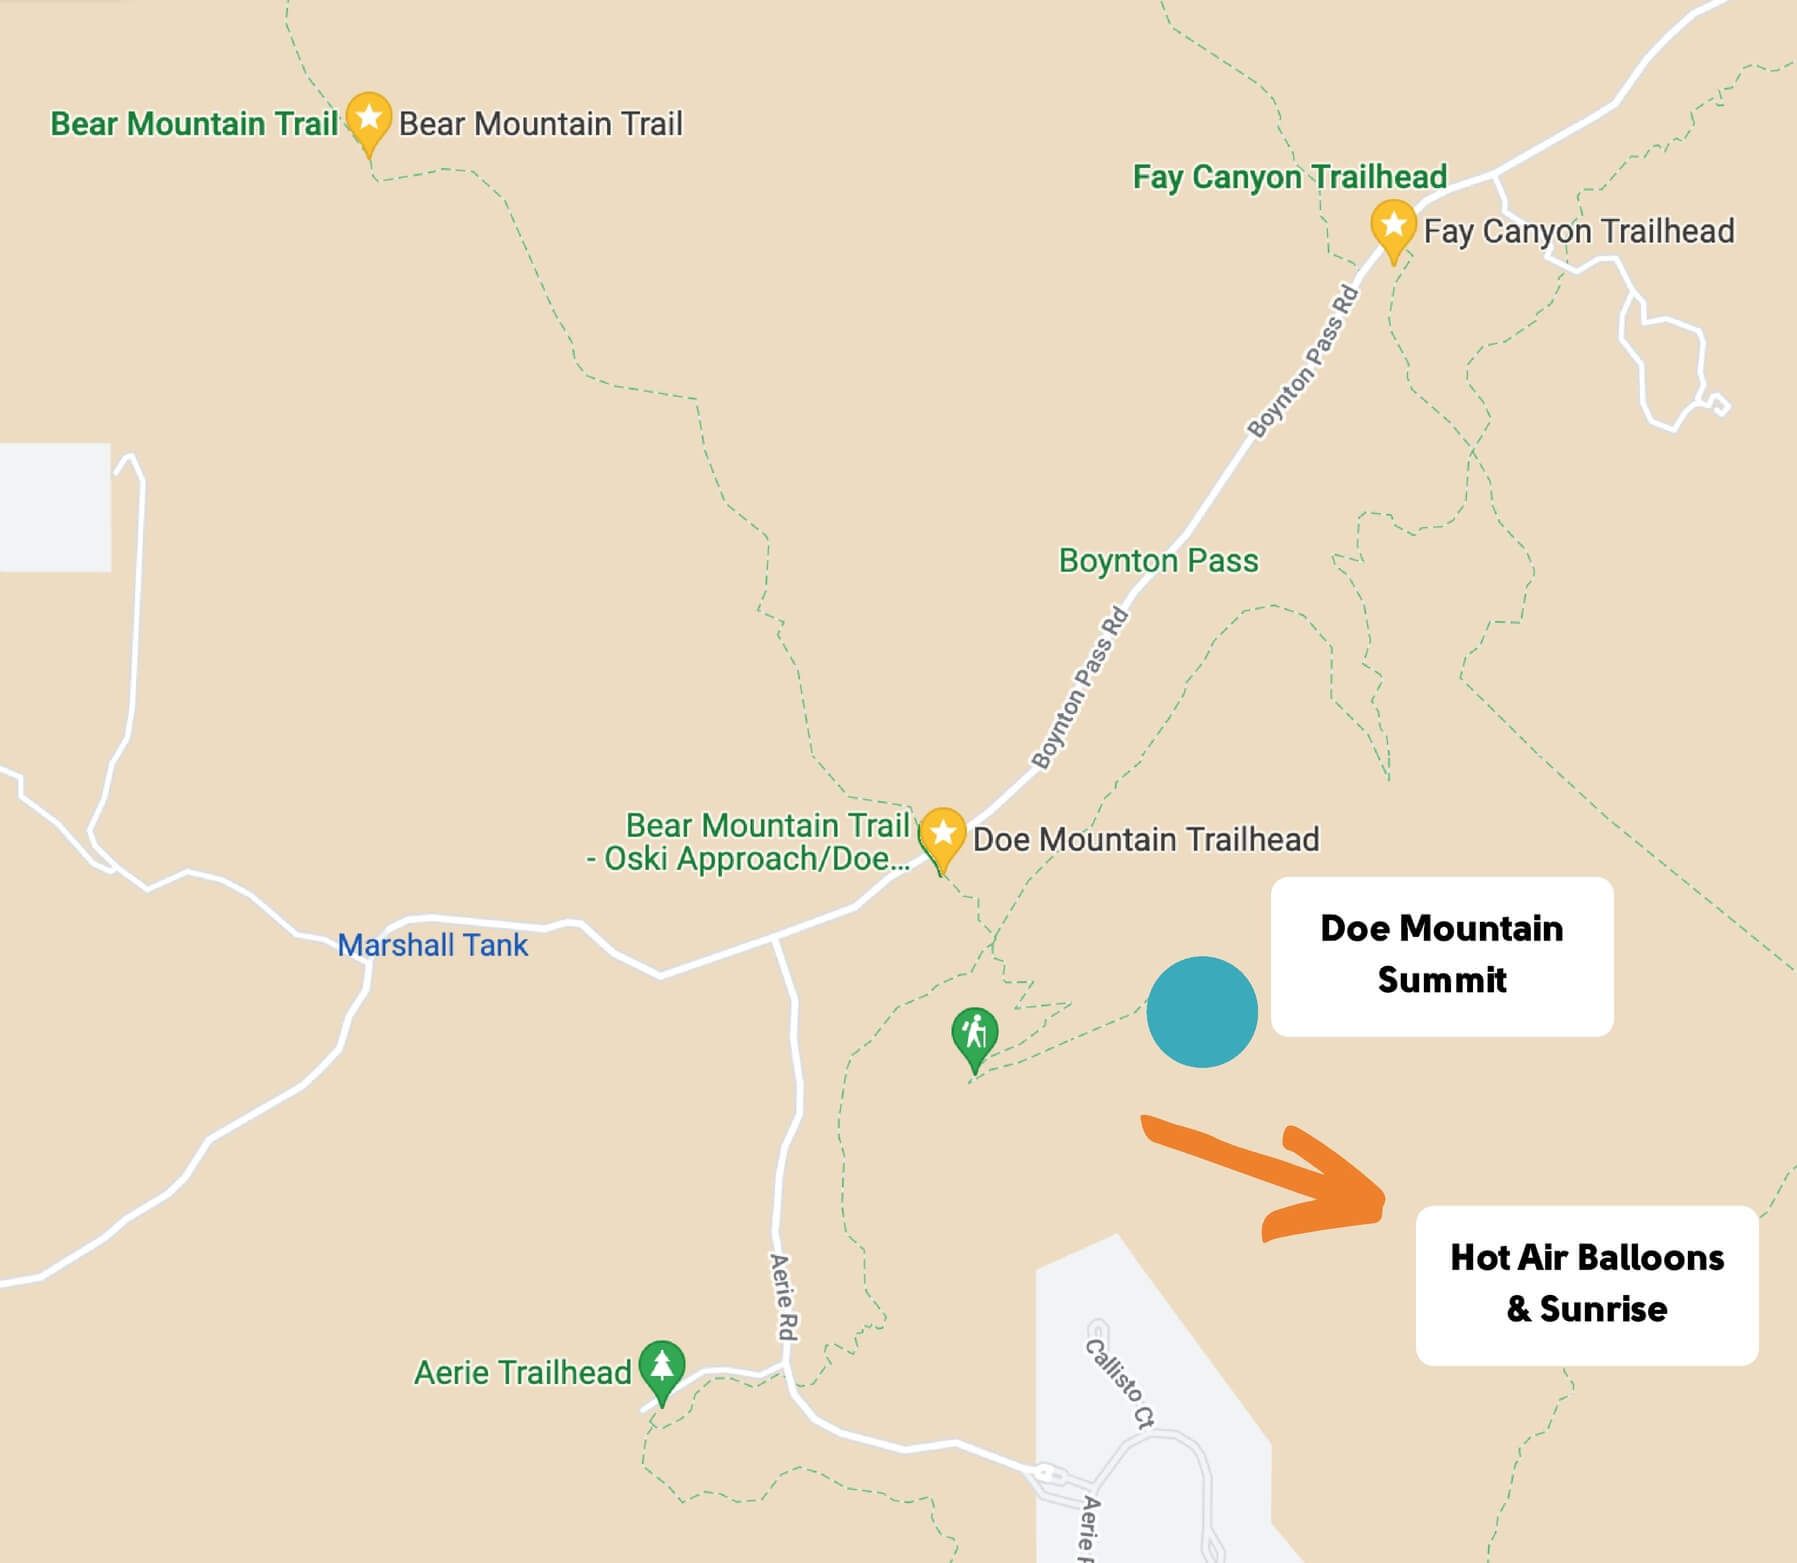
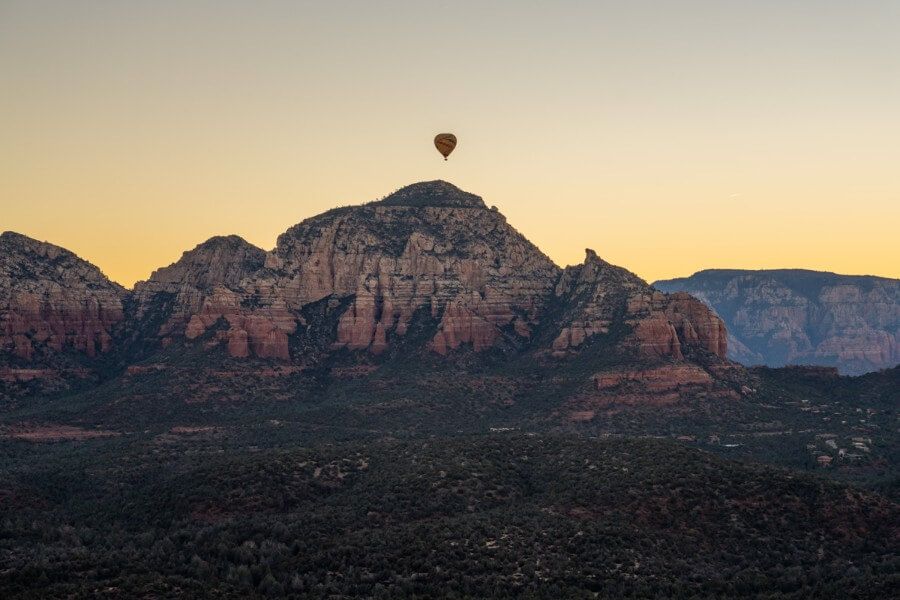
We parked at the trailhead in the dark, climbed for around 30 minutes with headlamps and made it to the viewpoint as hot air balloons were taking flight and the sun began to rise.
It was a wonderful experience and we highly recommend you do the same. If you can’t make it for sunrise, we still think Doe Mountain is well worth the short hike so don’t miss it.
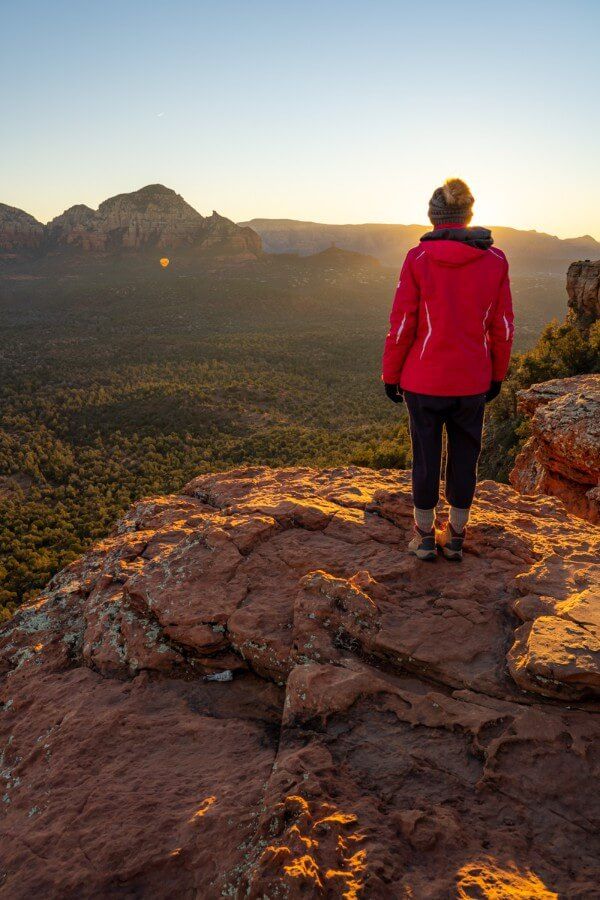
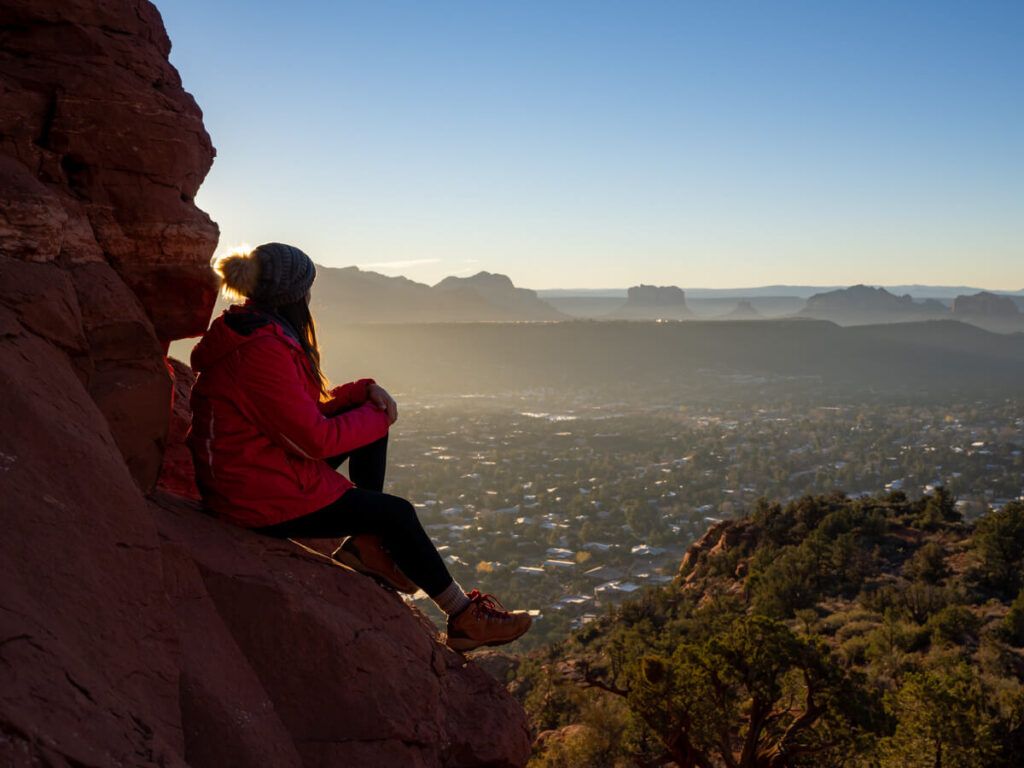
We took coffee and breakfast up with us, sat huddled together in our winter coats and waited for the sun to warm us up. It probably won’t surprise you to hear that we had the summit to ourselves for the sunrise, but we think it would be busier during warmer months.
Overall, we’d say the sunrise from Doe Mountain was one of our favorite experiences from our entire Sedona vacation.
11. Chimney Rock And Little Sugarloaf Loop Trail
- Difficulty: Moderate
- Distance: 2.3 miles roundtrip
- Elevation Gain: 800 ft
- Trailhead: Thunder Mountain Trailhead
- Time: 2.5 hours
Chimney Rock and Little Sugarloaf Trail is another Sedona sunrise hike you can’t miss. We actually did this one on our last morning, and we think it’s definitely a strong contender for the best hidden gem hike in Sedona.
It’s close to town so it’s convenient, it’s a short loop trail with two parking options (Thunder Mountain or Andante), and the views from both summits are amazing.
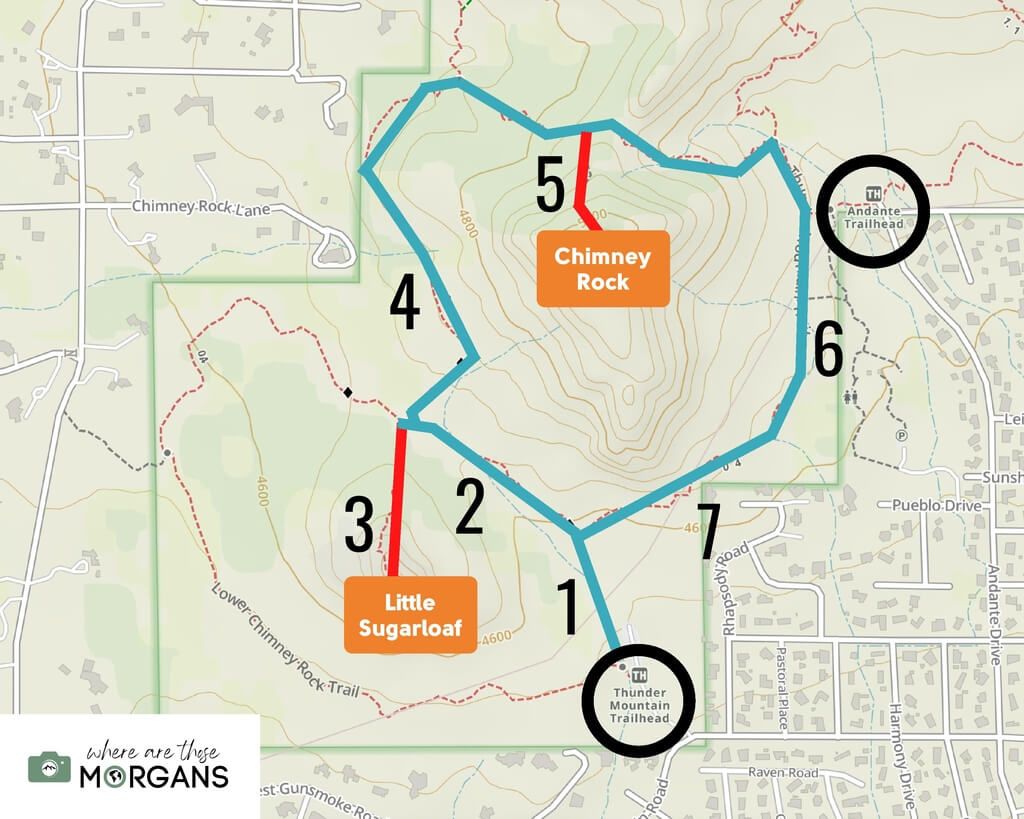
We’d seen Chimney Rock from other hikes, so we decided to hike it for sunrise. The climb was short but near the top it got steep and loose underfoot, so you must take care.
We watched a stunning sunrise erupt from behind Airport Mesa and Sedona’s eastern red rock walls, before heading down to Little Sugarloaf, which actually turned out to be a better viewpoint. Again, this loop is still well worth hiking even if you can’t make it for sunrise.
Little Sugarloaf is easier to access, it’s flat at the top and it has unobstructed 360 degree views. The best part is that very few know it exists so it’s much quieter than most other trails in Sedona.
We didn’t see a single other person at either summit and we stayed up there until around one hour after sunrise. Do not miss these summits if you enjoy sunrise photography.
12. Pyramid And Scorpion Loop Trail
- Difficulty: Moderate
- Distance: 2.1 miles roundtrip
- Elevation Gain: 430 ft
- Trailhead: Pyramid Mountain Trailhead
- Time: 2 hours
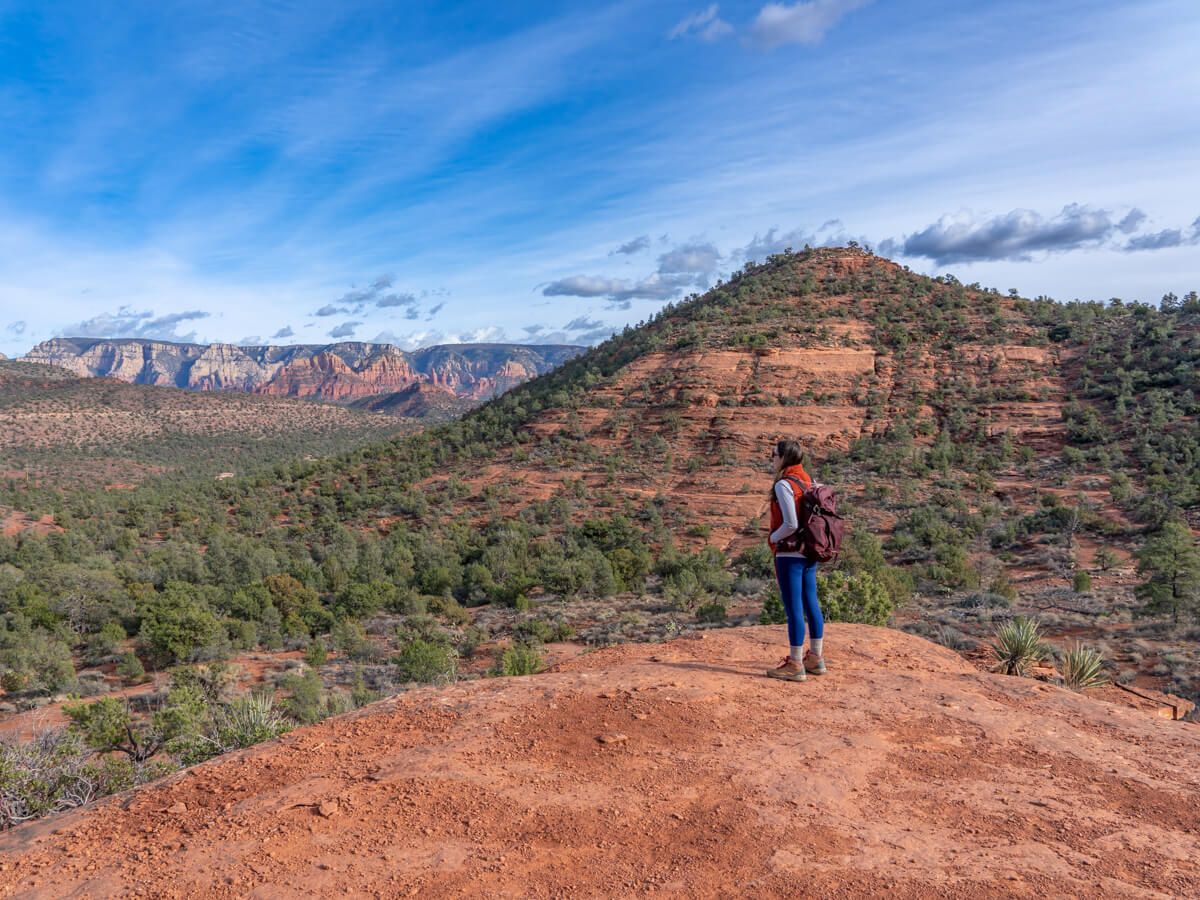
Pyramid and Scorpion Loop Trail is another hidden gem hike we found in Sedona that you definitely shouldn’t miss.
Park at Pyramid Mountain Trailhead on Red Rock Loop Road and hike anti-clockwise, starting with Pyramid Trail and looping left onto Pyramid Trail before returning to the trailhead.
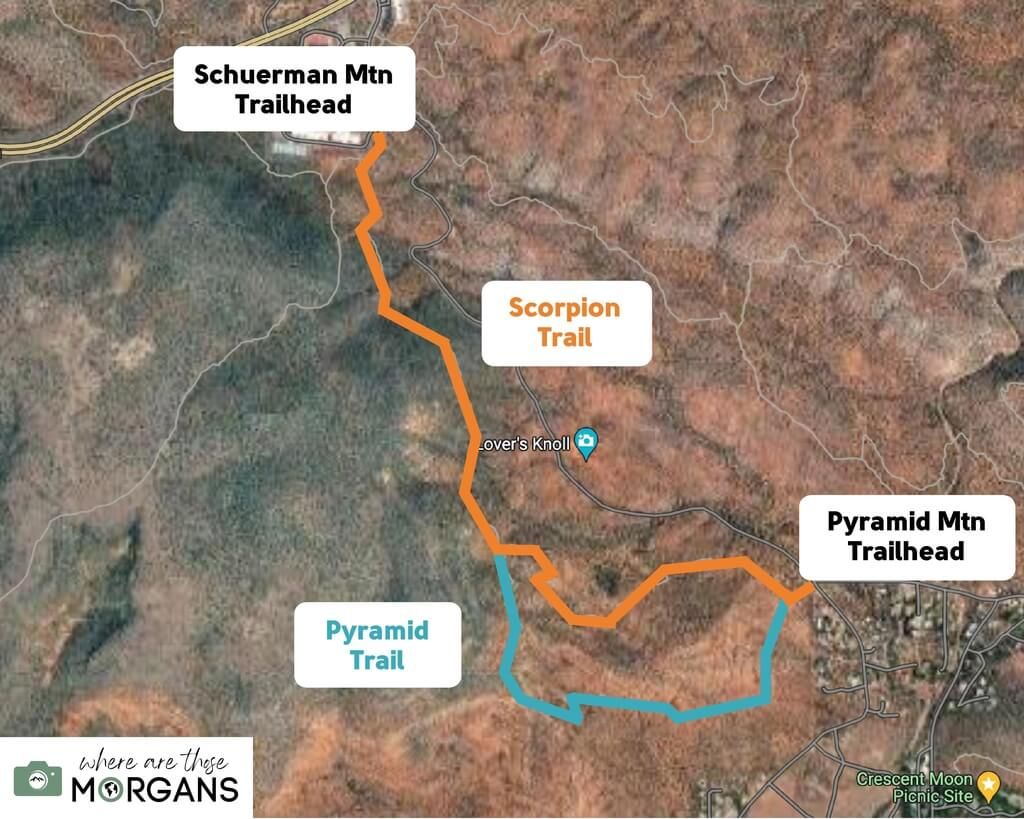
You could also include the whole Scorpion Trail by using Schuerman Mountain Trailhead, but then you’d also have an out and back section to hike with more elevation.
We stuck to the shorter loop and we didn’t see a single hiker the whole time. But we did see a mountain biker, so be aware that it’s a shared trail.
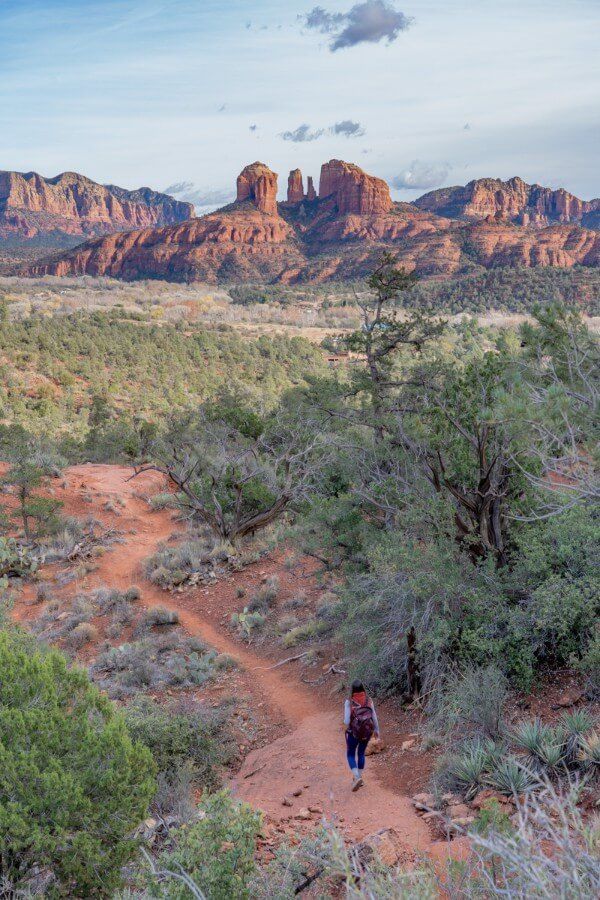
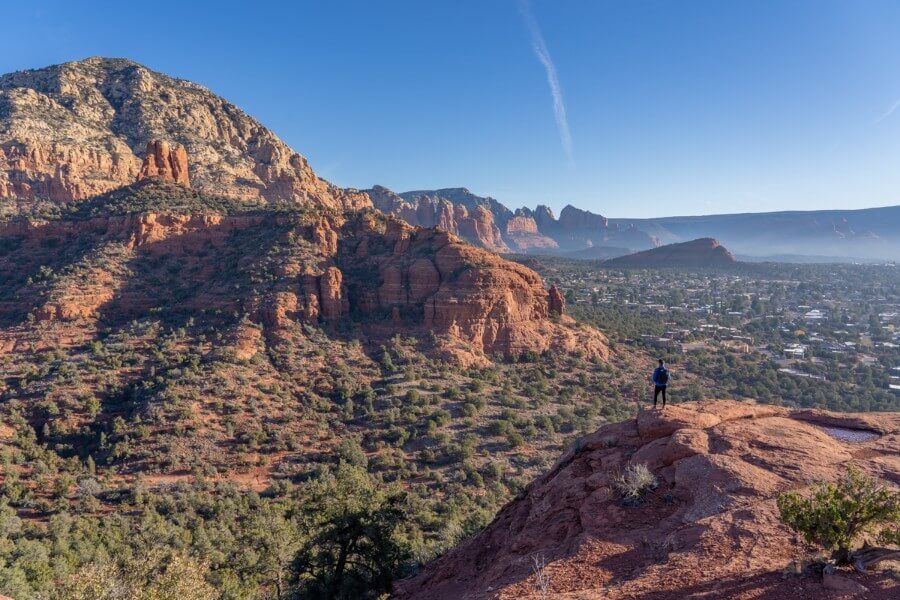
We enjoyed the tranquility on this trail, and the front-on views of Cathedral Rock were some of the best we saw in Sedona. It’s not going to blow your socks off with adventure, but it’s a very calming and scenic hike to add to your itinerary.
Sunset might be the best time of day to hike it so you can see Cathedral Rock glowing red under soft light.
13. Munds Wagon Trail
- Difficulty: Moderate
- Distance: 9 miles roundtrip
- Elevation Gain: 1,500 ft
- Trailhead: Munds Wagon Trailhead
- Time: 5 hours
Munds Wagon Trail is one of the better moderately difficult hikes you can do in Sedona to get away from the crowds. It starts at the bottom of Schnebly Hill Road in a small dirt parking lot and climbs up way beyond Merry Go Round.
But to make the most of this hike, we recommend including Hangover Loop and stopping at Merry Go Round, before returning downhill to the trailhead. Hikes on the east side of Sedona are typically much quieter, and Munds Wagon is great if you want a longer stretch out.
After 1.7 miles on Munds Wagon you’ll join Hangover Loop Trail which you should hike anti-clockwise so you spend more time with Sedona facing views.
We drove our Jeep up the hill, stopped to hike Hangover Loop and went all the way to Schnebly Hill vista overlook. In truth, Merry Go Round was our favorite part because the view was fantastic. This hike is worth considering if you want something a bit different.
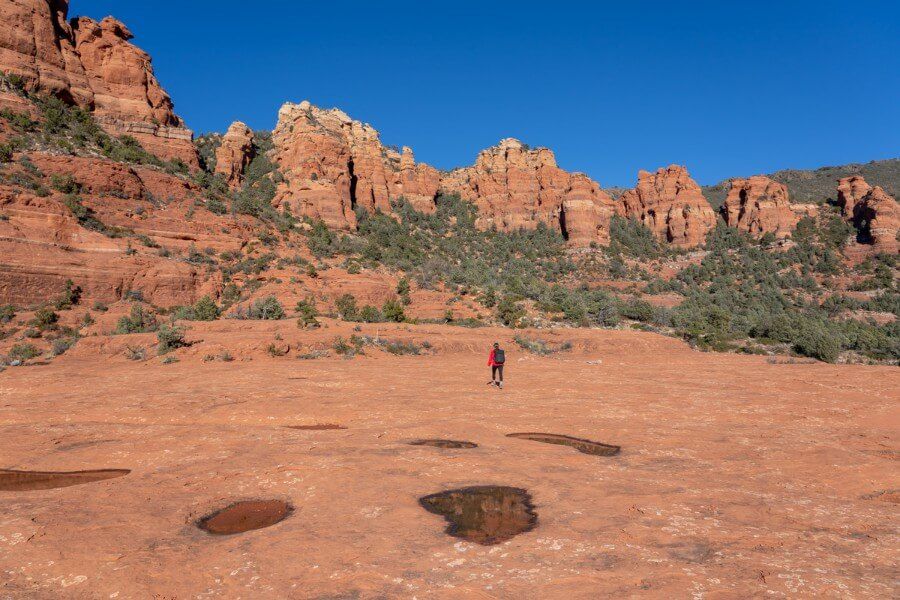
14. Cathedral Rock Trail
- Difficulty: Hard
- Distance: 1.2 miles roundtrip
- Elevation Gain: 700 ft
- Trailhead: Cathedral Rock Trailhead
- Time: 2.5 hours
Cathedral Rock Trail is the most iconic hike in Sedona. It’s like the sun to our solar system, everything in Sedona revolves around it. It’s an awesome trail (we think it’s one of the top hikes in the US) but it’s also extremely busy.
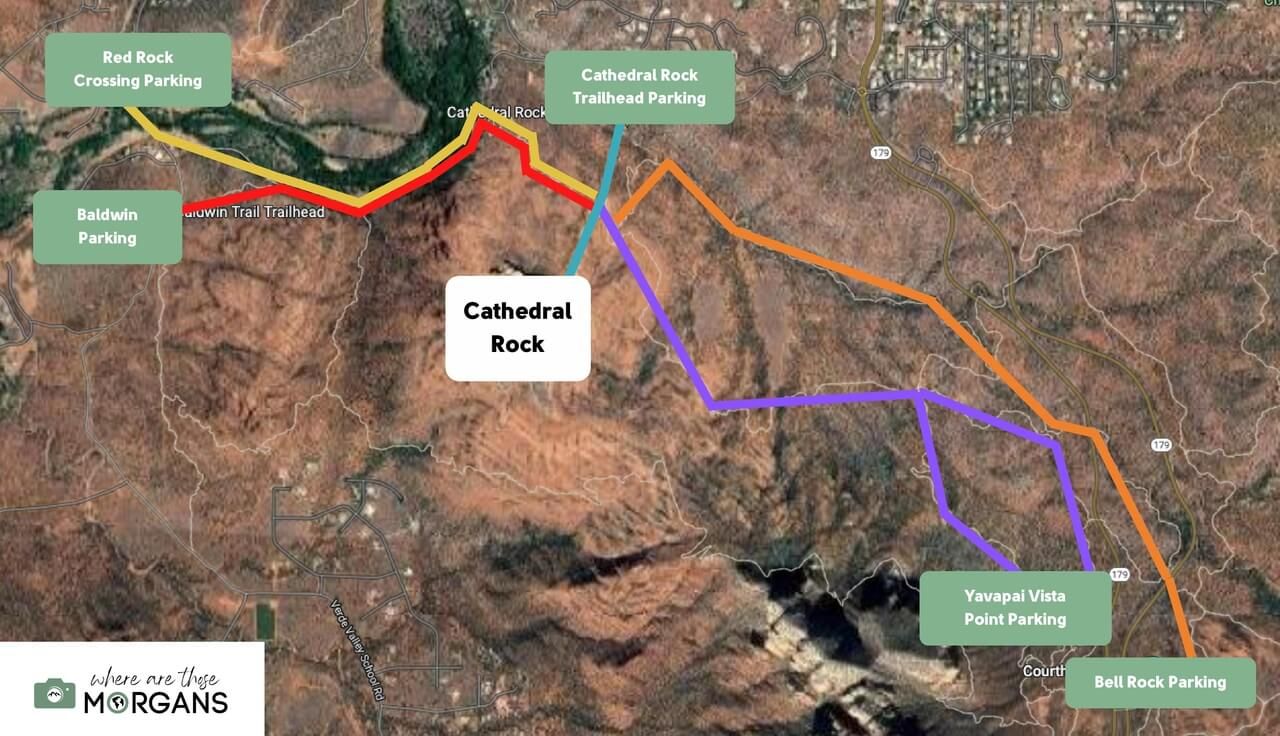
Parking at Cathedral Rock Trailhead is near impossible during the day and around sunset. So you may have to park at Yavapai Vista, Bell Rock, Red Rock Crossing or Baldwin instead.
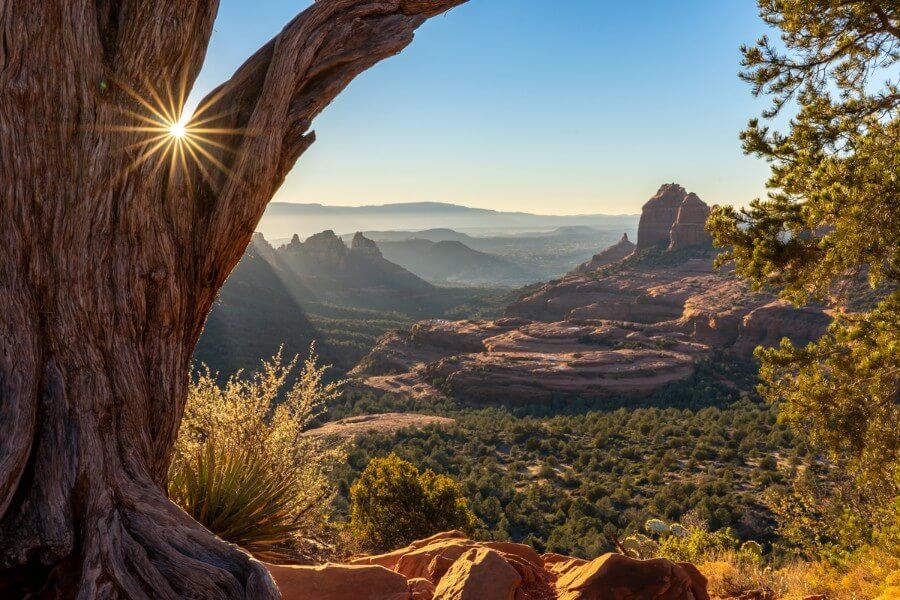
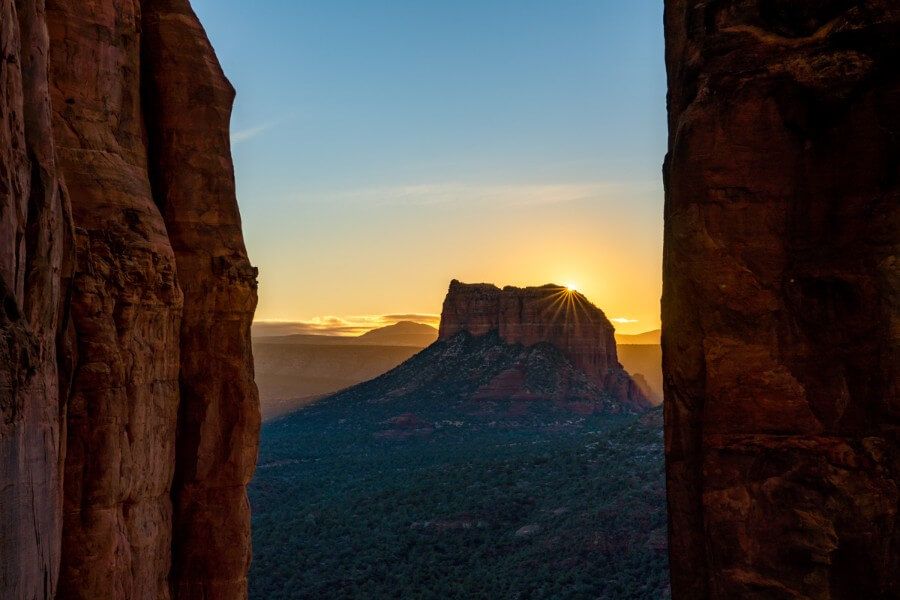
We decided to hike Cathedral Rock for sunrise to beat the crowds and it really did live up to the hype. Parking at the main trailhead was all but empty and we managed to summit in time to watch a might sunrise erupt from behind Courthouse Butte in the distance.
Now, the trail was very steep and slick, with some small scrambling elements involved. So you need to be confident and wear strong shoes with grips.

Once we summited and caught our breath, we turned left and followed a narrow trail hugging a rock spire to reveal another steep climb between the spires. At the top we sat and watched the sunrise completely alone.
Cathedral Rock is the hike you should prioritize, so if you’re short on time in Sedona, get organized and find somewhere to park early in the morning.
15. Keyhole Cave Trail
- Difficulty: Hard
- Distance: 2.3 miles roundtrip
- Elevation Gain: 500 ft
- Trailhead: Teacup Trailhead
- Time: 3 hours
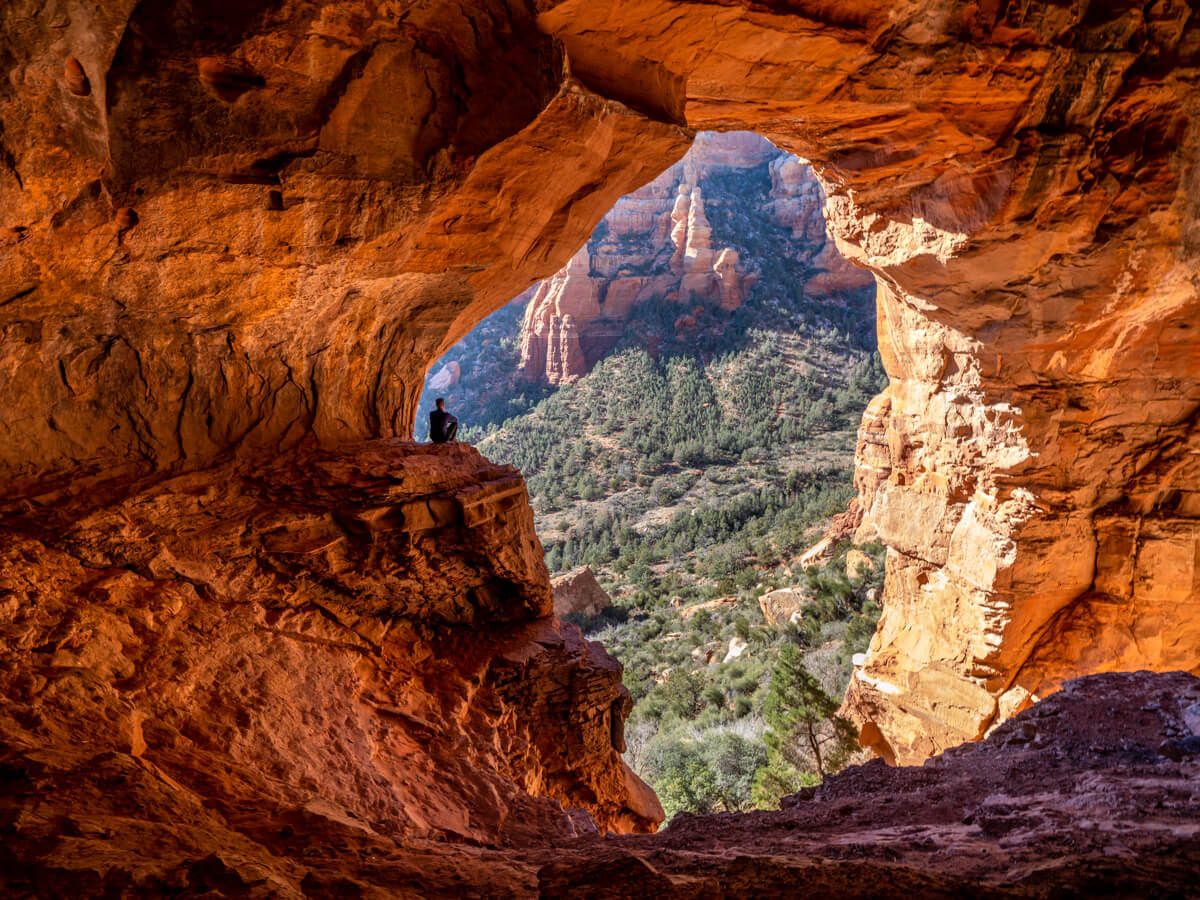
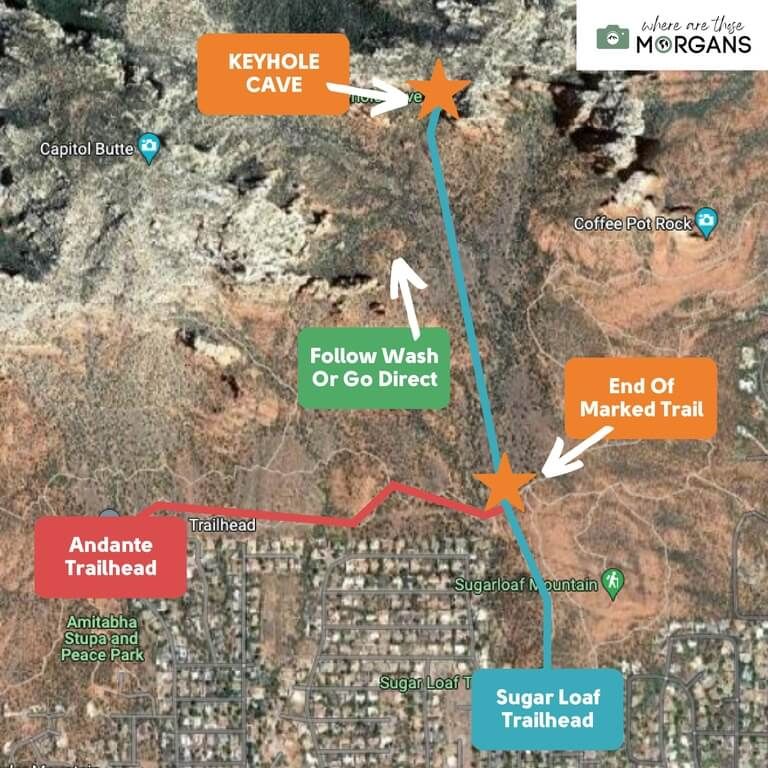
Keyhole Cave Trail is the most difficult cave hike in Sedona. It starts out on Teacup Trail, but you then have to forge your own path through rough desert vegetation for most of the hike and the cave climb is challenging.
If you’re an experienced hiker and you want to get off the beaten path in Sedona, you shouldn’t miss this adventurous trail.
Despite having no official trail, Keyhole Cave appears on hiking apps like AllTrails and Gaia GPS, and it’s all in public land.
After parking at Teacup Trailhead (also known as Sugar Loaf Trailhead), we took Teacup Trail until reaching the intersection with Thunder Mountain Trail. The path goes left to right, but we walked straight behind the sign and used the distant rock walls ahead as our destination.
We had to chop and change our paths and routes on both legs of the hike, but apart from getting sharp bush scratches every now and then, the hike was great.
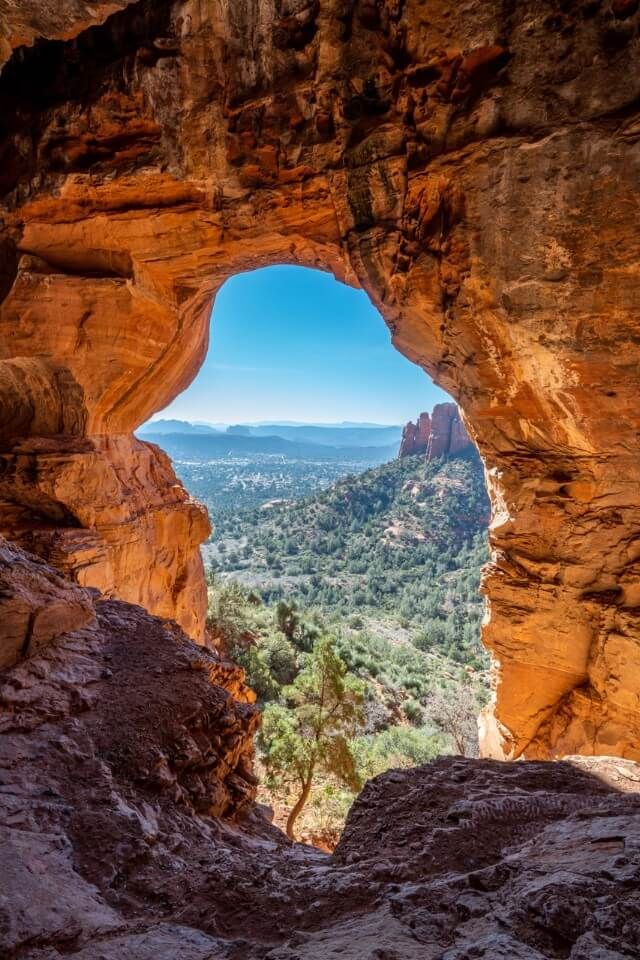
We didn’t pass anybody else but there was another couple already inside the cave when we arrived. After climbing inside, we were blown away by the size of the cave and its entrance, as well as the views overlooking Sedona.
Trails To Hike With More Time
Look, hiking is among the most popular things to do in Sedona and there’s just so many more excellent trails we could list. But if you have a bit more time available, you want to get off the beaten path, or you want more challenging trails, here are the next 5 hikes we would prioritize:
- Bear Mountain
- Capitol Butte to Thunder Mountain
- Wilson Mountain
- Vultee Arch
- Little Horse to Chicken Point
These hikes are harder to reach or harder in difficulty, so they’re not ones to include on a first visit. We’ll probably start with these the next time we’re in Sedona because we’ve already done the 15 trails covered in this guide.
Sedona Hiking Trails Map
Click or touch the map below to activate, zoom in and out, and scroll around. If you’d like to see a bigger version, click the “view larger map” icon in the top right, and if you’d like to see any specific trail, click the arrow and square icon in the top left.
Map key:
- Blue – Quiet or hidden gem hikes
- Orange – Moderately busy trails
- Red – Busiest hikes
Key Things To Know
Difficulty: Lots of the hikes in this guide are listed as moderate or hard. But in reality, we’d say everything up to Pyramid Scorpion Loop in our guide will be fine for most hikers. Remember, you don’t have to take the optional spur trails which increase difficulty.
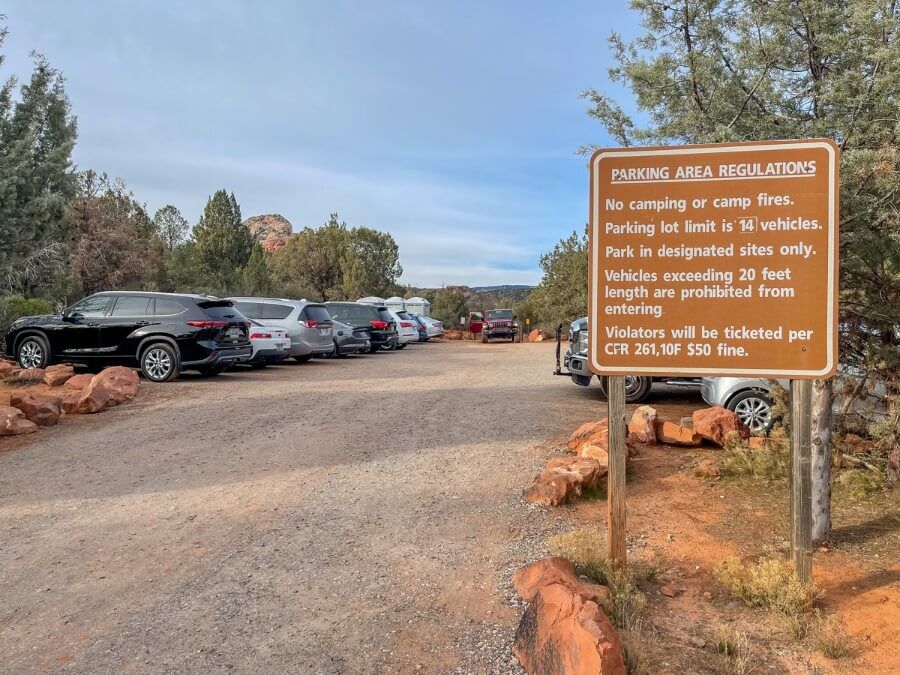
Passes and fees: You must display either a Red Rock Pass or America the Beautiful Pass at these trailheads in Sedona. Some parking lots have ticket machines to buy 1 day or 7 day Red Rock Passes, but we recommend buying online ahead of your visit to save time.
Trailheads: Parking at hiking trailheads was the biggest problem we faced in Sedona. We strongly recommend you get an early start each morning during your trip. A great tip we have for you is to pick the hikes you want to do the most, hike one the first morning, then hike another the second morning etc.
Busiest lots: Devils Bridge Trail (Dry Creek Trailhead), Cathedral Rock Trail (Back O Beyond Rd), Bell Rock Trail (Bell Rock Trailhead), Boynton Canyon Trail (Boynton Canyon Trailhead) and Soldier Pass Trail (Soldier Pass Trailhead) were the busiest parking lots we saw. Remember you can use alternative parking lots and connecting trails to access these hikes.
Shuttle: It’s easier to use the Sedona Shuttle than mess around with parking at the most popular hikes. Posse Grounds park and ride goes to Soldier Pass Trailhead, Dry Creek Trailhead and Mescal Trailhead. Whereas North SR-179 park and ride goes to Cathedral Rock.
Sedona Hiking Itinerary
Now you know the best hikes in Sedona, let’s go through some examples of how you can group them together from 1-3 days:
Easy One Day Itinerary
- Start with sunrise at Doe Mountain
- Next hike Fay Canyon (optional arch and end ascent)
- Park at Long Canyon and hike to Birthing Cave
- Hike either Devils Bridge or Soldier Pass Trail (may have to use Sedona shuttle)
- Walk around Bell Rock and Courthouse Butte (optional climb up Bell Rock)
- Finish with a walk along Airport Mesa Sedona View Trail at sunset
Challenging One Day Itinerary
- Start with sunrise at Cathedral Rock
- Next hike Devils Bridge
- Head over to Boynton Canyon and hike to Subway Cave
- Park at Teacup Trailhead and hike to Keyhole Cave
Two Day Itinerary
- Day 1 – Doe Mountain, Fay Canyon, Boynton Canyon, Birthing Cave, Devils Bridge and Soldier Pass
- Day 2 – Cathedral Rock, Bell Rock Courthouse Butte, Munds Wagon and Sedona View
Three Day Itinerary
- Day 1 – Doe Mountain, Fay Canyon, Boynton Canyon, Birthing Cave and Devils Bridge
- Day 2 – Chimney Rock Little Sugarloaf, Keyhole Cave, Soldier Pass and Pyramid Scorpion
- Day 3 – Cathedral Rock, Bell Rock Courthouse Butte, Munds Wagon and Sedona View
Hiking tip: Pick a parking lot with a connector trail, get there early and hike several trails before moving your car again. For instance you park at Doe Mountain, hike Doe Mountain, hike Aerie to Fay Canyon, hike Aerie to Boynton Canyon and then return to Doe Mountain via Aerie. You only park once but you hike 3 trails using Aerie as the connector.
The Morgan Conclusion
What we like: We loved how easy it was to hike in Sedona. Almost all of the trails are within 10 miles of town and lots of the popular hikes are clustered together. It almost had a theme park feel to it but instead of going from ride to ride, we’d go from hike to hike. It’s also a very inclusive place to hike, with lots of easy, moderate and hard trails making it perfect for all ages and abilities. Finally, the hikes are diverse, fun, adventurous and photogenic. Overall, Sedona really is a fantastic place to enjoy the great outdoors.
What we don’t like: Parking at trailheads in Sedona was painful. We hated how chaotic the parking lots were, everyone was fighting for spaces and people were overly aggressive. The trails were sometimes busy, but we mostly avoided peak times by doing lots of sunrise hikes and then getting off the beaten path between 10:00am-3:00pm. If you hike in peak seasons during the day, you’ll find the trails to be overcrowded. But other than being busy, we have absolutely no complaints about the hikes.

Next Steps
We hope our hiking trails guide helps with planning your trip to Sedona.
Don’t forget you can book a travel planning video call with us if you’d like our expert help organizing your trip to Sedona. We can answer any questions you have or walk through a personalized itinerary to make the most of your time.
Still researching for your trip?
- Here’s our ultimate first-timer’s guide to Sedona
- This is exactly what to do in Sedona
- Here are the top places to stay in Sedona
- Here’s our 1-5 days in Sedona itinerary
- This our ultimate 7-day Sedona itinerary
Finally, if you’ll be visiting more places on the same trip, we recommend reading our Arizona travel guide for more helpful tips and advice.
Happy Travels,
Mark and Kristen
Was this guide helpful? Pin it for your visit!


All Rights Reserved © Where Are Those Morgans, LLC. Republishing this article and/or any of its contents (text, photography, maps, graphics, etc.) in whole or in part is strictly prohibited.
Mark and Kristen spent 6 years traveling the world, visiting over 40 countries across 4 continents and more than 30 US states. They created Where Are Those Morgans in 2018 to help others plan the best possible vacations by writing authentic travel and hiking guides based on their real experiences.
Since the arrival of baby Maya in late 2024, Mark and Kristen’s extensive travels have slowed down but they still take plenty of trips. Where Are Those Morgans now helps millions of travelers each year to visit new places and hike new trails through information-packed blog posts and expert travel guidebooks. Read more about Mark and Kristen.
My family of 4 (incl two teenagers) is headed to Arizona. We will have a couple days at GC South Rim and a day in Sedona, among other things we are doing in Page and Scottsdale. I’ve read your VERY helpful articles about hiking in these two locations. We will be “easy” day hikers just there to see the views and take in the beauty. I’m wondering what kind of packing we should do? Do we just bring a daypack with sunscreen, hats, etc.? How much water? That seems very heavy. Do most people use refillable water bottles, camelbacks, disposable water bottles? I’m at a loss on what and how much we need to bring for easy day hikes…Thank you for your advice!
Hi Jennifer, thanks for getting in touch and we’re happy to hear you have a family trip planned to Arizona. Yes, take sunglasses, hats and sunscreen, as well as plenty of water per person either in refillable bottles or camelbacks. Not sure exactly when you are headed to Grand Canyon and Sedona but in summer months when it can be dangerously hot you should definitely carry more water in both places. You certainly won’t need to carry as much water as you would if heading down into the canyon, so just take enough to be comfortable. You can buy or refill water at several places along South Rim, including both “ends” of the rim at Hermits Rest or Desert View Watchtower. Almost all hikes in Sedona are within 10-20 minutes drive of town, which means you can dip back in and out anytime you need a refill, but you should carry plenty water between your family when hiking out in the red rocks, just in case of any emergency. Hope that helps and have a fantastic trip!
This was fantastic! Leaving Friday and can’t wait to start hiking. Thanks for the great tips!
Thank you, Roger. Fantastic news, Sedona is one of the very best places to hike in the US and we know you’re going to have a blast! Enjoy!