
When planning our 8-day trip to Sedona in December 2021, we had hikes, ruins, jeep trails and photo spots coming out of our ears. But one of the things we were most excited about was finding Sedona’s hidden caves. We researched, mapped, figured out our itinerary and hit the red rocks on a mission to hunt as many caves as we could.
How did we do? Well, we made it to 6 caves, we missed one (it still hurts!) and we found a giant cave-like arch. From our experiences, we think just 3 of those caves are absolute must-do’s if it’s your first time visiting Sedona – Subway Cave, Birthing Cave and Soldier Pass Cave.

Hi, we’re Mark and Kristen Morgan. We left our scientific careers in 2018 to become travel writers and photographers, and since then our expert guides have helped millions of travel planners take better trips. Read more about us.
Why trust us with your Sedona caves plans? We personally hiked to 6 out of the 7 caves (and the bonus arch) during our trip to Sedona. Our tips and directions will help you do the same. All photos in this guide are ours.
What about the others? Keyhole Cave, Hideout Cave and Kachina Tree Cave are definitely worth it but they’re not easy to access, Raven Caves should be skipped entirely and Fay Canyon Arch is cool but not essential.
Here are the 3 caves we loved most and 5 caves we think you should only do with more time, ranked in priority order and based on our real experiences. This is exactly how we did it, what we learned – and everything you need to know if you want to follow in our footsteps.
SEDONA Planning
📖 Ultimate Sedona Guidebook: Get our complete 50+ page offline PDF with everything you need for Sedona.
📞 Personalized Sedona Planning Call: Book a 60 minute call with Mark to have your questions answered, optimize your itinerary, avoid tourist traps and get our best insider tips.
💡 Still Planning? Read our essential first-timer’s guide to visiting Sedona.
Note: Our content is reader supported and contains affiliate links. If you make a purchase through one of these links, we may earn a small commission at no extra cost to you and it helps us keep this site running.

Quick Summary
Must-do’s:
- Subway Cave: Photography and Instagram (9/10).
- Birthing Cave: Striking cave entrance (9/10).
- Soldier Pass Cave: Fun hike with more to see (8/10).
Do with more time:
- Keyhole Cave: Pure adventure (7/10).
- Hideout Cave: Get off the beaten path (6/10).
- Kachina Tree Cave: Well-kept secret (6/10).
- Fay Canyon Arch: Bonus cave-like formation (5/10).
- Raven Caves: Multi-chamber cave (3/10).
We’re going to give you the tools and information you need to find every cave. There’s a lot to read in this guide, but it’s all helpful and you need to know it if you want to complete the set. This is the guide we wished we had before our trip to Sedona!
Here’s what we’ll show you for each cave:
- Hiking statistics
- Our experience
- Tips and advice
- Pros and cons
Let’s kick things off with the popular Instagram favorite – Subway Cave.
1. Subway Cave (9/10)
- Distance: 5 miles roundtrip
- Elevation gain: 600 feet
- Difficulty: Moderate
- Time: 3 hours
- Trailhead: Boynton Canyon
- Parking: Limited and busy
- Best time: Early morning
- Parking pass: Required
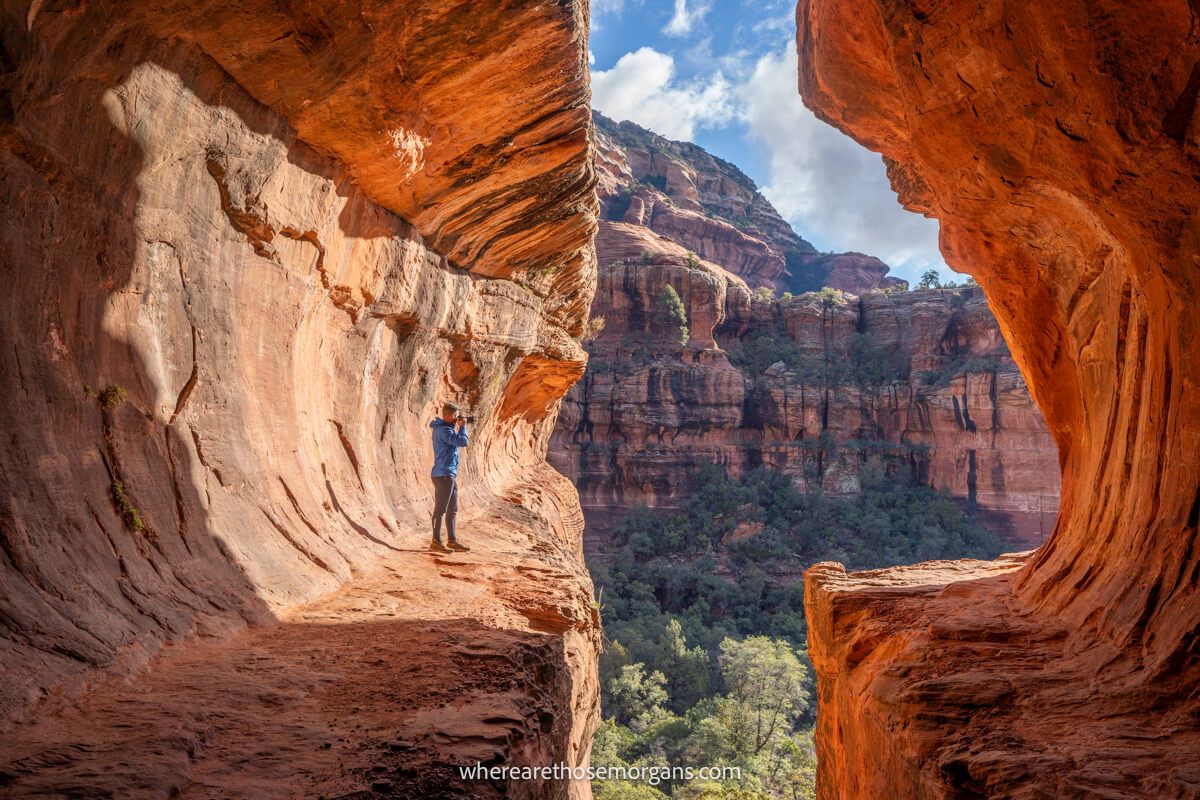
We found the Instagram-famous Subway Cave to be the most dramatic and photogenic cave in Sedona. The tunnel-shaped formation had a 5-foot gap from top to bottom like it had been sliced in half by the blade of a thick knife. Getting inside was a bit of a scramble but it wasn’t as bad as we were expecting after reading comments online.
Getting there: After parking at Boynton Canyon Trailhead, we hiked 2 miles until reaching a huge black and gray tree trunk on the left side of the trail, turned onto a spur path, followed a narrow path through vegetation, climbed a steep bank, walked around a curving sandstone ledge and carefully accessed the cave. Our Sedona Subway Cave guide shows you exactly how to find it.
Our hike: Boynton Canyon Trail was actually pretty flat and easy, but it had a moderately challenging climb at the end and a hard climb into the Subway Cave. After hiking the whole thing, we’d say the cave is unmissable but only continue to the end of trail if you have plenty of time in town. The views are good but not amazing like many other hikes in Sedona.
Why we think it’s a 9/10: The hike was fun, the trailhead was near other hikes on our list, the climb inside felt adventurous and it was immensely photogenic. We had it to ourselves, but we know it gets super busy which is the only reason we didn’t give it a 10/10. This is a must do, so don’t miss it.

Tips + Advice
Go in the off season: We had the cave entirely to ourselves for the full 30 minutes we spent taking photos because we visited on a weekday morning in December. But Subway Cave is the busiest and most popular in Sedona, so you must be prepared for crowds if you visit in spring or fall, on weekends or during holidays.
Wake up early: Do this hike first thing in the morning to get a parking spot and beat the crowds. Bonus – the Subway Cave is east facing which means it’s filled with light early in the day vs super contrasty later in the day.
Your backup plan: If you can’t get parked at Boynton Canyon Trailhead, go to the much bigger Fay Canyon Trailhead parking lot and hike the connecting Aerie Trail.
Accessing the cave: We took the left fork up a steep bank and skirted a ledge to get inside. But you can also climb up a steep slab of rock if you fork right instead – just know it’s a bit of a leap to get up onto that rock in the first place.
Pros + Cons
Here are our Sedona Subway Cave pros and cons:
Pros:
✅ Exceptionally photogenic
✅ Perfect for families with older kids
✅ Four popular hikes nearby
Cons:
❌ Overcrowded parking and trail
❌ Turn onto spur trail isn’t obvious
❌ Not for families with younger kids
2. Birthing Cave (9/10)

- Distance: 2 miles roundtrip
- Elevation gain: 270 feet
- Difficulty: Easy but moderate climb
- Time: 1.5 hours
- Trailhead: Long Canyon
- Parking: Limited spaces roadside
- Best time: Early to mid afternoon
- Parking pass: No
Our expectations were pretty low for Birthing Cave but it turned out to be one of our favorite experiences in Sedona. From the outside it didn’t even look like a cave but once we got inside, scrambled up to a depression and looked back out we were blown away by the cave’s teardrop-shaped entrance.
Getting there: After parking at Long Canyon Trailhead, we hiked 0.6 miles until reaching a broken wooden fence crossing the trail. The main path continued down the right fork, but we took a left turn and followed a spur trail for 0.3 miles as it climbed into the Birthing Cave.
Our hike: The final climb up to the cave was uneven and a bit of a lung-buster, but overall it was a super quick and easy hike. Missing the turn is the only part you need to worry about, but you can read our full Birthing Cave guide for step-by-step instructions.
Why we think it’s a 9/10: The hike was so easy, the photo opportunities were amazing and we had the cave to ourselves. It would be a 10/10 for us if it was a bit more adventurous. This is another must do.


Tips + Advice
Do the cave only: We didn’t bother hiking any more of Long Canyon Trail after going up to the cave because it didn’t look or sound exciting based on our research. Spend your time hiking other trails instead.
Backup parking: There’s a limited amount of parking spaces at Long Canyon Trailhead – your backup is Mescal Trailhead which has a connecting path to Long Canyon.
Do it after lunch: Birthing Cave’s east facing entrance is enormous so going early means you’d be looking straight at the sun. We went in the early afternoon and the light was perfect.
Pros + Cons
Here are our Birthing Cave pros and cons:
Pros:
✅ Much quieter
✅ Quick hike and easy access
✅ Stunning views
Cons:
❌ Limited parking
❌ Difficult to get in sphere
❌ Not the most exciting trail
3. Soldier Pass Cave (8/10)
- Distance: 4.2 miles roundtrip
- Elevation gain: 750 feet
- Difficulty: Moderate
- Time: 3 hours
- Trailhead: Soldier Pass
- Parking: Extremely limited
- Best time: Afternoon
- Parking pass: No
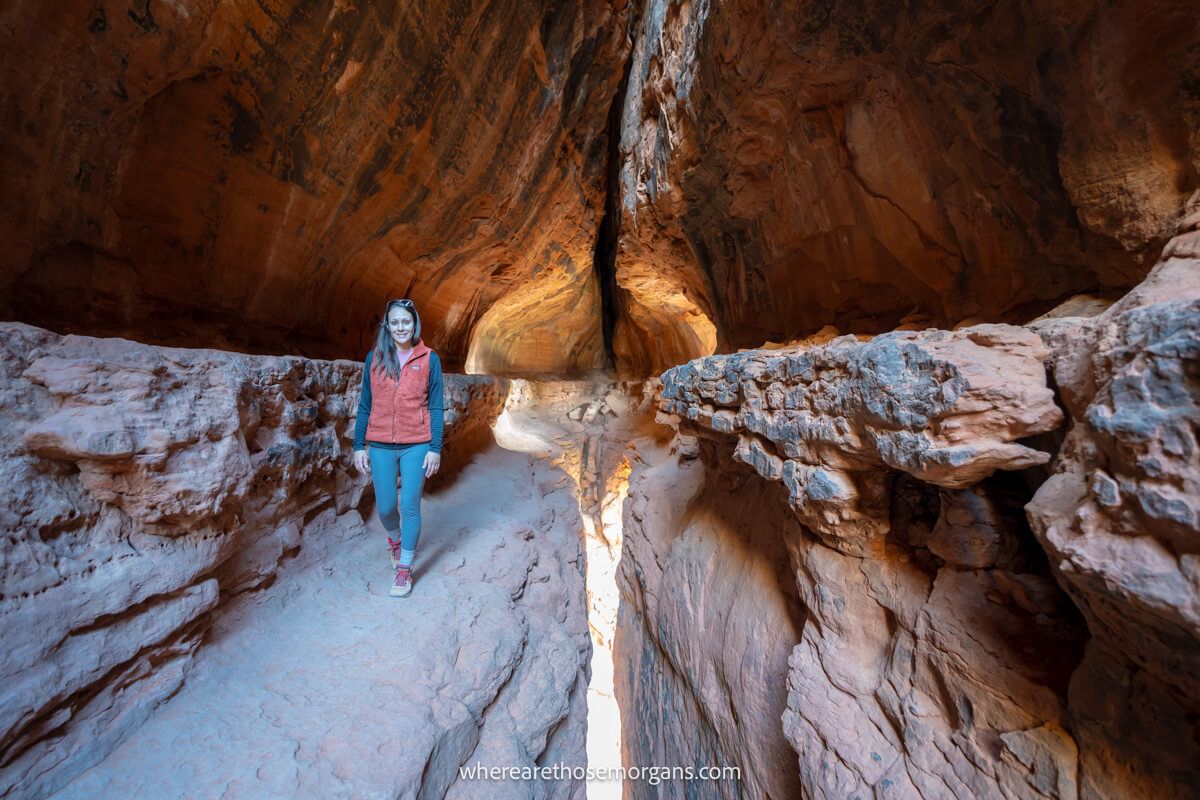
We knew Soldier Pass Cave was going to be busy based on the research we’d done, so it had a reputation to live up to in our eyes. And boy did it. Climbing into the cave was tricky because we had to use our hands and upper body strength, but it was worth it for the unique interior – which we thought looked a bit like the eye of Sauron.
Getting there: After reading there were only 14 parking spaces at the trailhead, we decided to save this hike until we’d rented our jeep because we knew we could drive up the adjacent 4WD road and access the cave without dealing with parking issues. The spur trail leading to cave was easy to spot thanks to a wilderness sign stuck to a tree trunk, then it was all uphill on a pretty obvious path.
Our hike: We drove to Devils Kitchen sinkhole and Seven Sacred Pools before parking our jeep at the end of the 4WD road. Then we walked clockwise for just a few minutes before taking the spur. The ascent was more tiring than we’d expected, but it was well worth the effort. Read our Soldier Pass Trail guide to learn more about getting to the cave.
Why we think it’s an 8/10: We loved the fun and varied trail preceding the cave, which made it a more complete experience than the other caves we did in Sedona. If parking was easier and the trail was quieter it could easily be a 10/10. This is our final must do.

Tips + Advice
Don’t park at Soldier Pass Trailhead: With just 14 spaces available at a trail this busy, you’re all but guaranteed to sit in a line of cars waiting for a space to open up. Either park at Jim Thompson Trailhead and walk Cibola Trail to join Soldier Pass Trail, or take the Sedona shuttle from Posse Grounds park and ride instead.
Go later in the day: Soldier Pass Cave is west facing so do it as your last hike of the day when sunlight hits the cave entrance directly and illuminates the three chambers inside. It will be dark inside if you go in the morning. We went mid-afternoon which worked well for light.
Brins Mesa: If you have time, complete a full hiking loop on Brins Mesa Trail rather than just going out and back to the cave. It’s longer, but you’ll find far fewer people do the loop and it shows off some of Sedona’s finest scenery.
Pros + Cons
Here are our Soldier Pass Cave pros and cons:
Pros:
✅ Uniquely striking formation
✅ Varied hike overall
✅ Perfect for families
Cons:
❌ Very popular and busy
❌ Tricky cave access
❌ Small inside the cave
Need help planning your trip to Sedona?
Our expert guidebook will help you plan every aspect of your visit. No fluff, just top experiences, our hidden gems, itinerary ideas, insider tips, exclusive map and more.

4. Keyhole Cave (7/10)

- Distance: 2.3 miles roundtrip
- Elevation gain: 500 feet
- Difficulty: Hard
- Time: 3 hours
- Trailhead: Sugar Loaf
- Parking: Limited lot with 12 spaces
- Best time: Mid morning to mid afternoon
- Parking pass: Yes
By far and away the most adventurous cave hike we did in Sedona was to the Keyhole Cave. This one really was like getting lost in wilderness and actually having to think about where we were going. The climb to get inside was intense but views from the chamber were magnificent and it felt more like a real cave than any of the others.
Getting there: We parked at Teacup/Sugarloaf Trailhead, walked up the Teacup Trail until it joined Thunder Mountain Trail and then basically carved our way north through rough desert vegetation on no particular path. Eventually we reached the entrance, took the right approach instead of left (although they were similar in difficulty) and pulled ourselves up.
Our hike: Keyhole Cave had the hardest hike and climb out of all the caves we did by a landslide. After going beyond Teacup Trail, the hike was all pathfinding and tracking back if we hit anything we couldn’t pass. We tended to stay above the wash rather than snaking through the wash because it would have added on a bunch more time. Here’s our guide to hiking Keyhole Cave to learn more.
Why we think it’s a 7/10: Despite the thrilling hike and massive cave blowing us away, we don’t think this one is for every visitor. It’s hard, the desert vegetation is a nightmare and not everyone will be able to do the cave climb. It’s a must do for adventurers, but most people should skip this one.


Tips + Advice
Footwear: Wear robust shoes or boots with thick hiking socks and pants to combat those aggressive prickly plants. Mark got loads stuck in his foot through his trail runner and it wasn’t fun plucking them out.
Planning your route: You can just about see the cave entrance in a distant cliff, so keep heading directly for it rather than zig-zagging otherwise you’ll add tons of time to the hike.
Use rope if it’s there: When we climbed into the cave someone had kindly left rope dangling down from the chamber to the bottom of the entrance. We thoroughly tested it to make sure it wasn’t going to break, and Kristen found it helpful to take some of the weight.
Be respectful: Most of the hike passes through a wilderness area with no maintained trail. You must respect the land and avoid causing damage to the vegetation or cave.
Backup parking isn’t great: There’s only 12 spaces at Sugarloaf/Teacup Trailhead – and your only backup option Andante Trailhead has even fewer spaces. It’s also residential so be courteous and quiet.
Go early or late: Keyhole Cave is southwest facing, which gives you good lighting inside but poor lighting looking out straight at the sun. Go early morning or later in the day for the best balance.
Pros + Cons
Here are our Keyhole Cave pros and cons:
Pros:
✅ Very impressive inside
✅ Adventurous off-trail hike
✅ Not as well known
Cons:
❌ Very limited parking
❌ Rough vegetation can hurt
❌ Cave access is hard
5. Hideout Cave (6/10)

- Distance: 3 miles roundtrip
- Elevation gain: 450 feet
- Difficulty: Moderate
- Time: 2.5 hours
- Trailhead: FR 525C / FR 9530
- Parking: Plenty of space
- Best time: Early morning
- Parking pass: No
We really wanted to see a cave that was secluded, isolated and completely free of crowds during our time in Sedona – and the Hideout Cave, which is also known as Shaman’s Cave, delivered exactly what we were looking for. It was a nightmare to reach and we wouldn’t have bothered if we didn’t hire the jeep, but we really felt like we were alone in the red rock wilderness.
Getting there: It took us 45 minutes to drive from our hotel in West Sedona to the parking area at Robbers Roost Trailhead near the cave. The gravel roads were doable for 2WD cars until around 1 mile before the trailhead when we turned onto FR 9530 which was 4WD only (this is where you’ll park in a 2WD car).
Our hike: After parking, we walked down and back up a deep V-shaped depression, climbed a group of rocks and then shimmied into the Hideout Cave across a narrow ledge which had a big drop off. It was short and easy, but the cave access was a bit sketchy. Read more in our Robbers Roost Trail guide to Hideout Cave.
Why we think it’s a 6/10: The cave’s two windows were great for photos (especially the smaller round one) and the views were sensational, but the drive was a killer and it’s a long way to go just to see a cave. With a 4WD it’s definitely worth doing, otherwise skip it.

Tips + Advice
Driving isn’t easy: The gravel roads were slow and dusty, and ATV’s would go screaming past us kicking back stones at our rental jeep which wasn’t especially enjoyable.
Only do it with 4WD: Honestly, after doing it we’d say it’s really not worth it if you only have a 2WD vehicle. The drive is rough, but worse is the extra mile each way hiking up FR 9530 which is totally exposed and rocky.
Go earlier than we did: We arrived into the cave at 11:30am and it was already covered in deep shadows, which would only get worse later in the day. If we did it again, we’d get in there for sunrise because the larger window has unobstructed east facing views.
Pros + Cons
Here are our Hideout Cave pros and cons:
Pros:
✅ Quietest cave in town
✅ Stunning views from inside
✅ Easy hike with 4WD vehicle
Cons:
❌ Furthest cave from town
❌ Cave access is tricky
❌ Long exposed hike without 4WD
6. Kachina Tree Cave (5/10)
Hiking Statistics
- Distance: 3 miles roundtrip
- Elevation gain: 500 feet
- Difficulty: Moderate
- Time: 2 hours
- Trailhead: Boynton Canyon
- Parking: Limited and busy
- Best time: Mid morning
- Parking pass: Yes
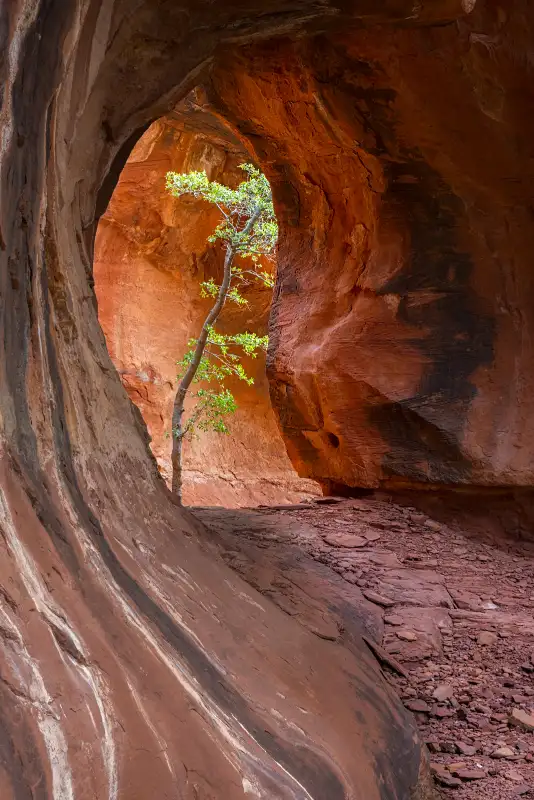
Remember earlier when we said we missed a cave? This was it. Back when we were researching and planning, we didn’t see any mention of Kachina Tree Cave – not even when looking into the Subway Cave which is on the exact same hike through Boynton Canyon. So we’re including it in our guide because we don’t want you to miss it like we did.
Getting there: Finding the spur trail is the hardest part. After realizing we’d missed it, we jumped on our maps app and zoomed into Boynton Canyon on satellite mode and after a lot of searching we finally found it. The spur trail is a left turn off the main path a few minutes after passing the last residential buildings.
Why we think it’s a 6/10: Even though we didn’t do it, we still give Kachina Tree Cave a 6 because it can be done alongside Subway Cave and the lone tree is a unique photo opportunity. Why not higher? Because it’s very hard to find the turnoff, the climb is up a steep bank and the same problems with parking apply. It’s worth doing if you’re already doing Subway Cave, otherwise skip it.
Tips + Advice
Finding the spur: After around 1.3 miles, look for a collection of tree branches on the ground not far beyond the residential area. You’ll walk through a wash and climb a steep unmarked bank to reach the cave.
The tree lights up in the morning: Plan your hike to do Subway Cave first, then Kachina Cave on the way back to the trailhead. It works better for both caves because sunlight penetrates into Kachina Cave between 9:00am-11:00am and illuminates the lone tree.
Pros + Cons
Here are our Kachina Cave pros and cons:
Pros:
✅ Unique lone tree
✅ Almost unknown
✅ Close to trailhead
Cons:
❌ Very limited parking
❌ Spur trail not marked
❌ Steep climb to cave
7. Fay Canyon Arch (5/10)

- Distance: 1.5 miles roundtrip
- Elevation gain: 250 feet
- Difficulty: Moderate
- Time: 1 hour
- Trailhead: Fay Canyon
- Parking: Larger lot than usual
- Best time: Late afternoon
- Parking pass: Yes
We know this is a guide about caves, but as we stood underneath Fay Canyon Arch we both agreed it looked and felt just like some of the other caves we’d visited in Sedona. The steep bank climb to reach the arch was a thigh-burner, but it was well worth it for yet more stunning views and photos.
Getting there: After parking at Fay Canyon Trailhead (which has way more spaces than most other lots in Sedona), we hiked 0.75 miles on the flat and easy Fay Canyon Trail, kept a close eye on the exact place that the tall cliffs to our right side met the top of the steep bank, and finally located the arch.
Our hike: The hike was super easy until we turned right and started climbing on a steep and uneven zig-zagging path to the arch. Are you up for a bit more adventure? After the arch we dropped back to the main trail, continued to the end of trail sign and then climbed up a steep unmarked rock which led to fantastic views looking back down Fay Canyon.
Why we think it’s a 5/10: Honestly, we’re being a bit harsh here but our rating reflects the fact it’s not classed as a cave. But it was an impressive formation and it had a similar flame-shaped entrance to Birthing Cave as we looked back out at the view. What if it was called Fay Canyon Cave? Well, then we’d give it a 7/10. It’s worth doing but it’s not essential.

Tips + Advice
Locating the arch: Don’t worry about missing the arch, it’s pretty obvious when you see it. Just track the top of the bank and bottom of the cliffs until you see a gap.
End of trail climbs: There are two unofficial climbs you can do after the end of trail sign – west ascent and east ascent. They’re both totally unmaintained and hard to climb, so only try them if you’re a strong hiker and don’t have a fear of heights. We did west ascent and it was a cool experience.
Afternoon is best for light: We hiked up to Fay Canyon Arch first thing in the morning and it was all in total darkness because it’s a southwest facing view. Go later in the afternoon so the arch illuminates, but the sun is high enough in the sky so you’re not looking straight at it.
Pros + Cons
Here are our Fay Canyon Arch pros and cons:
Pros:
✅ Striking natural arch
✅ Just 0.75 miles each way
✅ Ample parking spaces
Cons:
❌ Steep climb to the arch
❌ Dark deep morning shadows
❌ It’s not an official cave
8. Raven Caves (3/10)

- Distance: 0.5 miles roundtrip
- Elevation gain: 50 feet
- Difficulty: Easy
- Time: 45 minutes
- Trailhead: Raven Caves
- Parking: 4 or 5 spaces
- Best time: Late afternoon
- Parking pass: No
We write travel guides for a living, so we felt compelled to go to Raven Caves for the sake of completeness before creating this guide. It was fine – but if you imagine Sedona’s other caves as the main course, Raven Caves wasn’t even the appetizer, it was the piece of bread you get when you sit at the table.
Getting there: We parked in the dodgy-looking roadside dirt patch on the south side of Sedona, walked down some sharp rocks and turned around a right corner to see a tiny entrance to a small series of interconnected caves. At first we didn’t think the trail was legit and almost turned around!
Our hike: It wasn’t much of a hike, it was more of a quick walk and scramble down some pretty jagged rocks. We were the only people parked, on the trail and inside the caves.
Why we think it’s a 3/10: The parking, hiking and actual caves themselves aren’t great compared to every other cave in this list. It’s also nowhere near any other caves or hikes, so overall we’d say skip this one for sure unless your goal is to see all 8.


Tips + Advice
Limited parking: There’s only room for maybe 4 cars to park, and there’s no backup options because it’s right on the main road running south from Sedona.
The caves are small: The only way to get through Raven Caves is to duck and stay crouched down. In its defense, the caves are actually quite cool inside but the views aren’t anything to shout home about.
Go in the late afternoon: Raven Caves is west facing, so late afternoon or even early evening is best when light pours inside the cave network. In the morning you’ll find the caves to be very dark inside.
Pros + Cons
Here are our Raven Caves pros and cons:
Pros:
✅ Shortest trail to reach a cave
✅ Extremely quiet and unknown
✅ Fill with light in afternoon
Cons:
❌ Not very exciting
❌ Only 4 parking spaces
❌ Have to duck through chambers
Map
Click or touch the map below to activate, zoom in and out, and scroll around. If you’d like to see a bigger version, click the “view larger map” icon in the top right, and if you’d like to see any specific cave, click the arrow and square icon in the top left.
Map key:
- Blue – Hiking trailheads
- Orange – Cave locations
One Day Caves Itinerary

If we only had one day in Sedona to tick off as many caves as possible, this is exactly how we’d do it:
- Subway Cave – Arrive as close to sunrise as possible to you get the best light and beat the crowds.
- Kachina Tree Cave – Stop on the way back to the trailhead for best light between 9:00am-11:00am.
- Birthing Cave – Drive to Long Canyon Trailhead and hike the trail to arrive at the cave just after lunch time for best light.
- *Soldier Pass Cave – Take a shuttle and hike to Soldier Pass Cave in the afternoon.
- *Keyhole Cave – Or alternatively, if you’re feeling adventurous take on the Keyhole Cave instead.
If you can split up the caves over a few days, try to visit them all when they have the best light and group them together by location for better efficiency. Just remember, there’s tons more to do in Sedona so prioritize Subway Cave, Birthing Cave and Soldier Pass Cave then do the others if you have plenty of time.
Tip: Remember the 7 principles of leave no trace when hiking to caves and take care not to disturb formations, ancient sites or wildlife in any area you visit.
Parking Passes

The following trailheads require parking passes:
- Soldier Pass Cave – If you park at Jim Thompson Trailhead
- Subway Cave and Kachina Cave – Boynton Canyon parking requires a pass
- Keyhole Cave – Parking at Sugarloaf/Teacup Trailhead requires a pass
Buy a Red Rock Pass at this recreation.gov site in advance, or buy one from a ticket machine at select Sedona trailheads. It costs $5 for 1 day, $15 for 7 days or $20 for an annual pass.
Insider Tip: We used our America The Beautiful Pass in place of a Red Rock Pass at hiking trailheads in Sedona.
What To Pack
- Footwear – Wearing robust shoes with good grips and traction helped us climb up steep slick rock banks. Many of the caves were challenging to access and we were glad to have proper shoes on.
- Water – Many of the cave hikes we did were open and exposed so we packed a lot of water. If we visited in summer we’d pack even more water and even electrolyte drinks.
- Sun protection – We visited in December so it wasn’t too hot but sunglasses, sun hats, long layers and sunscreen are vital if you go to Sedona in summer.
- Winter – The mornings and evenings were very cold during our trip to Sedona in December. We packed layers, gloves and hats for early hikes, but we made sure our backpacks were empty so we could pack our layers once the day warmed up.

Next Steps
We hope our guide to finding the hidden caves helps with planning your trip to Sedona.
Don’t forget you can book a travel planning video call with us if you’d like our expert help organizing your trip to Sedona. We can answer any questions you have or walk through a personalized itinerary to make the most of your time.
Still researching for your trip?
- What to know about a first trip to Sedona
- Here are the top things to do in Sedona
- Here’s exactly where to stay in Sedona
- These are the unmissable hikes in Sedona
- Here’s our 1-5 days in Sedona itinerary
- This our ultimate 7-day Sedona itinerary
Finally, if you’ll be visiting more places on the same trip, we recommend reading our Arizona travel guide for more helpful tips and advice.
Happy Travels,
Mark and Kristen
Enjoy this guide? Pin it for your visit!


All Rights Reserved © Where Are Those Morgans, LLC. Republishing this article and/or any of its contents (text, photography, maps, graphics, etc.) in whole or in part is strictly prohibited.
Mark and Kristen spent 6 years traveling the world, visiting over 40 countries across 4 continents and more than 30 US states. They created Where Are Those Morgans in 2018 to help others plan the best possible vacations by writing authentic travel and hiking guides based on their real experiences.
Since the arrival of baby Maya in late 2024, Mark and Kristen’s extensive travels have slowed down but they still take plenty of trips. Where Are Those Morgans now helps millions of travelers each year to visit new places and hike new trails through information-packed blog posts and expert travel guidebooks. Read more about Mark and Kristen.