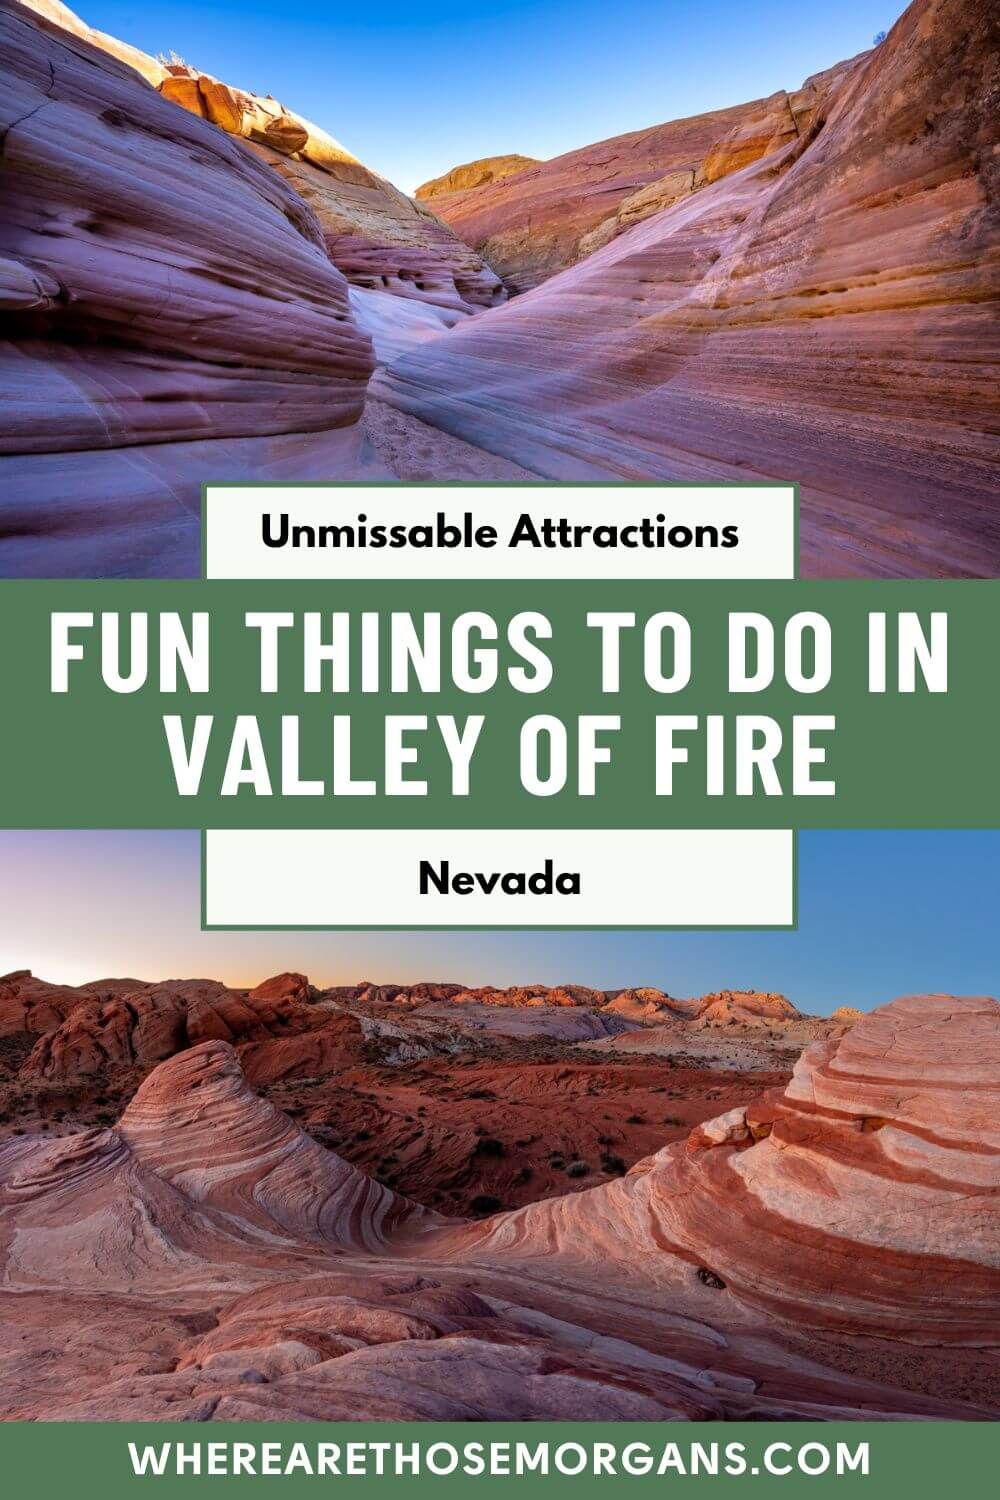
When we planned our 2 month road trip from Seattle to Sedona in November 2021, Valley of Fire State Park wasn’t on our “most excited about” list. We’d already done Las Vegas and Zion, and we couldn’t wait to spend more time in both places. But Valley of Fire? It was more of a stepping stone, a detour, a way to break up the drive.
Any guesses what happened next? What started as a quick side trip turned into nearly 2 full days exploring one of the most underrated natural wonders in the American Southwest. We watched in awe as a stunning sunrise illuminated swirling red rock formations at the Fire Wave, and our landscape photos from Valley of Fire were even selected for publication in this Gestalten book.

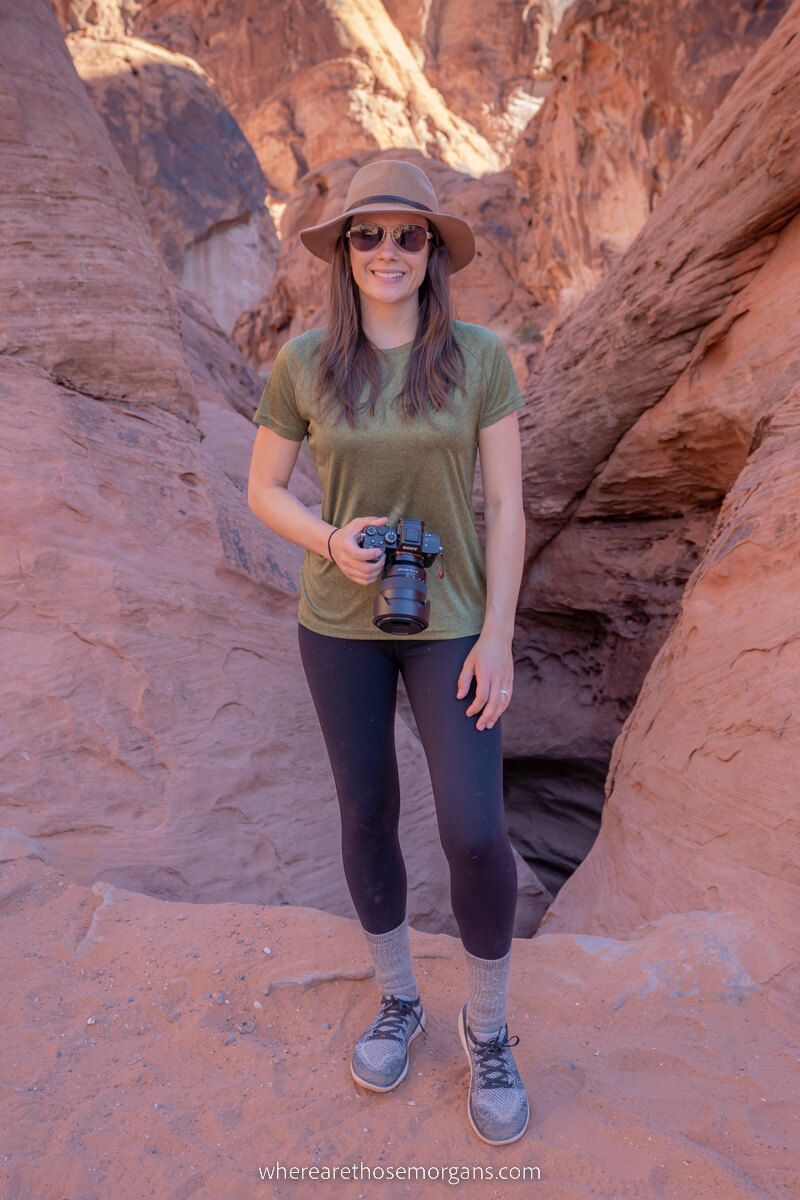
Hi, we’re Mark and Kristen Morgan. We left our scientific careers in 2018 to become travel writers and photographers, and since then our expert guides have helped millions of travel planners take better trips. Read more about us.
Why trust us with your Valley of Fire plans? We spent 2 days blasting around every part of the park, we did a sunset and a sunrise, and we hiked all the trails. So we know what’s worth doing and what isn’t.
It only took us an hour to reach Valley of Fire from our hotel on the Las Vegas Strip, and it was a little over 2 hours to Zion after we left the next day. Where did we stay overnight? The North Shore Inn in Overton, just 15 minutes from the park’s east entrance. There wasn’t much going on but it had a few hotels and places to eat, plus it allowed us to do both sunset and sunrise which were well worth it.
Here are the 10 best things we actually did in Valley of Fire State Park and 5 things we think you can skip on a first visit, based on our real experiences exploring Nevada’s hidden gem. This is exactly how we did it, what we learned, what we loved, what we’d do differently – and everything you need to know if you want to follow in our footsteps.
Note: Our content is reader supported and contains affiliate links. If you make a purchase through one of these links, we may earn a small commission at no extra cost to you and it helps us keep this site running.

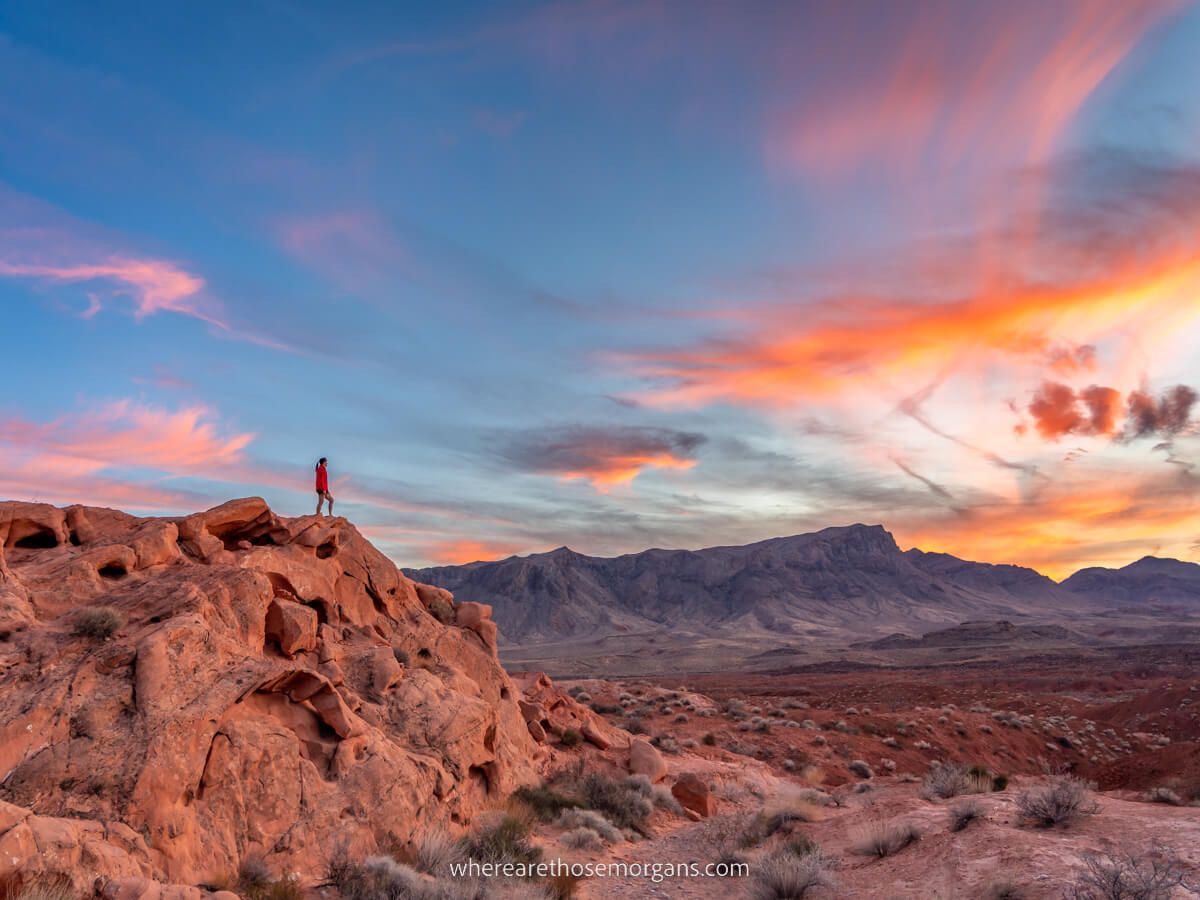
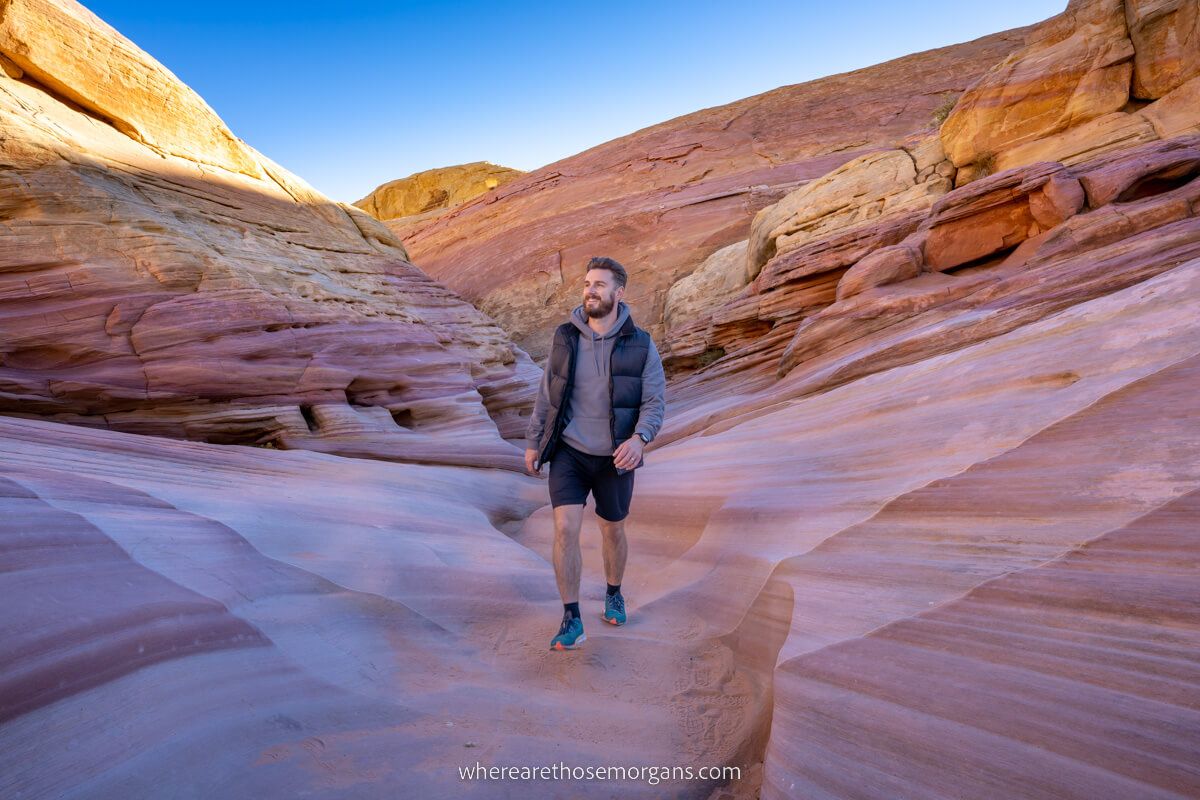
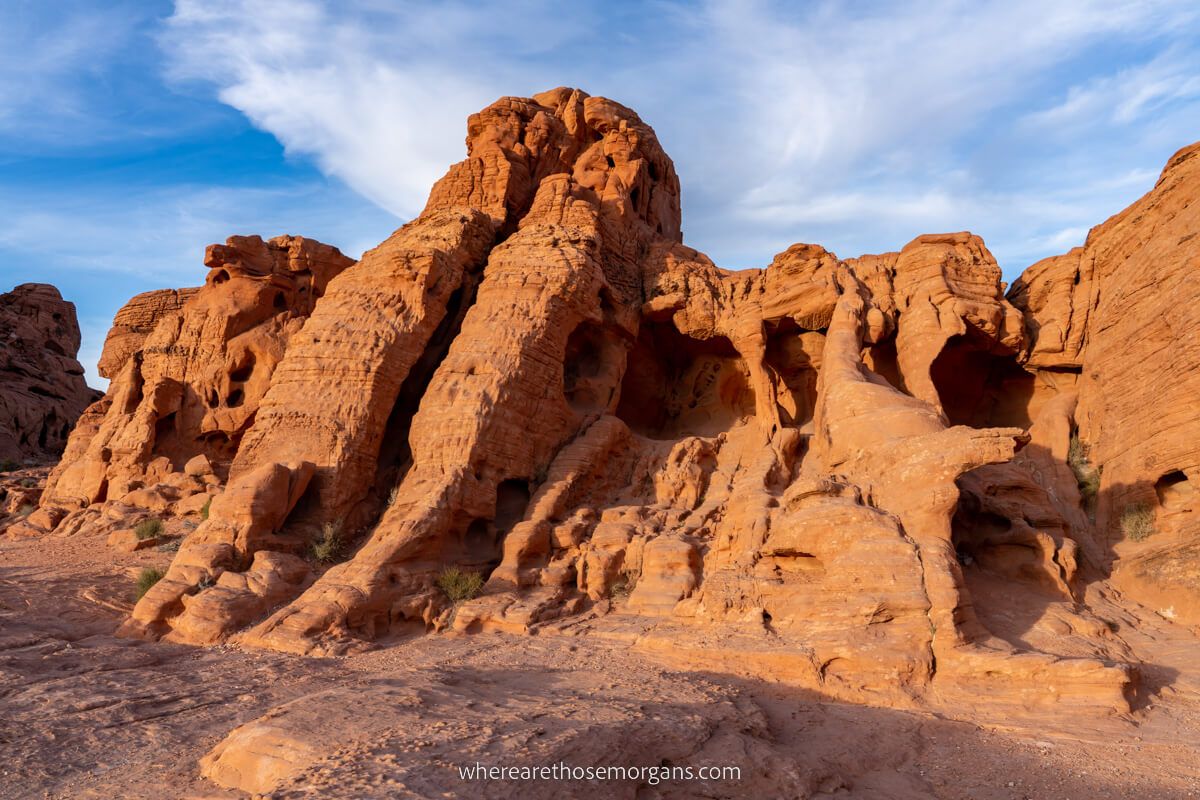
Be Blown Away By Sunrise At The Fire Wave
Standing completely alone at the Fire Wave as powerful sunrise beams of light illuminated the swirling red and white sandstone formations all around us was genuinely a magical experience. It’s easily our favorite place in Valley of Fire, and the sunrise will always be something we remember as a major highlight from our travels around the US.
What made the Fire Wave unforgettable: We left our Overton hotel at 5:30am in total darkness, drove to the trailhead, hiked the easy 1.5-mile trail by headlamp and arrived at the Fire Wave 30 minutes before sunrise. Being the only 2 people there felt like having a private showing of nature at its finest. Here’s our full guide to hiking the Fire Wave Trail to learn more.
Taking photos: The landscape made it easy! We rushed around the domes and curves finding new angles and contrasts, then we just sat and waited for the sun to burst out from behind formations to the east. We have also hiked The Wave in Arizona which has a ridiculously hard-to-win permit lottery, but we love the Fire Wave as a fantastic backup option for stunning landscape photos if you can’t get a permit.
What you need to know:
- 1.5 miles roundtrip, 250 feet elevation gain
- No permit required (unlike Arizona’s The Wave)
- Best at sunrise or sunset
- Park at Fire Wave Trailhead off Mouse’s Tank Road
- Allow 2 hours (3 hours with photos)
Insider Tip: Going to the park straight from Vegas? Check sunrise times and set off from your hotel on the Las Vegas Strip at least 2 hours 30 minutes before sunrise.
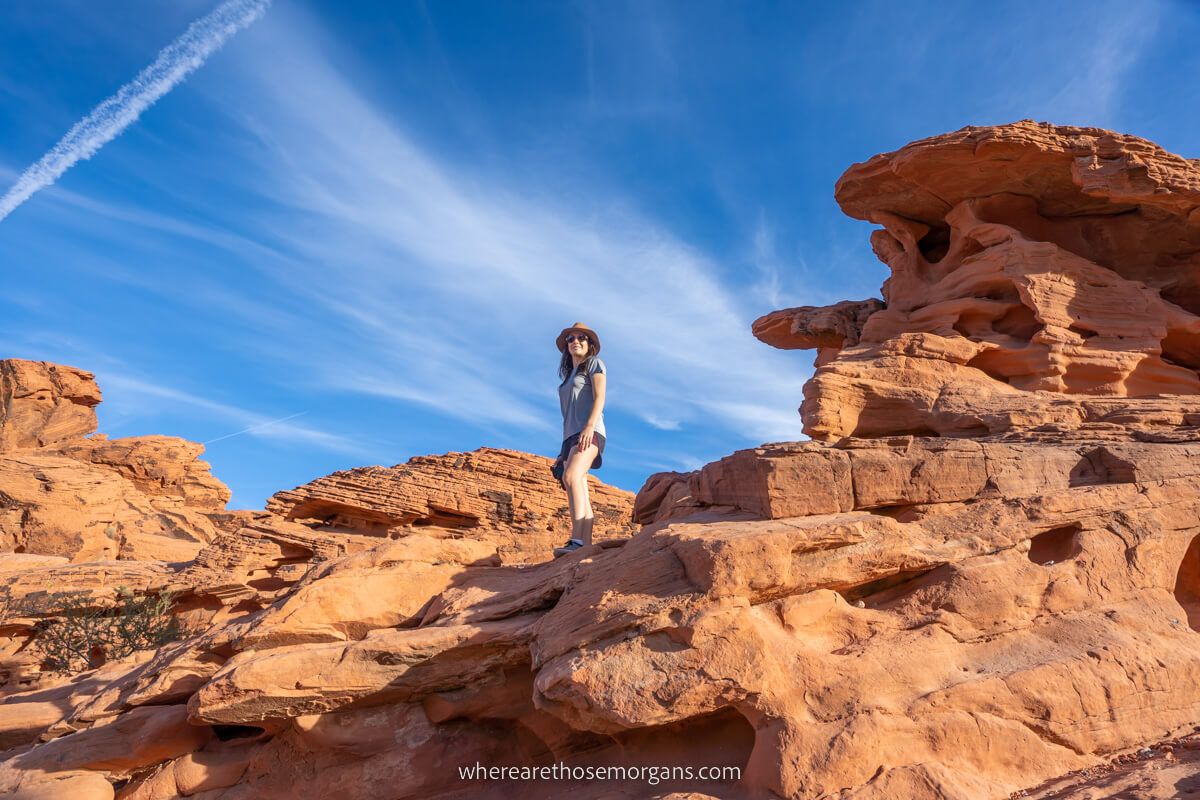
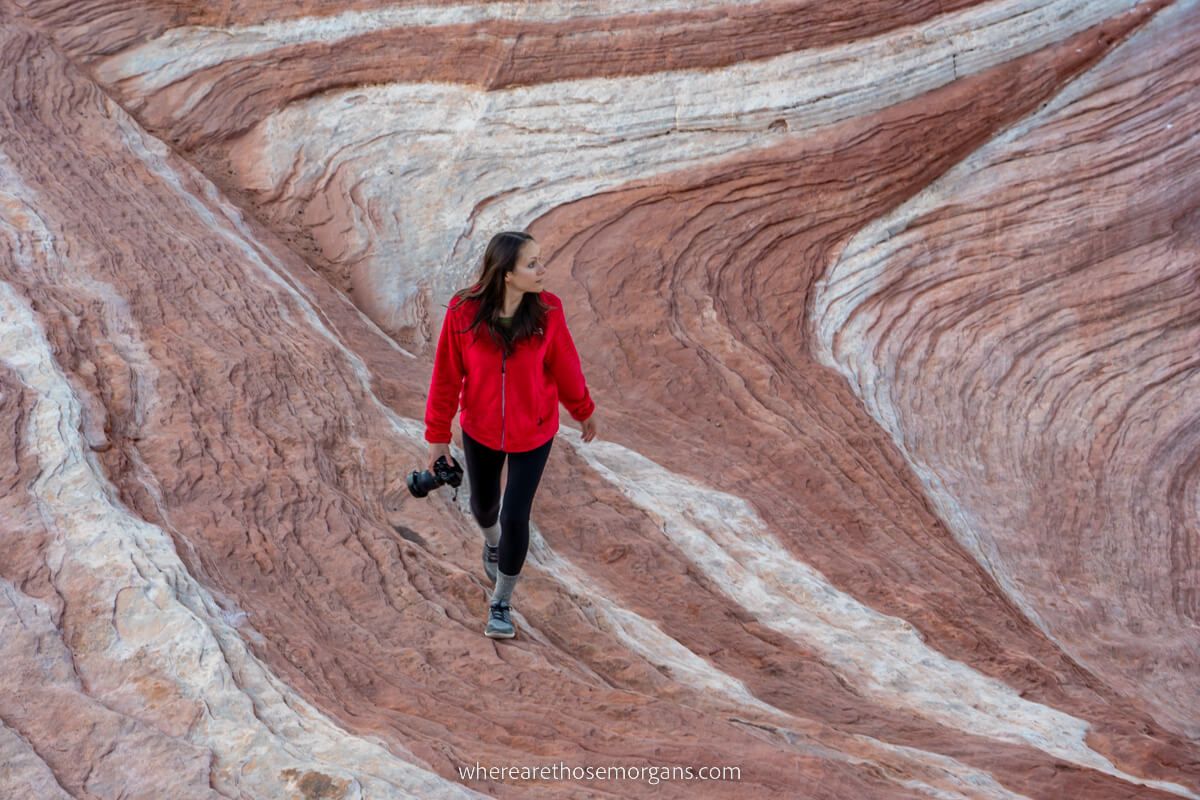
Get The Famous Mouse’s Tank Road Photo
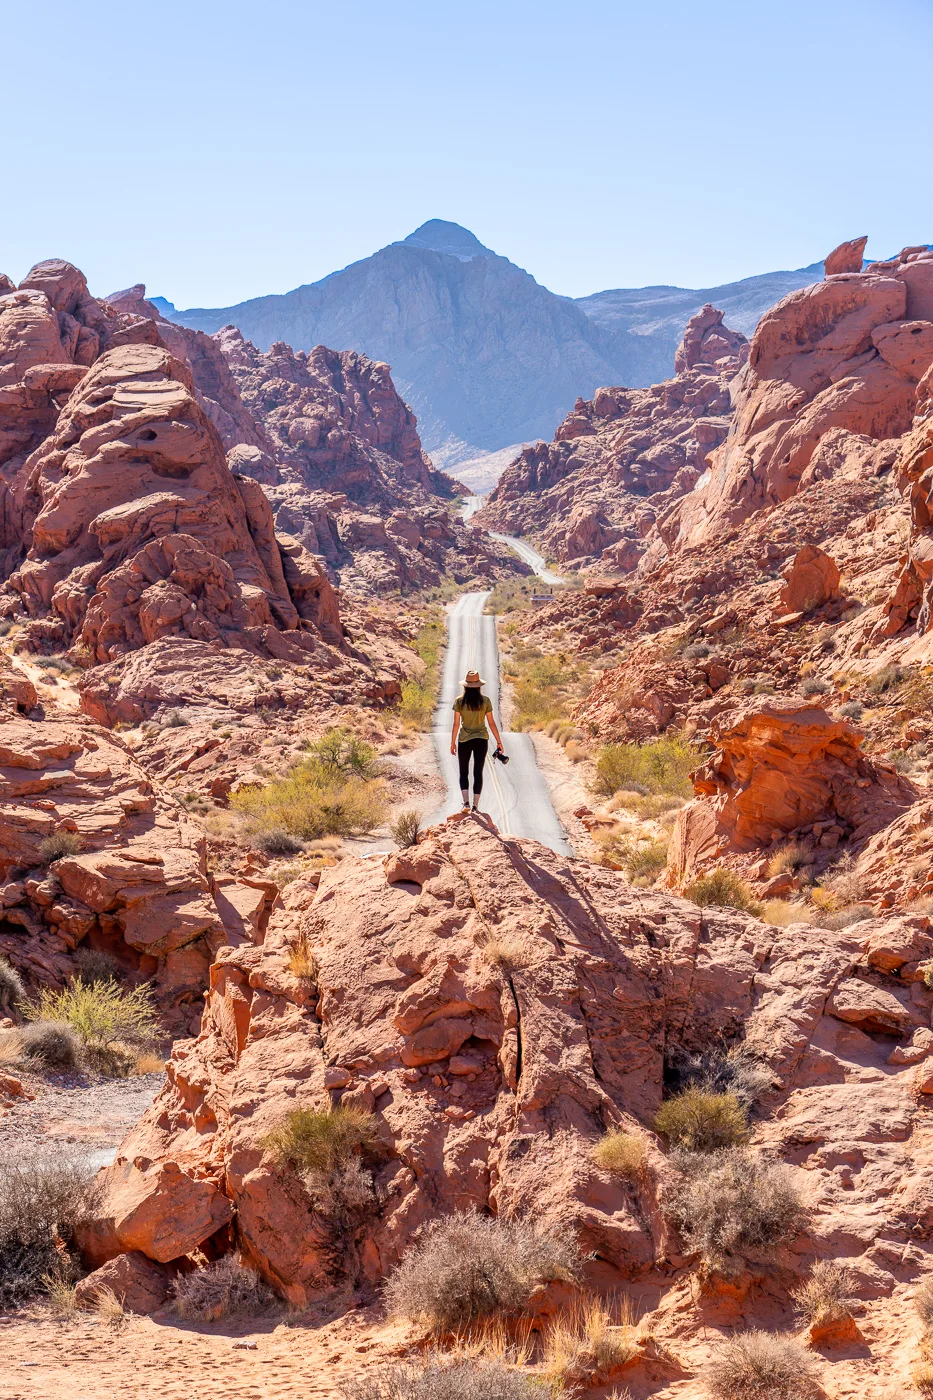
Every iconic Valley of Fire image features this dramatic shot: a lone person standing on red rocks with a narrow road cutting through the canyon towards distant mountains. We spent an hour perfecting our perspective, and we had so much fun doing it.
Our Mouse’s Tank Road photo process: We parked at Rainbow Vista, carefully crossed the road and walked south towards the famous viewpoint. Mark stayed at the perfect camera angle while Kristen climbed onto a tall rock formation to become the subject. The hard part was lining up the road, the subject and the mountain backdrop perfectly – but we got there in the end.
What we learned: This photo requires a bit of patience and teamwork. Walkie-talkies would have been handy! The rocks are sharp and uneven, so we really took our time finding safe footing. We both took turns being the subject, but it turned out Kristen was better at posing for this one.
What you need to know:
- Here’s the map location for parking
- Cross the road and head south
- Use a telephoto lens to compress the scene
- Plan for 1 hour with photos
Insider Tip: Get this photo at dawn or dusk for the best light and colors. We did it in the middle of the day which meant there were no shadows in the canyon, but next time we’d do it before sunrise or after sunset.
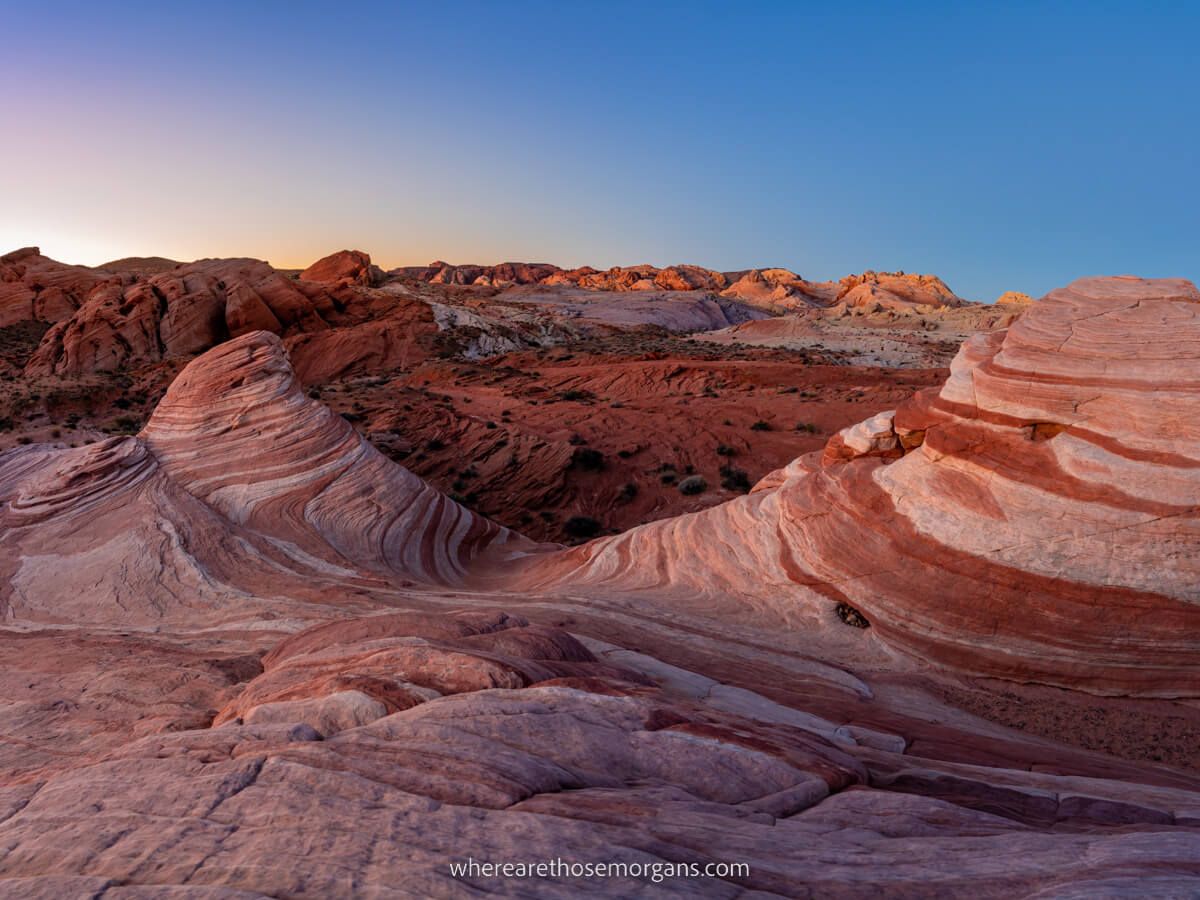
Hike The Surprisingly Fun White Domes Trail
Our easy 1-mile hike around White Domes Trail at the very end of Mouse’s Tank Road was way better than we expected. We thought it would be a simple walk but it turned out to be a fun adventure through slot canyons, deep sand and colorful rock formations.
The unexpected highlights: The slot canyon felt like a mini version of Utah’s famous slots, the diverse terrain kept us engaged every step of the way and the rock formations were surprisingly photogenic. We can confidently say White Domes was our second favorite hike in Valley of Fire.
What you need to know:
- 1 mile loop, 200 feet elevation gain
- Deep sand and uneven rocks
- Perfect for families with energetic kids
- Trail is very easy to follow
- Takes around 1 hour
Insider Tip: Check out Seven Wonders Trail, a 2-mile hike with 200 feet elevation change which includes Fire Wave, Pink Canyon, Striped Rock, Kaolin Wash, Crazy Hill, Thunderstorm Arch, Fire Cave and the loop around White Domes.
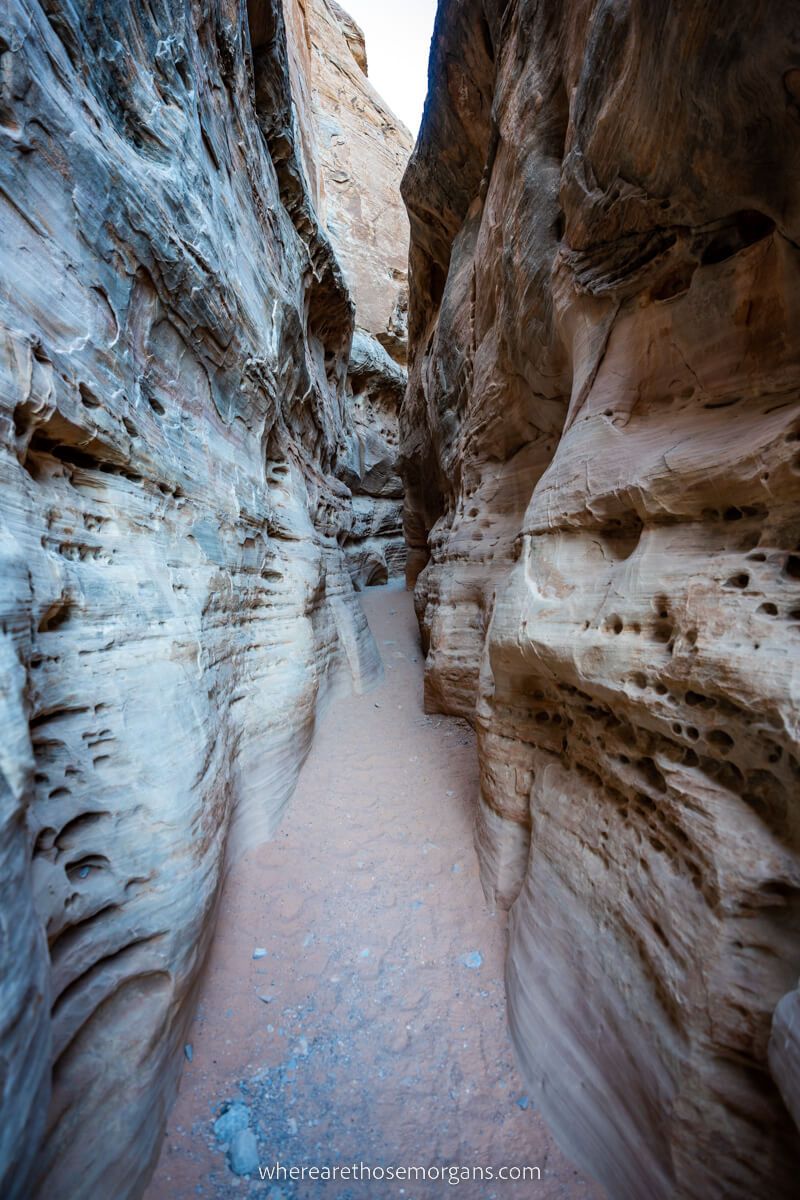
Walk Through The Hidden Gem Pink Canyon
The narrow V-shaped Pink Canyon wowed us with stunning layers of pink and blue rocks. It was easily our favorite hidden gem photo spot in the park (a lot of people miss it), and we honestly think the Pink Canyon should be second on every photographers wishlist after the Fire Wave.
How we saw Pink Canyon: We parked at this unmarked pullover on Mouse’s Tank Road and walked a short sandy trail to reach the canyon entrance. Once inside, the layered rock walls created incredible natural frames and the vibrant colors were astonishing.
Why we loved it: Pink Canyon felt like our own private slot canyon. We had it entirely to ourselves and it really was fantastic for taking fantastic photos with ease. The topography did all the work, all we had to do was walk through it and smile.
What you need to know:
- You can access Pink Canyon behind the Fire Wave
- Easy scrambling through the canyon
- Best early or late to avoid contrasting shadows
- Perfect for social media photos and videos
- Easy to see in under 1 hour
Find Solitude At The Beehives
Our second stop in the park was to walk among unique cone-shaped sandstone formations with honeycomb patterns at The Beehives. The area closest to parking was busy but we found complete solitude just a few minutes walk away, and looking back we think The Beehives is a perfect introduction to Valley of Fire’s incredible diversity.
How we avoided the crowds: The Beehives were swarming with people as we arrived, so we simply walked deeper into the formation. Within 2 minutes we had the isolation we were craving, and the eroded rocks had more holes, grooves and beehive-like shapes than those near the parking area. So it was a win-win.
What you need to know:
- First stop after entering west entrance
- Ample parking available
- Whole area is uneven rock surfaces
- Best photos well away from parking area
- Takes less than 1 hour to see
Wade Through Deep Sand Into Petroglyph Canyon
The flat but sandy walk into Petroglyph Canyon led us past ancient rock art to a dead end at Mouse’s Tank, a natural water collection point in the rock that fills after rainfall. Once we reached the end and looked around at the Swiss cheese-like rock formations, we had one of those lightbulb moments “Ahh, that’s why it’s called Mouse’s Tank.”
What we learned: The 0.7-mile roundtrip trail was tougher than we expected due to deep sand and blistering heat, but the prehistoric petroglyphs were absolutely worth the effort. We saw more bighorn sheep at the beginning than we saw other people on the entire hike! It’s not going to blow you away, but it’s a worthwhile trail to include on your itinerary.
What you need to know:
- 0.7 miles roundtrip, minimal elevation gain
- Deep sand makes walking more challenging
- Well-preserved petroglyphs
- Natural water tank at the end
- Takes less than 30 minutes
See 4,000 Year Old Art Up Close At Atlatl Rock
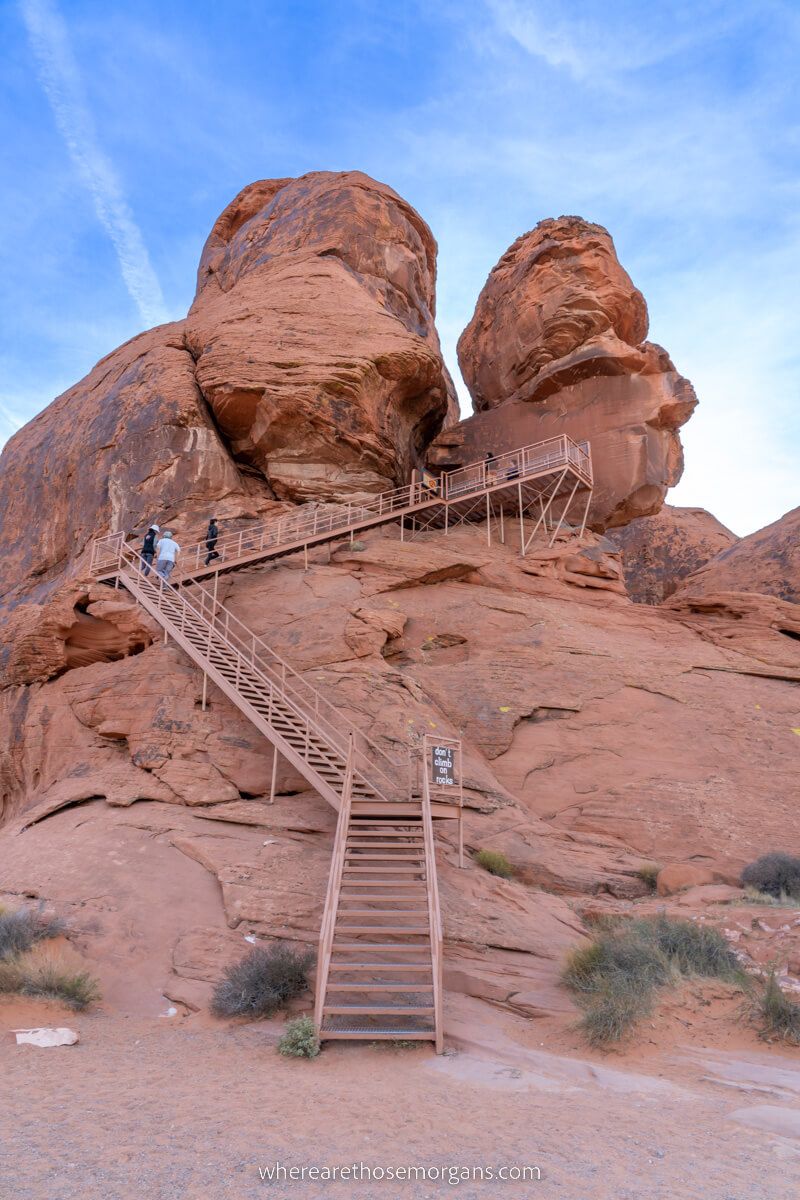
Walking up the metal staircase to Atlatl Rock was like passing through a time machine to 4,000 years ago. The perfectly preserved rock art and petroglyphs here were among the clearest we’ve seen anywhere – they looked as though they were created that same day. Atlatl Rock’s protected location combined with the dry desert climate have kept them in excellent condition.
Our findings: We visited during late afternoon when the petroglyphs were in shadow, making them much easier to see and photograph. The spear-thrower drawing that gives the rock its name was clearly visible and detailed. Most other parts of the park were quiet, but this was the place we encountered the most foot traffic.
What you need to know:
- Metal staircase provides easy access
- 4,000 year old Native American petroglyphs
- Climbing on rocks strictly prohibited
- Best viewed in shadow rather than full sunlight
- Can see it in 15 minutes
Find Cool Photos And Shade In Fire Cave
Fire Cave is a small series of eroded cave-like formations with smooth curved interior walls that ended up being a big hit with us. After crouching to enter, we were face-to-face with striking curves and photogenic sandstone shapes glowing under intense sunlight. Oh, and it was also the perfect place to get a brief respite from the relentless sun.
Our Fire Cave experience: The tiny cave was the very first place we stopped after entering the park. We were excited to see its standout feature called “Windstone Arch”, but unfortunately the cave’s famous centerpiece collapsed in 2021. Even without the arch, it was a superb photo spot that was well worth visiting.
What you need to know:
- Multiple connected cave-like formations
- Dramatic lighting contrasts between light and shadow
- Go early or late for photography
- Easy to access from the parking area
- Takes around 30 minutes total
See The Color Contrast At Fire Canyon And Silica Dome

Learning that the sand grains of the rugged Fire Canyon and Silica Dome are almost pure silica white while the red coloration comes from iron staining helped us to understand the incredible forces that shapes this otherworldly landscape. We also learned a valuable lesson here – midday is not a good time to be out exploring this exposed state park.
Our negative experience: We arrived into the parking lot for Fire Canyon and Silica Dome at the worst possible time around midday. The sun was directly ahead of us at the south facing viewpoint so the view was completely washed out and the sun was brutally beating down on us. We were able to appreciate the unique geological transition from cream to red rock, but we didn’t hang around.
What you need to know:
- End of Fire Canyon Road
- Completely exposed to the sun and elements
- Easy to see views from the car
- Visit early or late in the day
- Only requires 10-15 minutes
Hike The Rocky Trail To Rainbow Vista Overlook

The 1-mile Rainbow Vista hike led us through deep sand and over rocks with light scrambling to a low-down overlook with views over Fire Canyon’s smooth domes, sharp ridges and rugged valleys. The trail was more challenging than we expected, but it was worth doing to be immersed into some of the park’s most jagged rock formations.
Our hike: We tackled Rainbow Vista Trail during the hottest part of the day, which definitely made it a lesser experience. The heat was a killer, and the deep sand didn’t help! But we do think it would be a good one to do early or late in the day. In terms of the rainbow colors that give the hike its name, we thought the colors were more vibrant near the trailhead.
What you need to know:
- 1 mile roundtrip, 100 feet elevation
- Some light rock scrambling and deep sand
- Best rainbow colors at the trailhead
- Takes around 45 minutes
Skip On A First Visit (Unless You Have Extra Time)
If you’re visiting Valley of Fire for the first time, focus on the 10 attractions above. These additional spots are worth exploring if you have more time or you’re visiting the park with younger kids who can’t do the hikes.
Arch Rock: We saw bighorn sheep and a natural arch formation, but it required driving on a rough gravel road and offered less dramatic photography than other locations.
Seven Sisters: We parked here and walked out but realized the photo would only work if we went a long way, so we turned around. It’s actually better to photograph the Seven Sisters from the main road a little to the east, otherwise skip the stop.
The Cabins: Interesting depression-era history and CCC craftsmanship but not as visually stunning as the geological formations. It does have a picnic area which could work for families, but there’s nothing else around.
Elephant Rock: Whimsical rock formation near the east entrance that’s fun for families but easily skipped if you’re prioritizing the most dramatic landscapes. It’s also an uphill walk from the parking area which isn’t great in the heat.
Balanced Rock: Quick 10 minute walk from the visitor center that’s perfect for an introduction to park geology but doesn’t offer the wow factor of other formations, especially if you’ve seen other “Balanced Rock” formations in the southwest.
Attractions Map
Click or touch the map to activate, zoom in and out, and scroll around. If you’d like to see a bigger version, click the “view larger map” icon in the top right, and if you’d like to see a specific attraction, click the arrow and square icon in the top left.
Map key:
- Red – Hikes
- Orange – Photo spots
- Black – Entrances
Tips, Advice + What To Know
Park info: It costs $15 per vehicle per day to enter the park ($10 Nevada plates), and it’s open from sunrise to sunset. There are no fees or permits required for hikes in the park. Here’s more info about the park.
How many days: Minimum 1 full day to see the top 10 attractions, but 2 days allows you to be at more places during dawn and dusk when the park is cooler and more photogenic.
Must-do’s: Fire Wave at sunrise, Mouse’s Tank Road photo, White Domes and Pink Canyon.
Biggest surprise: The truly spectacular sunrise at Fire Wave. It’s honestly one of the best we’ve seen in America.
Where to stay: Las Vegas Strip is only 1 hour away so it’s totally doable, especially as a detour on the way to Zion. But if staying over your best bet is Overton (see the one hotel option here).
What to pack: Plenty of water (1 gallon per person per day), sun protection, robust hiking shoes, headlamps for morning hikes and camera with extra batteries.
Packing: Layers are key for hiking and exploring by morning, day and evening no matter the season. Check live weather conditions and pack accordingly.
When to visit: Spring (March-May) and fall (September-November) offer comfortable temperatures for hiking and photography. Winter can be cold but at least everything is open. Summer is dangerously hot during the day.
Our November experience: Cool but comfortable mornings and evenings perfect for hiking and sunrise photography, but still very hot during the day. No crowds and excellent visibility.
Trail closures: Most of the park’s major trails close from mid-May to the end of September due to safety concerns. This includes Fire Wave and White Domes, so plan your trip in spring or fall instead.
What We’d Do Differently
Mouse’s Tank Road: We took the iconic photo in the middle of the day, but next time we’d definitely do it at dawn or dusk.
Seven Wonders Trail: We parked at each place individually to save time. In hindsight, we think it would have been fun to hike the full Seven Wonders Loop with White Domes.
Daytime: Basically every attraction we tried between 11:00am-3:00pm was a struggle because it was so hot and the park is so exposed. We’d be very selective over what we did early and late to maximize the cooler temperatures next time.
Next Steps
We hope our guide helps with planning your trip to Valley of Fire, but please let us know if you have any other questions in the comments box a little further below.
Still figuring out your plans for the American southwest?
- Here are the top things to do in Las Vegas
- These are our favorite hikes in Zion
- Here’s our guide to the hikes in Red Rock Canyon
Finally, we recommend reading our Nevada travel guide for more helpful tips and advice.
Happy Travels,
Mark and Kristen
Enjoy this guide? Pin it for later!

All Rights Reserved © Where Are Those Morgans, LLC. Republishing this article and/or any of its contents (text, photography, maps, graphics, etc.) in whole or in part is strictly prohibited.
Mark and Kristen spent 6 years traveling the world, visiting over 40 countries across 4 continents and more than 30 US states. They created Where Are Those Morgans in 2018 to help others plan the best possible vacations by writing authentic travel and hiking guides based on their real experiences.
Since the arrival of baby Maya in late 2024, Mark and Kristen’s extensive travels have slowed down but they still take plenty of trips. Where Are Those Morgans now helps millions of travelers each year to visit new places and hike new trails through information-packed blog posts and expert travel guidebooks. Read more about Mark and Kristen.
Great info as always!!! You know that I am such a fan!!!
Have you ever noticed the cross in the clouds in your photo of Seven Sisters?!!!
Thank you, Pat! That’s a great spot, we never noticed it but it really does look just like a cross!
Really nice article ! Great pictures and lots of great information ! Thanks
Thank you! It’s one of our favorite places to visit near Vegas, incredibly photogenic and easy to explore.